1. What (for) is Unity?
In short Unity is a complete solution for identity, federation and inter-federation management. Or, looking from a different perspective, it is an extremely flexible authentication service.
Unity allows its administrators to enable authentication (or login) using various protocols, with different configurations for many relaying parties. The actual authentication can be performed using the built-in, feature-rich users database or can be delegated to one of supported upstream identity providers (IdPs). The information obtained from upstream IdPs can be flexibly translated and merged with the local database (if needed) and re-exported using other protocols. Those fundamental usage patterns are shown on the following figure:
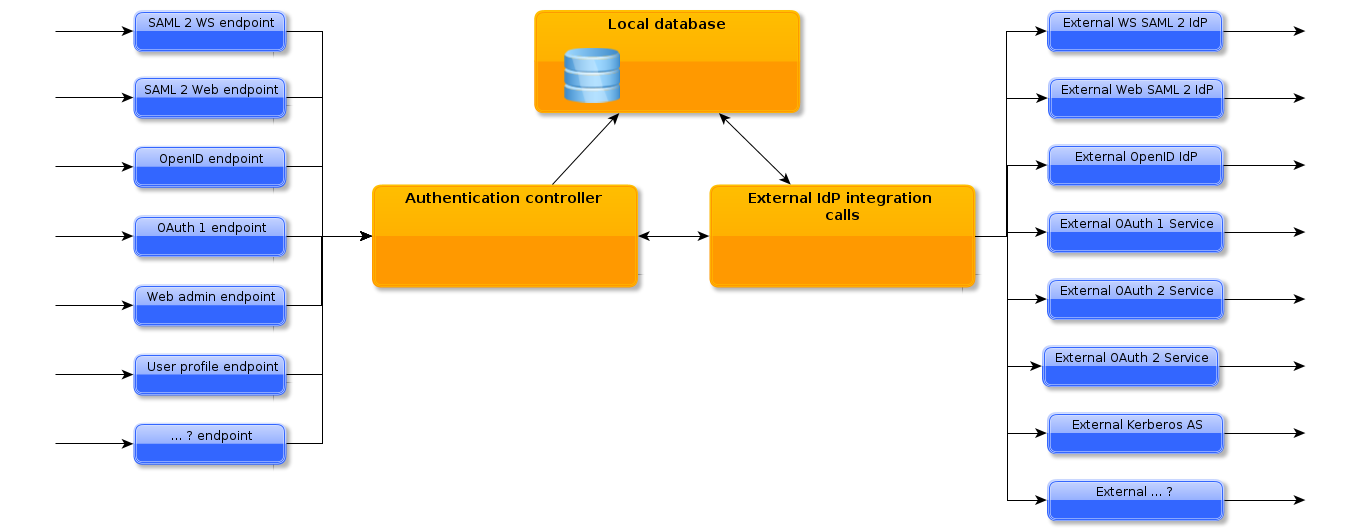
What is important to underline here:
Unity is NOT yet another bundle of several, coupled together systems. It is a solution built from the ground up. All pieces perfectly fit together. Startup is fast. Administration of all parts is performed in the same style. And the whole solution is fully web and cloud ready.
| Unity is under development. Not all extensions and functions of the engine which are on the presented figures are already available. For the actual and detailed information on what is currently supported please check the Currently supported features section. |
The most important design principles of Unity are:
-
Simplicity There are tons of competitive solutions, but we found most of them terribly difficult to install and maintain. We try hard to make Unity as user friendly as possible.
-
Extensibility There is a plethora of authentication protocols, credential systems, IDM solutions and issues related to their coordination. We can’t support all of them right from the start. But we should be able to seamlessly support most, if not all, of them. Unity is designed to be truly extensible in all places where it makes sense to do so.
-
Security We doesn’t provide inherently insecure solutions in Unity. No, it is not possible to use MD5 or SHA1 password hashes in the local database.
1.1. Use cases
We believe that the amount of Unity use-cases is endless. Here are some:
-
Web application developers want to secure it with authentication, provide user accounts with different authorization roles (admin, customer, …) and a couple of personal attributes.
-
Instead of developing the system, this whole functionality can be outsourced to Unity, after a simple step of integration with the protocol of choice as SAML or OpenID. What is more, the increasing user-management requirements will not require any development steps. Registration functionality needed? Yes, it’s here.
-
-
University wants to integrate its users with a national educational SAML federation.
-
Unity can be a drop in replacement of other SAML IdP as Shibboleth. And instantly delivers functionality of often needed add-ons (as Internet2 Grouper, authN extensions). It doens’t require installation of an additional user databases (as LDAP) - everything is included. And even better, Unity can still expose the legacy local LDAP instance if needed too.
-
-
Commercial company wants to enable an advanced authentication for their suite of cloud applications: multifactor authentication (MFA) for sensitive management applications and social network logins for customer-oriented interfaces. Still with an ability to control who uses what, how often, block unwanted users, with user profile management UI for the users.
-
This is the same situation as in the first use-case: it is only a matter of a different configuration of Unity.
-
-
University, which is already integrated with a SAML federation, wants to join also another SAML federation.
-
Instead of setting up (and what is much worse: maintaining) a second instance of IdP service, Unity can expose several SAML endpoints, with different configurations, so the new federation can be joined immediately.
-
-
Organization wants to offer its web resources to several SAML federations. At the same time people authenticating with the social logins as Google accounts should be let in to, but only after filling a registration form and after successful vetting by the organization’s staff.
-
Unity allows for arbitrary number of configuration of authentication endpoints and sources. The above task can be simply achieved by using several Unity authentication configurations together and the ability to define and deploy registration forms. Of course registration can be bound only to some designated authentication pipelines.
-
1.2. Details for IT professionals
Internally Unity is composed of two parts:
-
An orchestration platform, or a container of highly specialized extensions.
-
A rich (and growing) set of extensions providing support for the actual Unity features.
Unity extensibility is the the core concept, and there are no exceptions to this rule. For instance each and every supported credential type is an extension, there are no hardcoded ones.
The core platform provides persistence of the service state (i.e. managed entities, attributes, groups, etc), extensions management, orchestration and several cross cutting features. Such core features are preferences management, notifications, registrations support etc.
Unity is written solely in Java, which is the single, hard installation requirement. All used technologies are as lightweight as possible. Unity works as set of services available via an embedded HTTP server (Jetty). Therefore there is no need to install it on top of an existing HTTP or servlet server, or even worse to setup a JEE container.
The most of the Unity functionality is controlled via its rich Web Admin interface. Some, rather low-level subsystems need to be set up in configuration files.
Glossary: General Unity concepts
Below a glossary of key terms which are used throughout this manual is presented.
- Endpoint
-
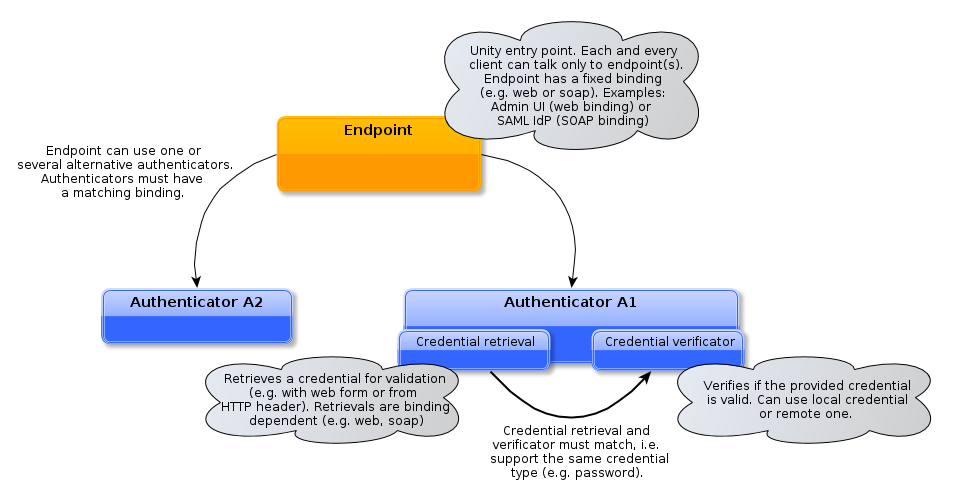
Unity provides a portfolio of access modules. Those modules are called endpoint types. Each endpoint type can be deployed multiple times, with different configuration. A deployed and configured endpoint type is called an endpoint instance or just an endpoint for short. Examples: Admin Console is an endpoint type providing web browser management access; SAML SOAP authentication is enabled by another endpoint.
- Authenticator
-
It is a configured authentication component which can perform a full authentication using a single credential with a well defined way to obtain it from the principal being authenticated. Authenticators are associated with endpoints.
- Authentication Realm
-
It is a simple group of endpoints, which share login sessions. Client logged to one of realm’s endpoints is immediately logged to all other endpoints of the realm. Authentication realms are used to control login session settings.
- Entity
-
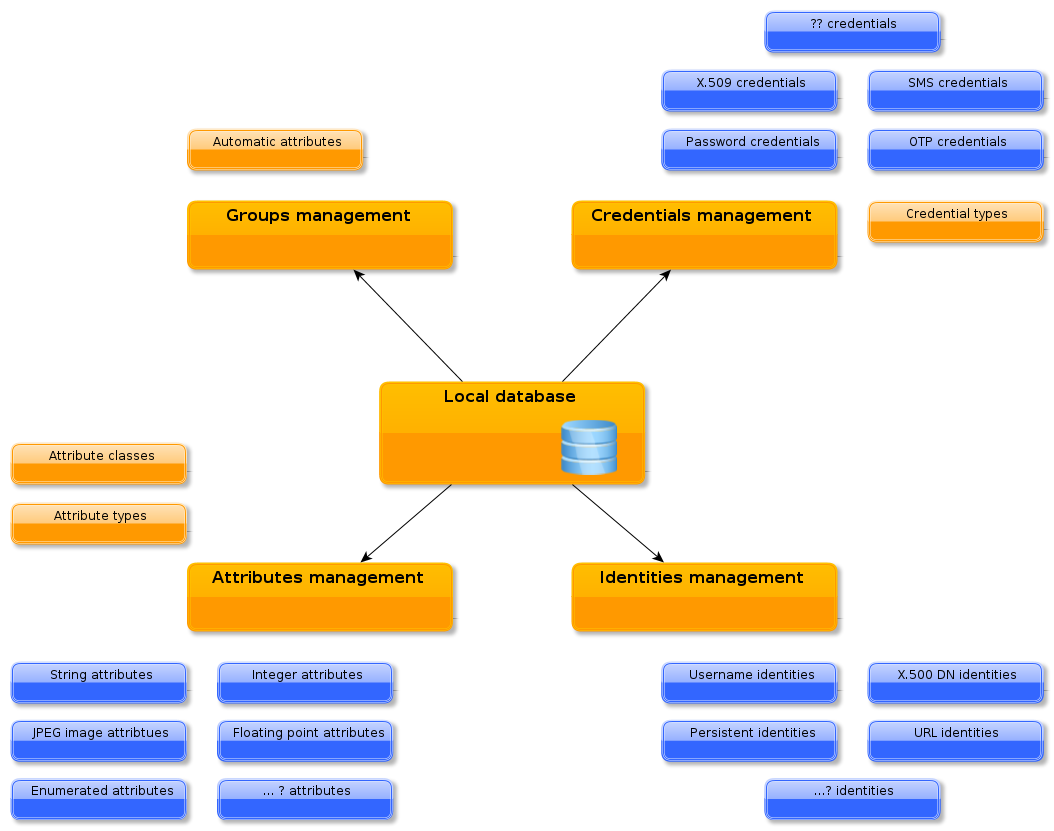
Entity is used to describe a principal that can try to authenticate using Unity, have assigned attributes etc. In practice it is a user or software agent. We can say that in the first place, Unity is a tool to manage and authenticate entities.
- Identity
-
Each entity can have one or more representations. Each representation is called identity. Identities have its type, as username or X.500 Distinguished Name (DN) which defines its syntax, equality rules etc. If an entity has several identities attached, then all are equivalent. This is used to provide aliases for the same principal, at the same time supporting different authentication systems, which represent principals in different ways. Identities are used during authentication (think about user name or email address used in login form or to match external user with the local one).
- Credentials (local)
-
Credentials are associated with entities and are used to perform local authentication of an entity. When authentication is done using a remote IdP, then the local credential is not used. Therefore some entities may have no local credentials, if only the remote authentication is allowed for them. Each credential implementation may be configured differently and each configured credential is called credential type. For example there is a password credential implementation, which can be configured two times: as a secured password which requires 3 character classes and minimal length of 8 characters and as a simple password with less strict requirements.
- Credential requirement
-
Credential requirement is a simple, named set of credential types. Credential requirement is assigned to an entity and defines which credential types make sense and can be used for the entity. Using credential requirements, the ordinary system users may have a simple password credential type assigned, managers a secured password and administrators tuple of secured password and certificate to employ a more secure authentication.
- Attributes and attribute types
-
Attributes are assigned to entities to express their characteristics. For instance a birthDate attribute may be used to express the birth date of an entity. Attributes are always assigned in a concrete group, so the same entity can have different attributes depending on the group. This is very useful in many situations e.g. to provide different user characteristics for different consumers. Attribute can have from zero to many values. Values must have a common syntax, Unity supports several syntaxes as string or JPEG photo. Attribute has its type, which define the rules for the attribute in the system, in the first place its name and values syntax and the cardinality of values.
- Group
-
Groups are nodes in a tree-like structure and contain entities. Groups are hierarchical, i.e. each member of a subgroup must be the member of the parent group. Groups not only are used to logically group/sort members but provide additional automatic content management features as automatic attributes assignment via attribute statements.
- Attribute statements
-
Attribute statements are defined in a group. Attribute statement automatically assigns an attribute to selected members of the group. For instance an attribute statement can copy an attribute X for all users who has the X attribute in a parent group to the current group (what enables attributes propagation). Another statement can create an attribute which will expose identities as values of an attribute.
- Attribute class
-
Attribute class defines which attributes (more properly: which attribute types) are allowed and/or mandatory. Attribute class is assigned either to a group (then it governs the settings for all group members) or to a specific group member. Attribute classes can be organized in a hierarchical structure, where more complex classes inherit definitions from basic classes.
- Upstream or remote IdP
-
An external service which is used by Unity to perform authentication. Upstream IdPs can return more information about the authenticated user (besides the fact that the user correctly authenticated with as a given identity). Unity is able to make use of this information: translate it and insert to the local database. This is done with translation profiles.
- Translation Profile
-
See the above point.
2. Installation and operation manual
2.1. Prerequisites
Unity is tested on the Linux platform. Also other variants of Unix should be fine to run Unity.
Unity theoretically can be run on Windows server, however we neither provide startup scripts for windows nor test it. If you would love to run Unity on Windows machine, write to the support mailing list.
Unity is distributed with everything needed to install and run the system except of Java. Java Runtime Environment 8 is a minimal supported version. Unity can be also run on newer version of Java, up to version 11. Later versions likely will work too.
| The recent OpenJDK 8 often cause troubles (depending on distribution) as it has sometimes certain ciphers disabled and clients (as web browsers) may be unable to find commonly supported, safe ciphers suites for bootstrapping TLS connection. If your browser is unable to connect to Unity then most probably this is the case. |
| In case of the Oracle JDK 8, the unlimited strength cryptography policy needs to be installed, as otherwise only the low quality key sizes are supported and even the demo certificate of Unity is not working. |
2.2. Fresh installation
If the .tar.gz version is used, it must be simply downloaded and unpacked. A directory with Unity version
number is included. Typically the start script should be created or integrated with the startup system of the
machine. The distribution’s extra/ folder may provide a suitable script.
It is also a good idea to add the INSTALLATION_DIRECTORY/bin/ folder to the PATH environment variable,
so the scripts are instantly available. This is assumed later on in all examples.
If the .rpm version is used it should be installed with the package manager. The only dependency is Java JRE,
which will be installed automatically if not yet available on the machine. The startup scripts are also installed
automatically.
In case of RPM installation the standard Linux directory layout is used. This manual uses the names of Unity
subdirectories as found in the .tar.gz distribution. The mapping of those folders to locations used in the case of
the RPM installation is as follows:
|
| TAR.GZ | RPM |
|---|---|
bin/ |
/usr/sbin/ |
lib/ |
/usr/share/unity-idm/lib/ |
logs/ |
/var/log/unity-idm/ |
data/ |
/var/lib/unity-idm/data/ |
conf/ |
/etc/unity-idm/ |
Unity can be started right away, but most probably the default setting should be changed. Please refer to the Quick start or General server configuration sections for a short or detailed information how to configure the system.
2.3. Starting and stopping the server
Starting is simple:
$> unity-idm-server-start
It is always good to check the log files. The log/unity-startup.log should contain only few lines saying that
the server started successfully. If there are any errors there, it means that a very low level problem happened,
for instance the JRE is not available. The log/unity-server.log should provide a more detailed information,
which should be also checked. There should be no ERROR and no WARN entries.
Stopping the server is simple as well:
$> unity-idm-server-stop
2.4. File vs Console control
Since Unity 3 it is possible to set (almost) all settings at runtime using the web Console (and some with REST Admin API). Except very basic settings as DB connection and HTTP server settings, the configuration from config files is only loaded at the first start to populate initial contents of the server. After subsequent restarts all modifications done at runtime are preserved. This applies to endpoints, authenticators, realms, etc.
If, however, it is preferred to configure Unity with a configuration file, in a way that its settings are overwritting the settings made at runtime, it is possible to change the initialization behavior. To do so set
unityServer.core.useConfiguredContentsOnFreshStartOnly=false
If this option is set as above Unity will use the same initialization logic as in older version 2.
2.5. Notes on redundant installations
It is possible to install Unity in a High Availability (HA) setup. The Unity HA can be realized in two variants:
-
on the database level when using MySQL or PostgreSQL database.
-
(experimental) by using Hazelcast storage mechanism
When configuring the system some precautions must be made:
-
In general only a single instance should be responsible for loading the initial state of the system (endpoints, authenticators etc). Otherwise the servers might have problems during startup and it is hard to keep multiple configurations the same. It is good to set
unityServer.core.ignoreContentsReloadingFromConfiguration=trueon the slave nodes. -
All instances should use the same
unityServer.core.httpServer.advertisedHostvalue. At the same time DNS entry of the value should be switched when a primary service is detected to be down.
Please note that several runtime features of the system are propagated to other nodes with some latency. For instance a removal of an endpoint on one instance will be reflected in the shared database immediately, however other Unity instances will catch up and undeploy the endpoint with some delay.
If the server is being managed (via Admin Console) with two instances simultaneously, the Refresh buttons are more then handy: the UI state is not updated automatically.
Finally note about login sessions: login sessions are shared between Unity instances, while HTTP sessions are not. Therefore if the web browser is logged to one instance’s endpoint and then the browser is directed to another the session should be preserved (assuming that the browser has the same DNS address associated with both instances as it is suggested above). The same applies to the logout operation.
3. Quick start
This section is fairly standalone and serves as a first-read, hands-on introduction to Unity. It is advised to read the What (for) is Unity? section first. Also installation of Unity is not covered here. While it is simple (download & unpack) you can read the details in Installation and operation manual.
3.1. What is provided in the package?
Unity server can be started right after installation. By default the server is configured to listen on the localhost (loopback) network interface and uses absolutely insecure credentials for the TLS protocol. Therefore you can play around but before going into any real usage some reconfiguration is mandatory.
Let’s start from crucial facts about Unity in general:
-
Unity by default uses a single HTTPS port. It must be opened on firewall. The port is configurable.
-
Plain HTTP port may be used instead if you plan to hide Unity behind a HTTPS proxy.
-
Unity uses a configurable persistence mechanism to store its state. Not only the users and attributes are stored in database: also a nearly complete configuration of the system is.
-
Typically a RDBMS storage backend is used (several databases are supported) but more sophisticated deployments may use Hazelcast in-memory data grid backend or maybe even others in future.
-
Therefore the most of the Unity configuration which is provided in config files is only loaded on first startup and persisted. Those settings can be edited at runtime in the web Admin Console interface.
Here we list the most important facts about the default configuration:
-
The server is configured to run on
localhostaddress on the port2443. Also the advertised address (i.e. the address which Unity presents as its address to external clients) is localhost. All of those parameters need an update before going into production. -
The server uses an insecure credential (its private key is well known) issued by an insecure CA, which is the only one trusted CA. A real credential and truststore should be used for production.
-
When a proper certificate is installed it is strongly advised to consider turning on the HSTS mechanism to improve server’s security (with
unityServer.core.httpServer.enableHsts=true). -
The server uses an embedded H2 database. Its performance is fine, however it is not recommended in production deployments where DB backups and high availability may easily become a requirement.
-
The server should be started by an unprivileged user. It is not required in case of using the system initialization scripts installed with RPM, which can be run by root (the user will be automatically changed to
unity-idm). -
If one wants to use a low port (e.g. 443) for Unity, then authbind is the suggested solution. It can be easily enabled in
startup.properties -
The distribution can load some demo contents. If you need it enable the configuration module
demoContents.moduletowards the end of theunityServer.conffile.
3.1.1. The first and subsequent startups
During the startup the server checks if it needs to initialize the various subsystems. This initialization takes place during the first start after installation and also after the Unity database is deleted.
-
If the database is empty the tables are automatically created. There is no need to invoke any database initialization scripts. The database is populated with the mandatory system contents.
-
If there is no configured admin user in the database, this user is created, using the configured credentials. The default admin user credential is automatically set to the outdated state, what causes a necessity to change it immediately after the first login.
-
Subsequently the data structures defined in configuration files are loaded to the database on the very first (cold) start only. This is default behavior from version 3 onwards (and can be changed as noted in the installation section).
3.2. What should be reconfigured always before going into production?
Once again, to have a short list:
-
Remove the demo truststore and credential (in
pki.properties). Add regular truststore and certificate. -
Set a desired bind address, port and external address in
unityServer.conf. -
If demo content loading was enabled - remove it and disable creation.
-
Consider configuring a MySQL/PSQL database instead of the default H2.
-
After the first start consider commenting out the default admin user creation. You should use it only if you accidentally remove your last user with administrative privileges.
3.3. How to login to the Admin Console?
Navigate your browser to:
https://your-unity-host:2443/console/
Of course if you changed the port use the one you set. Default login and password are provided in the
unityServer.conf file. Note that you will be asked to change them immediately after logging in.
Also note that the path /console can be reconfigured: this is the location of the Admin Console endpoint, and you can set
this path freely for each Unity endpoint.
3.4. How to work with Unity
-
Make note on what you want to do with Unity:
-
what are the planned clients, what protocols are going to be used to access Unity by those clients?
-
whether external authentication services are going to be used, which ones, and with what protocols?
-
-
Design the internal DB schema (attribute types, groups structure, attribute classes).
-
Enable proper authenticators, and
-
required endpoints.
3.5. Understanding Unity
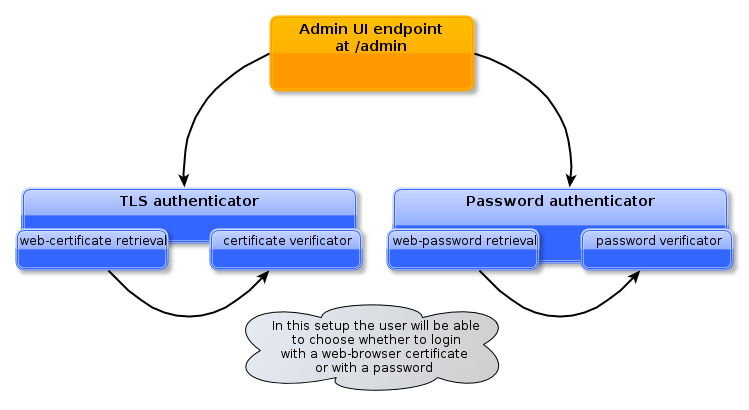
What are the most important elements of the system to configure? The following diagrams should introduce you to endpoints and authenticators:
A concrete example of the above schema can be as follows:
Endpoints are the modules which are entry points to Unity. We can divide endpoints into two categories: Identity provider (IdP) endpoints and Services. IdPs provide fundamental Unity features to clients (often called relaying parties). Services are a catch-all term for endpoint providing remaining functionalty.
Each endpoint has its binding the low level access protocol which can be for instance web (designated for web-browsers) or SOAP (for web service clients). Example of endpoints are SAML IdP endpoint (allows relying services to authenticate their users with SAML) with the web binding or the Admin Console endpoint (again with the web binding) which provides an embedded administration UI.
Each endpoint’s authentication is configured by associating it with authenticator(s). It is possible to set more then one on endpoint to provide alternative authentication possibilities. It is also possible to group authenticators together to require providing of several credentials simultaneously (MFA) - this is done using authentication flows(s) on endpoints.
The authenticators can be local or external. Local authenticator checks the credential against a data stored in the local Unity database. On the other hand an external authenticator uses a 3rd party service to check the credential. Examples of such remote services are LDAP or remote SAML IdP. In this case a more complicated authenticator configuration is required.
3.6. What to read next
If you want to learn more about integration with external identity systems, the separate SAML HowTo is the best starting point.
It is also good to play with the Admin Console to get familiar with the features offered there.
4. Update
This section covers a general update procedure. Make sure to read version specific update instruction too: Version specific update instructions. If you are updating with a revision release (change of the version number after the last dot only, e.g. 1.3.0 → 1.3.1 or 9.11.2 → 9.11.5) you can skip to the simplified Revision (bugfix) update instruction.
The update is a potentially dangerous operation, therefore we suggest to take two precautions:
-
MANDATORY make a full database backup before starting the update.
-
SUGGESTED make a test drive. To do this you need a separate instance of Unity service, with database copied from the production one. Update it first and only if everything goes OK, proceed with an update of the production instance.
After the precautions are done the update instructions are following.
When using the .tar.gz:
-
Install the updated version in a separate directory as in the case of a fresh installation.
-
Configure it with the settings of the running instance. Copy the config files of the old version and (if required) made any version specific modifications which are given below.
-
Stop the old service.
-
Start the new instance.
-
Carefully check log files for any errors or warnings.
-
If needed reconfigure startup scripts to start the updated service, as well as update the
PATHvariable to use new Unity binaries location. It is a good practice to have a symbolic link to the actual Unity installation directory that is used in thePATHand startup scripts. Then it is possible to simply change its target to the updated service directory.
If using the RPM:
-
Stop the old service.
-
Update the RPM using platform tools (usually
yum). -
Check if any configuration files needs to be updated (see below, also search for
.rpmnewfiles in /etc/unity-idm). -
Start the new service.
-
Carefully check log files for any errors or warnings.
| The database dump can be created and loaded from the Web Admin UI, from the Server maintenance tab. It can be used to transfer the Unity state between instances, can be also used as a backup tool. However in the upgrade case it is strongly suggested to make a regular database dump. |
4.1. Revision (bugfix) update
From time to time a revision version of Unity is released. Such version is marked with a change of the last number in the distribution version only. When installing such revision release a simplified procedure can be taken. Database backup is advised as always, though in revision update the risk is minimal - revision releases typically do not introduce database changes.
When using the .tar.gz:
-
Unpack the updated release
-
Stop the server
-
Replace the contents of the server’s
lib/directory with the contents of thelib/directory of the updated package. -
Start the server
When using RPM distribution it is enough to update the package with your package manager and restart the server.
4.2. Version specific update instructions
| The last component in the version string is irrelevant for the following instructions. For instance instructions for the 1.2.0→1.3.0 applies also to 1.2.0→1.3.1 and all other 1.3.x versions. |
4.2.1. From 2.x to 2.y
Please check documentation of the 2.y version. Below we are only focused on Unity 3 updates.
4.2.2. From 2.x to 3.0.0
No reloads by default upon restart from config files
This is new behavior in version 3. It can be turned off by adding:
unityServer.core.useConfiguredContentsOnFreshStartOnly=false
to unityServer.conf. It might be needed temporary when upgrading to load new config options, or when
it is preferred to use config files to set up system in the Unity 2 way.
Admin UI → Admin Console
Admin UI is deprecated and will be removed in subsequent versions. It
It is disabled in a default configuration file of Unity 3.0 and replaced by a new endpoint: Admin Console.
By default it is exposed on a /console path. It is strongly suggested to enable this endpoint in the upgraded system
and afterwards undeploy Admin UI.
Example configuration:
unityServer.core.endpoints.consoleUI.endpointType=WebConsoleUI
unityServer.core.endpoints.consoleUI.endpointConfigurationFile=${CONF}/modules/core/console.properties
unityServer.core.endpoints.consoleUI.contextPath=/console
unityServer.core.endpoints.consoleUI.endpointRealm=adminRealm
unityServer.core.endpoints.consoleUI.endpointName=UNITY console administration interface
unityServer.core.endpoints.consoleUI.endpointAuthenticators=pwd;cert
Note that above setting won’t be picked up on upgraded system: see above for explanation and workaround. Another workaround is to login to the legacy Admin UI, and deploy the Console endpoint from the System Management→ Endpoints tab. Afterwards Admin UI can be dropped or used in parallel with Console.
4.2.3. From 3.0 to 3.1 or 3.2
No special considerations, besides the generic ones.
4.2.4. From 3.2 to 3.3
In version 3.0-3.2 Unity was using under the hood two themes: sidebarTheme and unityThemeValo. The former one was used by UpMan and Console endpoints. In version 3.3.0 the styles were unified, and all endpoints are using unityThemeValo. The sidebarTheme was dropped.
Those changes most likely won’t require any action, unless sidebarTheme was used as a base theme for customizations.
In such case customized theme needs to be modified to be based on unityThemeValo (although we advise to always depend
on the common mixin, which contains almost everything the unityThemeValo has.
Also note that a new unified look and feel across all endpoints is now adopted, what changes default appearance of many user facing UI views, in the first place the authentication screen.
4.2.5. From 3.3 to 3.4
AdminUI dropped
Version 3.4 drops AdminUI support completely. Before the upgrade make sure to:
-
deploy Admin Console endpoint, which is its replacement (suggested since the 3.0.0 release)
-
remove AdminUI from configuration files, if it is still there
Note that DB migration will drop all stored AdminUI endpoints that are found in DB.
Version 3.4 also migrates all jpegImage attributes to the newer and more flexible image attribute type.
This change requires no special action, although be aware that from that version image attributes can
be exported over OAuth and SAML interfaces, and OAuth clients logo can use compression format like PNG improving its quality.
Change of the default for the TLS wantClientAuthn option
Since version 3.4 Unity the default value for the option unityServer.core.httpServer.wantClientAuthn is false,
while previously it was true. This option controls whether client-side X.509 certificates are accepted
and so can be used for the X.509 credential authentication.
The change of default was caused by several problems caused by this setting. Among others there are problems with the Safari web-browser showing a popup to their users accessing a server with the aforementioned TLS feature enabled. What is more the recently introduced support for FIDO2 security keys also doesn’t work well in case of some keys with that feature turned on.
Installations relaying on default config settings for this feature, need to add the following option to unityServer.conf:
unityServer.core.httpServer.wantClientAuthn=true
4.2.6. From 3.4 to 3.5
Server logging configuration changes
3.5 release contains revised logging. There were several changes, which may require the log4j.xml update:
-
Additional logging facility categories were added, so that logging configuration can be precise without configuring individual logging facilities.
-
unity.servercategory is no longer directly used by any facility. It is from now only used to control default logging level for all Unity facilities. -
Several new loggers were added
-
Logging levels were updated in several cases (mostly DEBUG → INFO and INFO → DEBUG) so that the default configuration makes more sense.
In general all custom configurations entries using category unity.server (e.g. unity.server.AuditManager) will need to be updated.
Below is a list of all logging facilities formerly in unity.server, with their new logging category.
Change unity.server → unity.server.upman:
unity.server.ProjectController
unity.server.GroupsController
unity.server.ProjectInvitationsController
unity.server.GroupMembersController
unity.server.UpdateRequestsController
unity.server.DelegatedGroupsHelper
unity.server.ProjectAttributeHelper
Change unity.server → unity.server.db:
unity.server.AuditEventRDBMSStore
Change unity.server → unity.server.web:
unity.server.SMSCredentialEditor
unity.server.AuthenticatorsController
unity.server.InputTranslationsController
unity.server.AuditEventsView
Change unity.server → unity.server.externaltranslation:
unity.server.TranslationProfileInstance
Change unity.server → unity.server.forms:
unity.server.EnquiryTargetCondEvaluator
unity.server.SharedEnquiryManagment
unity.server.AutomaticInvitationProcessingSupport
unity.server.RegistrationConfirmationRewriteSupport
unity.server.RegistrationRequestPreprocessor
unity.server.RegistrationsManagementImpl
unity.server.SharedRegistrationManagment
unity.server.SetEntityStateActionFactory
unity.server.BaseRequestPreprocessor
unity.server.PolicyAgreementsValidator
unity.server.SharedEnquiryManagment
Change unity.server → unity.server.authn:
unity.server.AuthenticationProcessorImpl
unity.server.AuthenticatorsRegistry
unity.server.AuthenticatorSupportServiceImpl
unity.server.RemoteAuthnResultProcessorImpl
unity.server.AdditionalAuthenticationService
unity.server.LoginToHttpSessionBinderImpl
unity.server.SessionManagementImpl
unity.server.UnsuccessfulAuthenticationCounter
unity.server.AddParticipantToSessionTask
unity.server.CompositePasswordVerificator
unity.server.CredentialResetBase
unity.server.CertificateVerificator
unity.server.PasswordVerificator
unity.server.SMSVerificator
Change unity.server → unity.server.audit:
unity.server.AuditEventListener
unity.server.AuditManager
unity.server.AuditPublisher
Change unity.server → unity.server.notification:
unity.server.ClickatellChannel
unity.server.GroovyNotificationChannel
unity.server.EmailFacility
unity.server.NotificationProducerImpl
Change unity.server → unity.server.userimport:
unity.server.SingleUserImportHandler
unity.server.UserImportServiceImpl
Change unity.server → unity.server.script:
unity.server.GroovyRunner
unity.server.MainGroovyExecutor
unity.server.MockGroovyBindingProvider
Change unity.server → unity.server.event:
unity.server.EventProcessor
unity.server.EventsProcessingThread
Change unity.server → unity.server.confirmation:
unity.server.RegistrationEmailFacility
unity.server.MobileNumberConfirmationManagerImpl
unity.server.EmailConfirmationManagerImpl
Change unity.server → unity.server.bulkops:
unity.server.BulkQueryServiceImpl
unity.server.CompositeEntitiesInfoProvider
unity.server.BulkProcessingExecutor
unity.server.BulkProcessingSupport
unity.server.ChangeStatusActionFactory
unity.server.RemoveEntityActionFactory
unity.server.SendNotificationActionFactory
Change unity.server → unity.server.core:
Everything else not mentioned above.
Other changes
The logging facility showing loading of HTTP server related properties was changed as follows:
unicore.configuration.HttpServerProperties → unity.server.config.UnityHttpServerConfiguration
5. Understanding authentication in Unity
Unity offers a LOT in terms of authentication. In this section we give an overview of what is possible and where to search the concrete settings.
First of all, as Unity often acts as authentication proxy it needs to be understood that by authentication in Unity we understand authentication Unity’s client, as performed for internal Unity purposes. This authentication can be (and often is) a part of a larger process, where an external service asks Unity to authenticate its client (e.g. using OAuth or SAML). However such fact is irrelevant: in Unity authentication works in the very same way regardless whether is was initiated by redirection from 3rd party service or directly by a person or agent accessing Unity.
Each Unity endpoint (regardless whether it is Web Console, web OAuth IdP or SOAP SAML Attribute Authority) requires its client to authenticate itself. Therefore administrator has to configure authentication per endpoint.
Authentication of an endpoint is controlled using two main elements:
-
Authentication realm - controls settings which may be shared by multiple endpoints with similar security requirements. Those settings include in the first place session configuration. Endpoints in the same realm share login sessions and all their settings, therefore Single-Sign-On (SSO) is configured by assigning endpoints to the same realm. See Authentication realms and login sessions.
-
Authentication flows - flow defines an authentication process. It is used to configure what 1st factor authentication should be used, what is the policy to trigger two factor authentication (2FA/MFA) and what are the 2nd factor authentication options. For simplicity an endpoint may have also an individual authentication options directly assigned. This is a shortcut for configuring an authentication flow with only the 1st factor enabled. See Authentication flows.
That said access to an endpoint may be protected by alternative authentication options: e.g. remote OAuth login or a local password with additional 2nd factor using SMS code. Those individual authentication options are provided by components which are called authenticators. See Authenticators. Authenticator can provide a single authentication option (as the password authenticator) or many of them (as the remote SAML authenticator allowing to use all federation IdPs).
Authentication screen can be configured to organize the authentication options in a desired way. This is especially important if there is many of them. See Configuration of web authentication screen for details.
5.1. Local authentication
Local authenticators use a locally stored credential to verify the client’s identity. Local authentication is simple in that sense that it can result only in two states: valid or invalid. Local authenticators have a very simple configuration (usually limited to a displayed name of the authenticator) as are using the configuration of an associated local credential.
Local authentication can be supported by the public registration forms. Each registration form which is marked as public (in the general settings of registration form) can be attached to the endpoint to offer the manual registration. Details on registration forms are given in Registration forms. For information how to configure registration forms for web endpoints (non-web endpoints naturally do not support this feature) see Configuration of web authentication screen.
The lost password reset feature can be configured in password credential configuration.
5.2. Remote authentication
Remote authentication is more complicated then the local one. In remote authentication an external authentication server is contacted and asked to authenticate the client. The details are dependent on actual authenticator: some redirect the user’s browser, some are contacting the remote server directly as in LDAP case.
Remote authenticator has a rather complex configuration. The authentication process using a remote authenticator works as follows:
-
The remote authenticator contacts the remote server in a protocol specific way to obtain an information about the logged user.
-
If the remote login was successful the remotely provided data is mapped to the local representation (translated, enhanced, filtered…) using an input translation profile which is assigned to the authenticator. Input translation profiles are discussed in Input translation. In effect of translation:
-
The remote user may be mapped to an existing account (at not-the-first login or when it is possible to automatically map remote user to local account using some attribute as email). In such case authentication is finished just after the translation.
-
The remote user may not be mapped to any identity. In such case authentication fails.
-
Finally a user (who is logging for the first time) may be mapped to an identity which does not exist in Unity database. In such case user can have a choice: either to fill a registration form to create a new local account or to associate the remote identity with an existing local account manually.
-
Registration of users using remote credential can be performed in two ways:
-
By creating a registration form and including in it a remote authenticator. User will have an option to setup using a remote login after entering the form.
-
By adding a form to remote authenticator as a handler for unknown locally users who were authenticated remotely. Such users will be shown a registration form upon return from remote authentication - if they try to login to Unity for the first time.
-
Finally authenticator may be configured to auto provision remote users.
Account association is enabled by default. It requires additional login to the existing account in a popup window. It can be turned off in authenticator settings.
5.3. Input translation
Translation profile is a named, ordered list of conditional rules. The rules are used to modify the information about a principal being processed by Unity. Input translation profile is used when a remote user was externally authenticated and its data is consumed by Unity.
For instance, an input translation profile can change remote attribute size name to width and insert a remotely authenticated user to the local database (to a desired group) if the user is not yet there.
A profile consists of a list of rules. Each rule has a condition and an action.
Conditions are used to dynamically turn action execution on or off. Conditions (as well as some of the arguments of translation actions have) have to be specified as MVEL expressions. Such expressions allow for a powerful, dynamic functionality.
The full MVEL documentation can be found here: https://en.wikibooks.org/wiki/Transwiki:MVEL_Language_Guide
The following example condition:
attr contains 'cn'
will trigger an action whenever the subject has an attribute cn. In the following sections there are
additional examples and a complete reference of all variables which are available to write conditions. Nevertheless
the most popular condition is simply: true.
Actions are different for each type of the profile. The editor provides you with helpful interface to create them.
An input translation profile is always associated with a remote authenticator in its configuration. It is a mandatory setting, all remote authenticators must have one profile associated.
Input translation profile (both conditions and rules) operate on a data structure which is initially filled by the protocol specific component. The structure can contain:
-
Identity (or identities) authenticated by the remote IdP.
-
Attributes provided by the remote IdP.
-
Groups assigned by the remote IdP.
What data is actually in this structure is dependent on the upstream protocol, upstream server and callout configuration.
Profile actions map remote data to Unity artifacts. For instance mapped result can be an attribute of type cn with some dynamic value. The value is completely controllable with a MVEL expression and can be anything from a simple direct reuse of remotely provided attribute to a sophisticatedly crafted string. It might be good to take a look at the example profile below.
Each profile should be started from a mandatory identity mapping. It is possible to control whether the remote identity should be matched against the local one and/or automatically created. Note that the identity mapping result decides how the general login process looks like: if a profile maps a user to an existing user (also by creating an new entity) login will proceed automatically. If the profile maps the remote user to some not existing identity then Unity can be configured to present a registration form or account association dialog. Finally if remote user is not mapped to any identity the login fails.
There are several so called identity mapping effects which are important for the remote user mapping process:
-
CREATE_OR_MATCHif the mapped identity doesn’t exist it is automatically created. If it exists then the remote user is mapped onto this entity what sets the context for all other profile actions. -
MATCHThe remote user is mapped onto existing entity it it is found. Otherwise nothing happens. -
REQUIRE_MATCHThe remote user is mapped onto existing entity it it is found. Otherwise authentication is failed. -
UPDATE_OR_MATCHis the most tricky option, similar toCREATE_OR_MATCH. The remote user is mapped onto an existing one if it exists. Conversely if the resulting identity does not exist in the system, then it is created but only if additionally the remote user was already mapped onto existing entity by other rules of the profile. This complicated behavior is actually quite useful whenever we want to have new remote identities propagated to the existing user in Unity, but at the same time we don’t want to have a new user (entity) created automatically (what would beCREATE_OR_MATCHeffect), so that a registration facility can be used.
Additionally the actions allow for creating Unity’s attributes, assigning the remote user to groups and to change entity status.
One action requires a special attention: removeStaleData. This action, when added to a profile, causes Unity
to remove all stale data: attributes, group memberships, identities. The data is assumed to be stale if it
was previously created by the same profile, basing on input from the same remote IdP
and which was not reproduced during the current invocation of the profile.
5.3.1. Translation profile testing
Unity provides a sophisticated feature helping to work with input translation profile.
Testing can be performed on an existing remote authenticator with some profile configured. This feature is available from the Authentication → Facilities main view (Test button). Test begins with a sandboxed authentication in a popup window, where one can select any of the remote authentication options available in the system. After authentication (failed or successful) a detailed information on the profile’s application to the data provided by remote IdP (and naturally the data itself) is presented, including even a relevant server’s internal log.
5.3.2. Reference
MVEL context reference:
-
idpName of the IdP which provided the data -
attrMap indexed with attribute names. Value of each entry is a single value of the attribute. If the attribute is multi-valued then the first value is returned. If the attribute has no value then empty string is returned. -
attrsMap indexed with attribute names. Value of each entry is a list of the attribute values. -
idValue of the authenticated identity. If remote IdP returned multiple identities, then a random one is available, though this is a very exotic case. -
idTypeThe type of the identity stored in theidvariable. -
idsByTypeMap of identity values indexed by type. Rarely useful. -
groupsList of all remote groups.
Actions as mapGroup, mapIdentity or mapAttribute can be used with an expression returning either
a single value or a collection of values.
Example input profile:
1: Condition: true
Action: mapIdentity
Action parameters:
  unityIdentityType = userName
  expression = attr['urn:oid:2.5.4.3']
  credential requirement = Password requirement
  effect = CREATE_OR_MATCH

2: Condition: true
Action: mapAttribute
Action parameters:
  unityAttribute = cn
  group = /
  expression = attr['urn:oid:2.5.4.4']
  effect = CREATE_OR_UPDATE

3: Condition: groups contains 'student'
Action: mapGroup
Action parameters:
  expression = '/A/B'
The above profile in the first action maps the attribute urn:oid:2.5.4.3 value to Unity identity of userName
type. Such identity will be created if doesn’t exist, otherwise all other actions will be performed against
the existing local identity with such userName. Subsequently the remote attribute urn:oid:2.5.4.4 value
will be mapped to Unity attribute cn and the attribute will be assigned in the root group if it doesn’t exist.
If it does, its value will be updated (upon each login). Finally the user will be added to the /A/B group
assuming it is in the student group as reported by the remote IdP.
5.3.3. Example expressions
The most often used condition:
true
Condition disabling the action:
false
Condition testing if a principal is a member of the students group (which is a group at the remote IdP):
groups contains 'students'
Condition testing if a principal has the cn attribute:
attr contains 'cn'
When writing expressions in actions, usually we need a string value. For instance here is the first value of the cn attribute:
attr['cn']
All values (list) of the same attribute:
attrs['cn']
It is also possible to glue many values. Let’s create a DN, which can be used to dynamically create an identity:
'CN=' + attr['cn'] + ',O=' + attr['o'] + ',C=NO'
MVEL provides convenient operations on list of values too. The following expression converts a list of
groups (as returned by remote IdP, e.g. LDAP) to unity groups. A constant prefix /it/groups/ is added and
3 initial characters are removed from the external group name, but only of the group name has at least 4 characters.
('/it/groups'+$.substring(3) in groups if $.length() > 3)
Finally the value of the identity provided by remote IdP is available as follows:
id
5.4. Step-up and repeated authentication
For certain sensitive operations Unity may be configured (and by default is) to require additional or step-up authentication. When this happens Unity asks an already logged user, to provide a single credential before operation is performed.
Operation may be classified as sensitive — and be subject to additional authentication — only when it is invoked by a user with ordinary permissions. Operations invoked by admins are always treated specially and additional authentication is alwyas skipped. There are two classes of sensitive operations:
-
Credential change by credential owner. This applies only to the change of existing credential, initial setup of a credential is not treated as sensitive operation.
-
Sensitive attribute change by owner. Attribute is assumed to be sensitive basing on its type metadata. Attribute types with contact email, contact mobile, sensitive metadata have their attributes protected. Note that sensitive attribute must also have "Self modify" flag set to be exposed for modification by its owner, which can trigger additional authentication.
Administrator can configure the additional authentication policy in the main server configuration file. Configuration is composed from three elements. The main one governs which authenticator is used for additional authentication. It must be always an authenticator which does not require web browser redirection (as remote OAuth) and it must be available on the endpoint. Typically policy is configured with constants which are resolved at runtime. The default policy is as follows:
unityServer.core.reAuthenticationPolicy=SESSION_2F CURRENT SESSION_1F ENDPOINT_2F
unityServer.core.reAuthenticationBlockOnNoOption=true
unityServer.core.reAuthenticationGraceTime=60
According to the default policy, for each sensitive operation server will check in order:
-
if user was logged with 2 factors, then 2nd factor is used for additional authentication
-
if user is changing credential then this credential (before change) is used (if its authenticator is on the endpoint)
-
the first factor credential of the user’s session is used, if it is available on the endpoint
-
the 2nf factor credential configured for the endpoint is used if it is available for the user
The remaining option can be used to control for how long additional authentication is valid (i.e. after setting it to 600s then user won’t need to perform additional authentication for one minute) and whether to block operation if there is no applicable additional authentication authenticator for the user (what typically means that system is misconfigured).
6. General server configuration
The server uses two main configuration files: conf/unityServer.conf and conf/log4j2.xml.
There is also a third one, conf/startup.properties, which allows for controlling low level Java VM options
(as memory or JVM executable) and for changing the location of the main configuration files mentioned above.
The conf/log4j2.xml file configures the logging of the server. This is described in the section Logging configuration.
The conf/unityServer.conf file is the main server configuration file. All other additional configuration
files are referenced from it.
Configuration files are loaded at startup. Most of the files (all except of the logging and mail settings) are quite strictly verified - in case of misconfiguration, syntax errors, or spelling mistakes server prints a loud error message in log file and (if the error is critical) does not start.
Configuration updates at runtime are handled as follows:
-
conf/log4j2.xmlfile is automatically reloaded after it is modified (with few seconds latency). It is recorded in the log file. -
No other file is automatically reloaded after modification.
-
Reconfiguration of the remaining options from the main configuration file and PKI settings requires server restart. Note that most of the features configured in the files can be managed at runtime from the Web Admin Console.
-
Note, however, that the
directoryandopenssltruststores which can be configured in PKI settings allows for automatic updates of their content when trusted certificates or CRLs are added or removed.
The table showing all the options is quite long, so here we provide a description of the most important parts of the configuration:
-
The general server settings (it is always good to review them) include:
-
The initial admin username and password. After the server is initialized and admin account(s) are set up those options may be removed and used only in emergency case (i.e. when the last admin user remove itself).
-
Location of the files with configuration of the e-mail subsystem and message templates. More information on this topic is included in the subsection Notifications and e-mail settings.
-
Location of Public Key Infrastructure (PKI) configuration file. This is documented separately in the subsection PKI settings.
-
Database configuration which is described in the section Storage configuration.
-
Loaders of example contents, which are useful for a quick start.
-
Configuration of enabled languages.
-
Selection of the server main truststore and credential, mostly used for SSL.
-
-
HTTP server settings, where there are three important settings: hostname and port where the server listens and the advertised address, which should be an address or IP via which the server should be reached from Internet. The remaining options of the HTTP server are fairly advanced.
-
Definitions of various artifacts of the server to be loaded: credentials, credential requirements, authenticators, endpoints and translation profiles. All of them can be managed from Admin Console, what is strongly preferred.
-
Finally Unity configuration can contain so called modules. Configuration modules are simply a complete fragments of related configuration, which can be enabled with a single statement. A few, ready to use, modules are available in the
conf/modulesdirectory. You can also create new ones to maintain clarity in the customized configuration. An example candidate for a configuration module is a configuration of a SAML endpoint, exposing IdP functionality with all related authenticators.
All Unity configuration files using properties format (with one exception of the conf/mail.properties file) allows
for using includes and variables. Includes are used to implement configuration modules and can be also used to split
longer configuration files into smaller pieces. The syntax of the include statement is:
$include.NAME=included/file/path
where NAME is an arbitrary, unique identifier of the include.
Variables allows for reusing configuration values. Variable is referenced in property value as follows:
some.property=${VAR1}
All environment variables and Java system properties are available as configuration variables. What is more, custom variables can be defined as follows in the configuration file itself:
$var.VAR_NAME=Variable value
Note that such defined variables are available only in the file in which they were defined and in all
files included from it with the $include statement.
A complete options reference follows:
| Property name | Type | Default value / mandatory | Description |
|---|---|---|---|
--- General settings --- |
|||
|
string |
- |
Can be set to message template name. If set message of the selected template will be sent to user after her/his account status is set to enabled, after being disabled. |
|
string |
- |
Can be set to message template name. If set message of the selected template will be sent to user after her/his account status was changed to disabled (including authentication disabled). |
|
string |
- |
Can be set to message template name. If set message of the selected template will be sent to user after her/his account removal. |
|
[true, false] |
|
If set to true then Unity will render full HTML in admin-configured descriptions of elements intended for end-user presentation (e.g. registration form agreements or credential description). If false then only a very limited set of HTML formatting tags will be rendered, the rest will be escaped. This setting must be set to false in case when Unity is used by not-fully trusted administrators, who (even with partially limited rights) may performXSS attacks. Then, however functionality of registration forms etc is slightly limited as it is impossible to insert links and other advanced formating. |
|
integer >= 1 |
|
Defines the interval of background update tasks in seconds. Those tasks are used to update runtime state of the server (for instance the deployed endpoints) with the data which is stored in database. |
|
[true, false] |
|
Indicate if AuditEvent logs are gathered by the system. |
|
integer number |
|
Defines for how long (in ms) authorization roles are cached. Increasing this value improves server overall performance, but change of authrization role may not be fully recognized by the system untile the time defined here passes. Set to 0 to disable cache. |
|
[true, false] |
|
If false Unity will show its confirmation screen after email verification. If true and a return URL is defined for the confirmation then the screen is not shown and redirect is immediate. |
|
string |
|
The name of a Freemarker template, relative to templates directory, with a template of the confirmation UI. Custom template can be used to add static header/footer etc. |
|
string |
- |
Sets the theme used for rendering the confirmation UI (shown after confirming email etc).This setting overrides the default server theme. |
|
string |
mandatory to be set |
Name of the credential to be used by the server. |
|
string |
|
The default locale to be used. Must be one of the enabled locales. |
|
string |
- |
If set the value should be a valid URL. The URL is used as a return (redirect) URL to be used after confirmation of a verifiable element as email. Can be overriden for instance in registration form definition, for all confirmations related to the form. |
|
string |
- |
Overrides the default theme name as used for rendering the web endpoints. This setting can be overriden per-endpoint. Applicable only for the web endpoints. |
|
filesystem path |
|
Defines a default folder from which the web endpoints will serve static content, configured locally. Also used for the shared endpoint under /unitygw path. |
|
string |
- |
If set Unity will redirect request without the path to this one |
|
integer number |
|
Defines number of confirmation request that can be send to particular address in day |
|
[true, false] |
|
If set to true then all platform low level operations will trigger events, which can be in turn consumed by scripts. This feature however causes a small performance penalty (even without taking into account a potential script execution time) and therefore by defualt is disabled. |
|
list of properties with a common prefix |
- |
List of enabled locales. Each entry must have a language code as en or pl first, and then, after a space an optional, short name which will be presented in the UI. By default the en locale is installed. |
|
Structured list |
- |
List of message sending facilities additional to built in SMS and email. |
|
string |
mandatory to be set |
Channel name. |
|
string |
mandatory to be set |
A file with Groovy script to send a message. Scripts context will be feeded with receipentAddress variable (String), and - depending on embedded templates support - variables with complete message (subject and body) or just template params (templateId, templateParams map). |
|
[true, false] |
|
Whether the notification service handles message templating on its own or not and requires complete messages. |
|
integer >= 1 |
|
Max file size in bytes which can be saved by file storage service in the database |
|
[true, false] |
|
If set to true then all Endpoints, Authenticators (with their translation profiles), authentication Flows and authentication Realms are fully recreated from configuration at startup. This is convenient if you prefer to steer the system with configuration file, and use UI only for contents management. By default (when option is false), only the new options from configuration are loaded, which basically becomes an initial system configuration template. Note that this option is ignored if ignoreContentsReloadingFromConfiguration is true. |
|
filesystem path |
|
Defines a folder where internacionalized messages are stored. Note that this directory is optional: a fallback messages are always included in the application. |
|
[true, false] |
|
If set to true then all configuration settings related to loading of database contents (endpoints, authenticators, credentials, …) are ignored. This is useful in the case of redundant Unity instance, which should use the database contents configured at the master server. |
|
[true, false] |
|
If false then the default admin user is not set to outdated state after creation. Useful only for testbeds. |
|
string |
|
Password of the administrator to be installed to the empty database. |
|
string |
- |
Username of the administrator to be installed to the database upon startup. Remove the property if no admin should be added. |
|
list of properties with a common prefix |
- |
List of identifiers of initialization modules that should be run on the first startup. |
|
[internalOnly, internalAndSyncPeers, internalAndAsyncPeers] |
|
Controls the way how the logout operation is performed. |
|
filesystem path |
- |
A configuration file for the mail notification subsystem. Email notifications will be disabled if unset. |
|
integer [1 — 256] |
- |
Number of concurrent passwords checks allowed to be run in parallel. Password checking is a memory (and CPU) intensive, and the biggger work factor, the bigger memory need for a single password checking is. The bigger this number is the lower the maximum allowed work factor is. Having this number larger then the number of cores makes no sense. By default this parameter is equal to JVM max heap size in GB times 2 (but not less then 1). |
|
integer number |
|
Defines number of confirmation request that can be send to particular mobile number in day |
|
filesystem path |
|
A file with the configuration of the PKI: credentials and truststores. |
|
[true, false] |
|
If set to true then message templates will be reloaded at startup from files on disk. Otherwise only the new templates are loaded and the templates in DB are left untouched. |
|
[true, false] |
|
If true then files from disk can be served only if are physically located in webContents |
|
Structured list |
- |
List of scripts that that can be used to enhance default server functionality |
|
string |
mandatory to be set |
A file with enhancement script contents |
|
string |
mandatory to be set |
Defines the name of event which triggers script invocation. See scripts documentation about more complete information. For execution at server startup it is possible to use: pre-init: run before configuration settings are loaded to database (endpoints, authenticators, credentials, …). post-init: run after configuration settings are loaded to database. |
|
[groovy] |
|
Type of script. |
|
filesystem path |
- |
A configuration file for the SMS notification subsystem. SMS notifications will be disabled if unset. |
|
filesystem path |
|
A file with the initial message templates. You can have this file empty and manage the templates via the Admin UI. |
|
integer number |
|
Number of threads used by internal processes of the server. HTTP server threads use a separate pool. |
|
list of properties with a common prefix |
- |
List of file paths, where each file contains a definition of a translation profile, used to configure mapping of remote identities to the local representation. |
|
string |
mandatory to be set |
Name of the truststore to be used by the server. |
|
filesystem path |
- |
Defines a folder from which all the web applications operating on the shared unitygw path (e.g. the email confirmation screen) will serve static content as images. Overrides the default webContent path. |
|
[true, false] |
|
If set to true then every element of system features (i.e. endpoints, authenticators, credentials, message templates, etc) defined in configuration are loaded only during the first start. This is the default and needed for preserving config changes performed at runtime using admin Console or REST API. If set to false then those settings will be also consulted on each restart. See other options (fullyRecreateEndpointsAROnStartup, reloadMessageTemplatesFromConfiguration) for how this can be further controlled in such case. |
|
list of properties with a common prefix |
- |
List of file paths, where each file contains a definition of a user import subsystem. Use of user import feature is naturally optional and so this list typically is empty. |
|
string |
|
The name of a Freemarker template, relative to templates directory, with a template of the well-known links web interface. Custom template can be used to add static header/footer etc. |
|
string |
- |
Sets the theme used for rendering the well known links UI (used for standalone registration forms and others).This setting overrides the default server theme. |
|
filesystem path |
|
Defines a folder where the server will write its internal files. |
--- Content initializers: credentials --- |
|||
|
Structured list |
- |
List of initially defined credentials |
|
string |
mandatory to be set |
Credential configuration file |
|
string |
empty string |
Credential description |
|
string |
mandatory to be set |
Credential name |
|
string |
mandatory to be set |
Credential type |
--- Content initializers: credential requirements --- |
|||
|
Structured list |
- |
List of initially defined credential requirements |
|
list of properties with a common prefix |
- |
Credential requirement contents, i.e. credentials that belongs to it |
|
string |
empty string |
Credential requirement description |
|
string |
mandatory to be set |
Credential requirement name |
--- Content initializers: authenticators --- |
|||
|
Structured list |
- |
List of initially enabled authentication flows |
|
string |
- |
Authentication flow name |
|
[REQUIRE, USER_OPTIN, NEVER] |
|
Defines multi factor policy. |
|
string |
mandatory to be set |
First factor authenticators, separated with a single comma (no spaces). |
|
string |
- |
Second factor authenticators, separated with a single comma (no spaces). |
|
Structured list |
- |
List of initially enabled authenticators |
|
string |
mandatory to be set |
Authenticator name |
|
string |
mandatory to be set |
Authenticator type |
|
string |
- |
Authenticator configuration file of the verificator |
|
string |
- |
For local authenticator the name of the local credential associated with it. |
--- Content initializers: authentication realms --- |
|||
|
Structured list |
- |
List of authentication realm definitions. |
|
integer >= 1 |
|
Defines maximum number of unsuccessful logins before the access is temporarely blocked for a client. |
|
integer >= 1 |
|
Defines for how long (in seconds) the access should be blocked for theclient reaching the limit of unsuccessful logins. |
|
integer >= 1 |
|
(web endpoints only) Defines the period of time (in days) to remember the login. It is used only when policy is not set to disallow |
|
[disallow, allowFor2ndFactor, allowForWholeAuthn] |
|
(web endpoints only) Defines a policy on whether and how to expose a remember me on this device authentication option. |
|
integer >= 1 |
|
Defines after what time of inactivity the login session is terminated (in seconds). Note: the HTTP sessions (if applicable for endpoint) will be couple of seconds shorter to allow for login session expiration warning. |
|
string |
- |
Realm’s description. |
|
string |
mandatory to be set |
Defines the realm’s name. Must contain only alphanumeric letters, and can not exceed 20 characters. |
--- Repeated and step up authentication --- |
|||
|
[true, false] |
|
Whether to block a sensitive operation when additional authentication is needed but policy returns no authentication option. |
|
integer >= 2 |
|
Time in seconds in which user don’t have to re-authenticate again. It is suggested not to set this value to less then 10 seconds |
|
string |
|
Comma separated list configuring repeated or step up authentication which isprotecting sensitive operations like changing credentials. Entries are either authenticators do not requiring redirection (as SAML or OAuth) or special entries: |
--- Content initializers: endpoints --- |
|||
|
Structured list |
- |
List of initially enabled endpoints |
|
string |
mandatory to be set |
Context path of the endpoint |
|
string |
- |
Endpoint authenticator or authentication flow names separated with ;. |
|
filesystem path |
mandatory to be set |
Path of the file with JSON configuration of the endpoint |
|
string |
empty string |
Description of the endpoint |
|
string can have subkeys |
- |
Endpoint displayed name. It is used whenever endpoint’s name is presented to the end-user, e.g. in top bars of web UIs. Localized values can be given with subkeys equal to locale name. If undefined then Unity will use endpointName |
|
string |
mandatory to be set |
Endpoint identifier. It is used to refer to this endpoint in other parts of the system. |
|
string |
mandatory to be set |
Authentication realm name, to which this endpoint belongs. |
|
string |
mandatory to be set |
Endpoint type |
--- Other --- |
|||
|
string can have subkeys |
- |
Properties starting with this prefix are used to configure Jetty HTTP server settings. See separate table for details. |
6.1. Storage configuration
Unity can use a configurable storage backend. Currently there are two options available, more may be added in future:
-
Relational database backend (RDBMS) - a typical classic choice
-
Hazelcast distributed in-memory data grid (HZ) - currently experimental, intended for instances with large traffic and a need for clustering
Selection of the database backend and its subsequent configuration is provided in the main unityServer.conf file.
The following option allows to select the database backend:
unityServer.storage.engine=rdbms # 'hz' is another possible option
Note that the Admin Console provides a possibility to create a dump JSON dump of the complete server state and to restore the system from such dump regardless of the selected storage engine.
6.1.1. RDBMS storage backend
Unity typically is deployed with a RDBMS backend. Several actual databases are supported: H2 (embedded, no setup required), MySQL or PostgreSQL. RDBMS service is stable, quite fast and offers an excellent ecosystem of maintenance supporting tools (backups, redundancy, etc) which is available for the mature RDBMS technology. It is however more difficult to create a HA or clustered Unity instance with RDBMS technology.
The following table enumerates all configuration options for the RDBMS backend.
| Property name | Type | Default value / mandatory | Description |
|---|---|---|---|
--- Low level database connection settings --- |
|||
|
integer number |
|
The default network timeout value in milliseconds to wait for the database operation to complete. When set to zero then such configuration is interpreted as an infinite timeout. |
|
integer number |
|
The number of active (i.e. in use) connections that can exist at any given time. |
|
integer number |
|
This is the amount of time in milliseconds that a Connection can be "checked out" of the pool before it will be forcefully returned. |
|
integer number |
|
The number of idle connections that can exist at any given time. |
|
integer number |
|
This is a low level setting about tolerance of bad connections got for any thread. If a thread got a bad connection, it may still have another chance to re-attempt to get another connection which is valid. But the retrying times should not more than the sum of poolMaximumIdleConnections and poolMaximumLocalBadConnectionTolerance. |
|
integer number |
|
Frequency in milliseconds of a ping query on an idle connection in a pool, used to keep the conection active. Can be set to match the typical timeout for a database connection, to avoid unnecessary pings. |
|
integer number |
|
The time in milliseconds to wait before retrying to get a connection from the pool. |
--- Database --- |
|||
|
[h2, mysql, psql] |
|
Database SQL dialect. Must match the selected driver, however sometimes more then one driver can be available for a dialect. |
|
Class extending java.sql.Driver |
|
Database driver class name. This property is optional - if not set, then a default driver for the chosen database type is used. |
|
string |
|
Database JDBC URL. |
|
string |
empty string |
Database password. |
|
string |
|
Database username. |
The remaining part provides more insight into specific setup of databases used by Unity. Note that if the simple embedded H2 database is used no special setup is required - it works out of the box. However is not recommended for production use as handling backups and redundancy is very problematic with it.
MySQL setup
Unity can work with:
-
MariaDB: for Unity version 2.0.0 — 2.4.x, the minimum supported version of MariaDB is 10.2.1. Since the Unity release 2.5.0 version 5.3 version of MariaDB should be fine.
-
Oracle’s MySQL, the minimum supported version is 5.6.4.
The setup of MySQL requires creation of a database with a separate user which is able to connect to the database. In mysql console (when logged with admin privileges) execute following commands:
CREATE DATABASE unitydb;
CREATE USER 'unity'@'localhost' IDENTIFIED BY 'unitypass';
GRANT ALTER, CREATE, DELETE, DROP, EXECUTE, INDEX, INSERT, LOCK TABLES,
   SELECT, TRIGGER, UPDATE, REFERENCES ON unitydb.* to 'unity'@'localhost';
using the desired database name, username and password. If the database is on a different host then the Unity instance,
change to localhost to a proper host of Unity installation or use % to allow connections from any host.
Test if the connection works with:
mysql -p -u unity unitydb
and give the password.
Unity server will setup all tables automatically on startup.
To configure Unity to use the database change the database JDBC URI as well as add the username, password and dialect:
unityServer.storage.engine=rdbms
unityServer.storage.engine.rdbms.jdbcUrl=jdbc:mysql://localhost/unitydb
unityServer.storage.engine.rdbms.dialect=mysql
unityServer.storage.engine.rdbms.username=unity
unityServer.storage.engine.rdbms.password=unitypass
Note: For certain authentication types it may be necessary to provide server’s public key or to use the
?allowPublicKeyRetrieval=true connection option (which however should never be used if the server
is accessed through public network). Refer to MariadB driver’s documentation for all available connection options
https://mariadb.com/kb/en/about-mariadb-connector-j/
PostgreSQL setup
The setup of PostgreSQL (Unity should be compatible with any recent version) requires creation of a database with a separate role (user) which is able to connect to the database. Typically on Linux system you have to invoke:
createuser -P unity
createdb -O unity unitydb
using the desired database name, username and password. Of course any other tool can be used to create the user and
database. Finally note that Postgres must allow for password authentication for the Unity user. Ensure that
in pg_hba.conf you have a lines similar to those two:
host   all         all         127.0.0.1/32          md5
host   all         all         ::1/128               md5
If the database is on a different host then the Unity instance, change IP addresses to a proper ones.
Test if the connection works with:
psql -h localhost unitydb unity
and give the configured password.
Unity server will setup all tables automatically on startup.
To configure Unity to use the Postgres database change the default database JDBC URI as well as add the username, password and dialect:
unityServer.storage.engine=rdbms
unityServer.storage.engine.rdbms.jdbcUrl=jdbc:postgresql://localhost/unitydb
unityServer.storage.engine.rdbms.dialect=psql
unityServer.storage.engine.rdbms.username=unity
unityServer.storage.engine.rdbms.password=unitypass
6.1.2. Hazelcast storage backend
Hazelcast storage engine (HZ) is in fact an overlay over RDBMS storage mechanism. HZ stores the whole Unity contents in memory. All read operations are exclusively served from memory (and so are fast), writes are also to memory (so are also fast) but additionally the same write operation is recorded to a classic RDBMS backend. As RDBMS writes are not blocking server operation (only the memory writes do) the overall performance is very high. RDBMS-stored data is read only once: during server startup.
What is more the HZ engine allows for easy clustering of Unity instances. Hazelcast technology has built-in support for clustering and can be used to achieve highly performing and HA instances.
Minimal configuration of Hazelcast subsystem is as simple as:
unityServer.storage.engine=hz
unityServer.storage.engine.hz.jdbcUrl=jdbc:h2:file:./data/myUnityDatabase.bin
using H2 database as the persistent store. All other RDBMS can be used with HZ engine too, their configuration is the same as for the RDBMS backend, with the exception of the configuration property prefix.
Note that RDBMS format is the same for HZ and RDBMS backend. This means that you can freely switch between those backends, without any need for data migration.
Complete reference to HZ engine config options follows:
| Property name | Type | Default value / mandatory | Description |
|---|---|---|---|
|
filesystem path |
- |
FOR ADVANCED USE only. If set then all other options are ignored. Configuration isloaded from the given path, and must be specified in Hazelcast XML configuration format. Note that after loading Unity performs couple of additional changes in configuration, especially related to serialization configuration, so do not set it manually. |
|
string |
|
Name of the cluster member. Must be unique in the cluster. |
|
string |
|
Listen IP of the internal cluster interface. Should not be accessible from outside. |
|
list of properties with a common prefix |
- |
List with IPs of cluster members. For safety it is strongly adviced to provide all cluster members. |
|
integer number |
|
Port used for the internal cluster communication |
--- Low level database connection settings --- |
|||
|
integer number |
|
The default network timeout value in milliseconds to wait for the database operation to complete. When set to zero then such configuration is interpreted as an infinite timeout. |
|
integer number |
|
The number of active (i.e. in use) connections that can exist at any given time. |
|
integer number |
|
This is the amount of time in milliseconds that a Connection can be "checked out" of the pool before it will be forcefully returned. |
|
integer number |
|
The number of idle connections that can exist at any given time. |
|
integer number |
|
This is a low level setting about tolerance of bad connections got for any thread. If a thread got a bad connection, it may still have another chance to re-attempt to get another connection which is valid. But the retrying times should not more than the sum of poolMaximumIdleConnections and poolMaximumLocalBadConnectionTolerance. |
|
integer number |
|
Frequency in milliseconds of a ping query on an idle connection in a pool, used to keep the conection active. Can be set to match the typical timeout for a database connection, to avoid unnecessary pings. |
|
integer number |
|
The time in milliseconds to wait before retrying to get a connection from the pool. |
--- Database --- |
|||
|
[h2, mysql, psql] |
|
Database SQL dialect. Must match the selected driver, however sometimes more then one driver can be available for a dialect. |
|
Class extending java.sql.Driver |
|
Database driver class name. This property is optional - if not set, then a default driver for the chosen database type is used. |
|
string |
|
Database JDBC URL. |
|
string |
empty string |
Database password. |
|
string |
|
Database username. |
6.2. PKI settings
Unity uses a centralized management of all Public Key Infrastructure (PKI) settings in a file defined in
the main configuration. By default the configuration file is called pki.properties.
In the file three types of objects can be defined:
-
PKI credentials (i.e. pairs consisting of an X.509 certificate and an associated private key),
-
truststores (sets of trusted CA certificates with many additional settings as CRLs), and
-
individual certificates of external entities.
| Individual certificates can be managed from Admin Console. Credentials and truststores can be only managed using configuration files. |
It is possible to define many objects of each type. For instance one can define two credentials: one for SSL server and another one for the SAML IdP endpoint to sign issued SAML assertions.
All of the artifacts are named and the names are used in other parts of the Unity configuration to refer to a configured instance. The main configuration reference is presented below. The subsequent sections cover in more details the configuration of each of the three classes of artifacts.
| Property name | Type | Default value / mandatory | Description |
|---|---|---|---|
|
Structured list |
- |
List of certificates. |
|
string |
mandatory to be set |
Certificate file path (PEM format). |
|
Structured list |
- |
List of credentials. The subkey defines the credential name. |
|
Structured list |
- |
List of truststores. The subkey defines the truststore name. |
6.2.1. PKI/X.509 trust settings
Public Key Infrastructure (PKI) trust settings are used to validate certificates, i.e. to check if the certificate are not faked. This is performed, in the first place when a connection with a remote peer is initiated over the network, using the SSL (or TLS) protocol. Additionally certificate validation can happen in few other situations, e.g. when checking digital signatures of various sensitive pieces of data.
Certificates validation is primarily configured using a set of initially trusted certificates of so called Certificate Authorities (CAs). Those trusted certificates are also known as trust anchors and their collection is called a trust store.
Except of trust anchors validation mechanism can use additional input for checking if a certificate being checked was not revoked and if its subject is in a permitted namespace.
Unity allows for different types of trust stores. All of them are configured using a set of properties.
-
Keystore trust store - trusted certificates are stored in a single binary file in the JKS or PKCS12 format. The file can be manipulated using a special tool like JDK
keytooloropenssl(in case of PKCS12 format). This format is a good choice if the trust store should be stored in a single file or when compatibility with other Java solutions is desired. -
OpenSSL trust store - allows to use a directory with CA certificates stored in PEM format, under precisely defined names: the CA certificates, CRLs, signing policy files and namespaces files are named
<hash>.0,<hash>.r0,<hash>.signing_policyand<hash>.namespaces. The hash must be generated using theopenssltool from a trusted certificate. This format is used by many well known servers, Linux distributions often provide tools to help in trust store management. Therefore this format is suggested if reuse of the truststore is needed. -
Directory trust store - the most flexible and convenient option, suggested for all remaining cases. It allows administrators to use a list of wildcard expressions, concrete paths of files or even URLs to remote files as a set of trusted CAs and corresponding CRLs. With this trust store it is trivial to configure a designated directory(-ies) as a trust store.
In all cases trust stores can be (and by default are) configured to be automatically refreshed.
The following table provides a reference to settings of all of the trust stores. Note that the prefix of the
pki.properties is not shown in the table.
| Property name | Type | Default value / mandatory | Description |
|---|---|---|---|
|
[ALLOW, DENY] |
|
Controls whether proxy certificates are supported. |
|
[keystore, openssl, directory] |
mandatory to be set |
The truststore type. |
|
integer number |
|
How often the truststore should be reloaded, in seconds. Set to negative value to disable refreshing at runtime. (runtime updateable) |
--- Directory type settings --- |
|||
|
integer number |
|
Connection timeout for fetching the remote CA certificates in seconds. |
|
filesystem path |
- |
Directory where CA certificates should be cached, after downloading them from a remote source. Can be left undefined if no disk cache should be used. Note that directory should be secured, i.e. normal users should not be allowed to write to it. |
|
[PEM, DER] |
|
For directory truststore controls whether certificates are encoded in PEM or DER. Note that the PEM file can contain arbitrary number of concatenated, PEM-encoded certificates. |
|
list of properties with a common prefix |
- |
List of CA certificates locations. Can contain URLs, local files and wildcard expressions. (runtime updateable) |
--- Keystore type settings --- |
|||
|
string |
- |
The keystore type (jks, pkcs12) in case of truststore of keystore type. |
|
string |
- |
The password of the keystore type truststore. |
|
string |
- |
The keystore path in case of truststore of keystore type. |
--- Openssl type settings --- |
|||
|
[true, false] |
|
In case of openssl truststore, specifies whether the trust store is in openssl 1.0.0+ format (true) or older openssl 0.x format (false) |
|
[GLOBUS_EUGRIDPMA, EUGRIDPMA_GLOBUS, GLOBUS, EUGRIDPMA, GLOBUS_EUGRIDPMA_REQUIRE, EUGRIDPMA_GLOBUS_REQUIRE, GLOBUS_REQUIRE, EUGRIDPMA_REQUIRE, EUGRIDPMA_AND_GLOBUS, EUGRIDPMA_AND_GLOBUS_REQUIRE, IGNORE] |
|
In case of openssl truststore, controls which (and in which order) namespace checking rules should be applied. The REQUIRE settings will cause that all configured namespace definitions files must be present for each trusted CA certificate (otherwise checking will fail). The AND settings will cause to check both existing namespace files. Otherwise the first found is checked (in the order defined by the property). |
|
filesystem path |
|
Directory to be used for opeenssl truststore. |
--- Revocation settings --- |
|||
|
integer number |
|
Connection timeout for fetching the remote CRLs in seconds (not used for Openssl truststores). |
|
filesystem path |
- |
Directory where CRLs should be cached, after downloading them from remote source. Can be left undefined if no disk cache should be used. Note that directory should be secured, i.e. normal users should not be allowed to write to it. Not used for Openssl truststores. |
|
list of properties with a common prefix |
- |
List of CRLs locations. Can contain URLs, local files and wildcard expressions. Not used for Openssl truststores. (runtime updateable) |
|
[REQUIRE, IF_VALID, IGNORE] |
|
General CRL handling mode. The IF_VALID setting turns on CRL checking only in case the CRL is present. |
|
integer number |
|
How often CRLs should be updated, in seconds. Set to negative value to disable refreshing at runtime. (runtime updateable) |
|
integer number |
|
For how long the OCSP responses should be locally cached in seconds (this is a maximum value, responses won’t be cached after expiration) |
|
filesystem path |
- |
If this property is defined then OCSP responses will be cached on disk in the defined folder. |
|
list of properties with a common prefix |
- |
Optional list of local OCSP responders |
|
[REQUIRE, IF_AVAILABLE, IGNORE] |
|
General OCSP ckecking mode. REQUIRE should not be used unless it is guaranteed that for all certificates an OCSP responder is defined. |
|
integer number |
|
Timeout for OCSP connections in miliseconds. |
|
[CRL_OCSP, OCSP_CRL] |
|
Controls overal revocation sources order |
|
[true, false] |
|
Controls whether all defined revocation sources should be always checked, even if the first one already confirmed that a checked certificate is not revoked. |
Examples
Directory trust store, with a minimal set of options:
unity.pki.truststores.MAIN.type=directory
unity.pki.truststores.MAIN.directoryLocations.1=/trust/dir/*.pem
Directory trust store, with a complete set of options:
unity.pki.truststores.MAIN.type=directory
unity.pki.truststores.MAIN.allowProxy=DENY
unity.pki.truststores.MAIN.updateInterval=1234
unity.pki.truststores.MAIN.directoryLocations.1=/trust/dir/*.pem
unity.pki.truststores.MAIN.directoryLocations.2=http://caserver/ca.pem
unity.pki.truststores.MAIN.directoryEncoding=PEM
unity.pki.truststores.MAIN.directoryConnectionTimeout=100
unity.pki.truststores.MAIN.directoryDiskCachePath=/tmp
unity.pki.truststores.MAIN.crlLocations.1=/trust/dir/*.crl
unity.pki.truststores.MAIN.crlLocations.2=http://caserver/crl.pem
unity.pki.truststores.MAIN.crlUpdateInterval=400
unity.pki.truststores.MAIN.crlMode=REQUIRE
unity.pki.truststores.MAIN.crlConnectionTimeout=200
unity.pki.truststores.MAIN.crlDiskCachePath=/tmp
Java keystore used as a trust store:
unity.pki.truststores.MAIN.type=keystore
unity.pki.truststores.MAIN.keystorePath=/trust/truststore.jks
unity.pki.truststores.MAIN.keystoreFormat=JKS
unity.pki.truststores.MAIN.keystorePassword=xxxxxx
6.2.2. Configuring the PKI credential
Unity uses private key and a corresponding certificate (called together as a credential) to identify itself to its clients during TLS connection and sometimes to digitally sign returned documents. This allows clients to be sure that they are talking with the genuine, not faked peer. Note that also clients or users may use certificates to identify themselves to Unity - this is another topic.
| Do not confuse the PKI credential used by the server to identify itself with the credentials of the entities handled in the Unity’s database. |
| For production usage, Unity should use a certificate issued by a globally trusted certificate authority. |
Credentials might be provided in several formats:
-
Credential can be obtained from a keystore file, encoded in JKS or PKCS12 format.
-
Credential can be loaded as a pair of PEM files (one with private key and another with certificate),
-
or from a pair of DER files,
-
or even from a single file, with PEM-encoded certificates and private key (in any order).
The following table list all parameters which allows for configuring the credential.
Note that nearly all settings are optional. If not defined, the format is guessed.
However, some credential formats require additional settings. For instance, if using the der format,
the keyPath is mandatory as you need two DER files: one with a certificate and one with a key (and
the latter path can not be guessed). Note that the prefix of the pki.properties configuration is not
shown in the table.
| Property name | Type | Default value / mandatory | Description |
|---|---|---|---|
|
filesystem path |
mandatory to be set |
Credential location. In case of jks, pkcs12 and pem store it is the only location required. In case when credential is provided in two files, it is the certificate file path. |
|
[jks, pkcs12, der, pem] |
- |
Format of the credential. It is guessed when not given. Note that pem might be either a PEM keystore with certificates and keys (in PEM format) or a pair of PEM files (one with certificate and second with private key). |
|
string |
- |
Password required to load the credential. |
|
string |
- |
Location of the private key if stored separately from the main credential (applicable for pem and der types only), |
|
string |
- |
Private key password, which might be needed only for jks or pkcs12, if key is encrypted with different password then the main credential password. |
|
string |
- |
Keystore alias of the key entry to be used. Can be ignored if the keystore contains only one key entry. Only applicable for jks and pkcs12. |
Examples
Credential as a pair of DER files:
unity.pki.credentials.MAIN.format=der
unity.pki.credentials.MAIN.password=SOME PASS
unity.pki.credentials.MAIN.path=/etc/credentials/cert-1.der
unity.pki.credentials.MAIN.keyPath=/etc/credentials/pk-1.der
Credential as a JKS file (credential type can be autodetected in almost every case):
unity.pki.credentials.MAIN.path=/etc/credentials/server1.jks
unity.pki.credentials.MAIN.password=xxxxxx
6.2.3. Configuring 3rd party certificates
Some Unity subsystems require an access to a 3rd party service certificate, e.g. to check a digital signature issued by such service. The configuration of such standalone certificates is done as follows:
unity.pki.certificates.SOME-SERVICE-CERT.certificateFile=/etc/credentials/someServiceCert.pem
The certificate must be stored in a PEM file. The above configuration defines a certificate, which can be used in
all Unity subsystems with the simple name SOME-SERVICE-CERT.
6.3. HTTP server settings
The embedded HTTP server is using sensible default values of HTTP settings. There are only two properties which always needs to be properly set: hostname and port. However in some cases it may be necessary to fine tune also the advanced settings. The complete reference is included below:
| Property name | Type | Default value / mandatory | Description |
|---|---|---|---|
|
integer >= 1 |
|
Time (in ms.) before an idle connection will time out. It should be large enough not to expire connections with slow clients, values below 30s are getting quite risky. |
--- General settings --- |
|||
|
string |
- |
The hostname or IP address (optionally with port), which is advertised externally whenever the server has to provide its address. By default it is set to the listen address, however it must be set when the listen address is 0.0.0.0 and also should be set whenever the server is listening on a private interface accessible via DNAT or similar solutions. Examples: |
|
[true, false] |
|
If set to true then server will listen on plain, insecure socket. Useful when Unity is hidden behind a proxy server, which provides TLS on its own. Note: it is still mandatory for web browser clients to access Unity over HTTPS as otherwise Unity cookies won’t be accepted by the browser. Therefore Unity’s advertised address is always be HTTPS. |
|
string |
|
The hostname or IP address for HTTP connections. Use 0.0.0.0 to listen on all interfaces. |
|
integer [0 — 65535] |
|
The HTTP port to be used. If zero (0) is set then a random free port is used. |
--- CORS settings --- |
|||
|
string can have subkeys |
- |
Common prefix under which CORS is configured |
|
[true, false] |
|
Whether the server allows requests with credentials |
|
string |
|
Comma separated list of allowed HTTP headers (default: any) |
|
string |
|
Comma separated list of allowed HTTP verbs. |
|
string |
|
Allowed script origins. |
|
[true, false] |
|
Whether preflight OPTION requests are chained (passed on) to the resource or handled via the CORS filter. |
|
string |
|
Comma separated list of HTTP headers that are allowed to be exposed to the client. |
|
integer number |
|
The number of seconds that preflight requests can be cached by the client. |
|
[true, false] |
|
Control whether Cross-Origin Resource Sharing is enabled. Enable to allow e.g. accesing REST services from client-side JavaScript. |
--- Proxy settings --- |
|||
|
[true, false] |
|
If false then only requests with X-Forwarded-For header will be accepted. |
|
list of properties with a common prefix |
- |
If not empty then contains a list of IPv4 or IPv6 addresses,that are allowed as immediate clients. In practice it is useful when Unity is deployed behind a proxy server: then proxy IP(s) should be entered as the only allowed IP to harden installation security. Note: CIDR notation can be used to denote networks, e.g. 10.10.0.0/16. |
|
integer [0 — 32] |
|
If set to 0 then it is assumed then this server is not behind a proxy. Otherwise the number should specify the number of (local, trusted) proxies that are protecting the server from the actual clients. In effect the assumed client IP will be taken from the X-Forwarded-For header, stripping the trailing ones from intermediary proxies. Not that only proxy servers setting X-Forwarded-For are supported. |
--- Advanced settings --- |
|||
|
string |
empty string |
Space separated list of TLS cipher suites to be disabled. Names of the ciphers must adhere to the standard Java cipher names, available here (search for Cipher Suites): https://docs.oracle.com/en/java/javase/11/security/oracle-providers.html#GUID-7093246A-31A3-4304-AC5F-5FB6400405E2 |
|
string |
|
Space separated list of protocol variants to be disabled. Names of the protocols are in table named Protocol Parametrs under the linkhttps://docs.oracle.com/en/java/javase/11/security/oracle-providers.html#GUID-7093246A-31A3-4304-AC5F-5FB6400405E2 |
|
string can have subkeys |
- |
Under this prefix the settings of the DoS filter must be placed. The reference of allowed settings is available in the Jetty DoS filter documentation, currently here: http://www.eclipse.org/jetty/documentation/current/dos-filter.html |
|
[true, false] |
|
If enabled then the DenayOfService fileter is enabled forall services. The filter prevents DoS attacks, but requires a proper configuration dependent on the installation site. |
|
[true, false] |
|
Control whether HTTP strict transport security is enabled. It is a good and strongly suggested security mechanism for all production sites. At the same time it can not be used with self-signed or not issued by a generally trusted CA server certificates, as with HSTS a user can’t opt in to enter such site. |
|
[true, false] |
|
Use insecure, but fast pseudo random generator to generate session ids instead of secure generator for TLS sockets. |
|
[true, false] |
|
Controls whether to enable compression of HTTP responses. |
|
integer number |
|
Specifies the minimal size of message that should be compressed. |
|
integer number |
|
Maximum number of concurrent connections the server accepts. |
|
integer number |
|
Maximum number of threads to have in the thread pool for processing HTTP connections. Note that this number will be increased with few additional threads to handle connectors. |
|
integer >= 1 |
|
Minimum number of threads to have in the thread pool for processing HTTP connections. Note that this number will be increased with few additional threads to handle connectors. |
|
[true, false] |
|
Controls whether the SSL socket requires client-side authentication. |
|
[true, false] |
|
Controls whether the TLS socket accepts (but does not require) client-side certificate authentication. |
|
string |
|
URI origin that is allowed to embed web interface inside a (i)frame. Meaningful only if the xFrameOptions is set to allowFrom. The value should be in the form: http[s]://host[:port] |
|
[deny, sameOrigin, allowFrom, allow] |
|
Defines whether a clickjacking prevention should be turned on, by insertionof the X-Frame-Options HTTP header. The allow value disables the feature. See the RFC 7034 for details. Note that for the allowFrom you should define also the xFrameAllowed option and it is not fully supported by all the browsers. |
6.4. Logging configuration
Unity uses the Log4j logging framework in version 2.x (note that the older version 1.x is much different).
Logging is configured in the conf/log4j2.xml file. Other log file formats supported by Log4j may be alternatively
used but we suggest to use the default XML format.
By default, log files are written to the the logs/ directory.
The following example config file configures logging so that log files are rotated daily. The example contains inline explanations in comments.
<?xml version="1.0" encoding="UTF-8"?>
<Configuration monitorInterval="30" status="warn">
  <!--
    What to log?
    Levels in order of verbosity: FATAL, ERROR, WARN, INFO, DEBUG, TRACE
  -->
  <Loggers>
    <!-- Default log level -->
    <Root level="INFO">
      <!-- Default appender specifies where to log by default
           (can be changed per logger) -->
      <AppenderRef ref="LOGFILE"/>
    </Root>

    <!-- Everything produced by Unity (unless overwritten below) -->
    <Logger name="unity.server" level="DEBUG"/>

    <!-- Loading of any configuration -->
    <Logger name="unity.server.config" level="INFO"/>

    <!-- Persistence subsystem -->
    <Logger name="unity.server.db" level="INFO"/>

    <!-- Web subsystem -->
    <!-- <Logger name="unity.server.web" level="INFO"/> -->
  </Loggers>


  <!-- Where to log? -->
  <Appenders>
    <Console name="CONSOLE">
      <PatternLayout pattern="%d{ISO8601} [%t] %-5p %c: %equals{%1x}{[]}{}%m%n"/>
    </Console>

    <RollingRandomAccessFile name="LOGFILE"
        fileName="/var/log/unity-idm/unity-server.log"
        filePattern="/var/log/unity-idm/unity-server.log.%d{yyyy-MM-dd}">

      <PatternLayout pattern="%d{ISO8601} [%t] %-5p %c: %equals{%1x}{[]}{}%m%n"/>
      <Policies>
        <TimeBasedTriggeringPolicy interval="1" modulate="true"/>
      </Policies>
      <DefaultRolloverStrategy/>
    </RollingRandomAccessFile>
  </Appenders>
</Configuration>|
In Log4j, the log rotation frequency is controlled by the DatePattern. Check
https://logging.apache.org/log4j/2.x/manual/appenders.html
for the details, search for |
For more info on controlling the logging we refer to the log4j documentation:
6.4.1. Logger categories, names and levels
Logger names are hierarchical. In Unity, prefixes are used to define category of log message (e.g. "unity.server.ldap") to which the Java class name is appended. Complete name of a logger is sometimes called as logging facility.
The logging prefixes are:
-
unity.server- can be used to control default logging level of all Unity-produced logs. No logging facility is directly using this prefix though, there is always something after server - see below. -
unity.server.core- general server messages (not covered by any other facility below) -
unity.server.config- configuration parsing and loading -
unity.server.db- database related -
unity.server.web- web interface related -
unity.server.saml- SAML subsystem related -
unity.server.ldap- upstream LDAP IdP related -
unity.server.ws- SOAP (web service) stack related -
unity.server.externaltranslation- messages connected with the translation of any upstream IdP data to the Unity format. -
unity.server.forms- Registration and enquiry related logs -
unity.server.authn- Authentication and session management -
unity.server.oauth- OAuth related -
unity.server.pam- PAM related -
unity.server.otp- One time passwords related -
unity.server.fido- FIDO related -
unity.server.rest- REST infrastructure -
unity.server.notification- User notifications subsystem -
unity.server.confirmation- Email and mobile confirmations -
unity.server.upman- Unity projects management endpoint -
unity.server.audit- Audit logging -
unity.server.script- Invocation of external scripts -
unity.server.userimport- Import of user information from 3rd party DBs like LDAP -
unity.server.bulkops- Bulk operations on Unity directory -
unity.server.event- Low level events handling
Therefore the logging output produced can be controlled in a fine-grained manner. Log levels in Log4j are (in increasing level of severity):
-
TRACEon this level huge pieces of unprocessed information are dumped, -
DEBUGadmin-friendly, verbose information, useful for hunting problems, -
INFOstandard information, not much output, -
WARNwarnings are logged when something went wrong (so it should be investigated), but recovery was possible, -
ERRORsomething went wrong and operation probably failed, -
FATALsomething went really wrong - this is used very rarely for critical situations like overall server failure.
|
The best way to discover what is the name of the interesting category is to turn on the general DEBUG logging for a while. Then interesting entries can be seen and subsequently the logging configuration can be fine tuned to only show them. |
6.4.2. Diagnostic context (MDC)
Unity inject several pieces of context information. Those are commonly referred as Mapped Diagnostic Context and are useful to trace processing flows consisting of many subsequent log entries. The following keys are available:
-
endpoint- name of the endpoint handling the request -
user- displayed name of the user who initiated operation -
entityId- numeric entity id of the user who initiated operation -
clientIP- IP of the client who initiated operation
Note, that all of the MDC keys are not always present, i.e. may be absent when are not applicable. Example is a periodic operation invoked by server itself - its logs won’t have diagnostic context.
Example configuration of console appender using all available MDC:
	<Appenders>
		<Console name="CONSOLE">
			<PatternLayout pattern="%d{ISO8601} [%t] [%X{endpoint}] [%X{user}] [%X{entityId}] [%X{clientIP}] %-5p %c:%equals{%1x}{[]}{} %m%n"/>
		</Console>
	</Appenders>
Log entry with the above configuration could look like this:
2021-03-24T12:53:05,988 [qtp1132974836-39] [RESTful administration API] [Default Administrator] [1] [0:0:0:0:0:0:0:1] DEBUG unity.server.rest.RESTAdmin: getEntity query for 1
6.5. Advanced
The following elements are best configured from Admin Console. The configuration below is kept only for advanced users and those who prefer to use config files instead of Console.
6.5.1. Authenticators
| Credential types and credential requirements can be configured in the Admin Console, so we skip a description of their configuration in the configuration files. |
Authenticators define different ways of authentication offered to end users. Each authenticator uses a fixed authentication technology as local password verification or remote OAuth authentication. Authenticator can provide one or more authentication options. This latter situation holds when authenticator allows a user to select among different identity providers. For instance OAuth authenticator can allow for selection of user’s identity provider as Google or Facebook. Sometimes more complex deployments may facilitate several authenticators of a single technology, when different Unity endpoints require different authentication settings (e.g. consumer-oriented endpoint may use SAML authentication in public SAML federation while admin-oriented endpoint may use SAML authentication in corporate federation).
Authenticators and endpoints as of now can be configured only in the configuration file. Endpoints are covered in a separate section Consumer access: the endpoints. The Consumer access: the endpoints section covers also how to configure authentication screen, i.e. the visual composition of authentication options which is defined per endpoint. Here we cover only the functional definitions of authenticators, which can be used with many endpoints in various configurations.
Authenticators are added either directly to endpoints or are tied together in authentication flows, what allows for flexible control of multi-factor authentication. The endpoint must have at least one authenticator or flow associated and can have more when alternative or multi-credential authentication scenarios are implemented.
Example configuration of an authenticator:
unityServer.core.authenticators.pass.authenticatorName=securePass
unityServer.core.authenticators.pass.authenticatorType=password
unityServer.core.authenticators.pass.localCredential=secured password
unityServer.core.authenticators.pass.configurationFile=conf/password-config.properties
The name of the authenticator is an arbitrary, unique string. The type is the most important part: it defines the name of the authentication technology to be used. The following table lists supported technologies.
| Authn technology | Works with | Description |
|---|---|---|
|
Password |
Local verification |
|
Password |
External verification, uses LDAP. |
|
X.509 certificate |
External verification, uses LDAP to resolve attributes of a given certificate subject. |
|
X.509 certificate |
Local verification |
|
SAML assertions |
External verification, interacts via associated retrieval with a remote SAML IdP. |
|
OAuth tokens |
External verification, using OAuth Authorization Server or OpenID Connect provider. |
|
OAuth access token |
External verification, using OAuth Authorization Server or OpenID Connect provider. |
|
JWT |
Local verification, not bound to any local credential. Validated tokens are self contained. |
Authenticator typically require a configuration file. In that file details of how to collect and check the credential can be specified. Note that for local authenticators (i.e. checking the credential internally, without help of external service) must be associated with an existing local credential, and configuration of authenticator is typically minimal or even empty: verification process is defined by the local credential settings, and the only things that can be configured for authenticator are UI details like a label to be used on password retrieval text field.
More complex configuration of external authenticators is covered in the section Integration of 3rd party Identity Providers.
Configuration of credential retrievals follows. Note that this configuration is universal for all authenticators
that use the credential in question, e.g. password retrieval settings below can be used both with
password and ldap authentication technologies.
The password retrieval options:
| Property name | Type | Default value / mandatory | Description |
|---|---|---|---|
|
[true, false] |
|
(Only used for remote password verification) Whether to present account association option for unknown locally users who were correctly authenticated remotely. |
|
string can have subkeys |
- |
Label to be used on UI for this option. Can have multiple language variants defined with subkeys. |
|
string |
- |
(Only used for remote password verification) Registration form to be presented for unknown locally users who were correctly authenticated remotely. |
The SMS retrieval options:
| Property name | Type | Default value / mandatory | Description |
|---|---|---|---|
|
string can have subkeys |
- |
Label to be used on UI for this option. Can have multiple language variants defined with subkeys. |
The X.509 certificate retrieval options:
| Property name | Type | Default value / mandatory | Description |
|---|---|---|---|
|
[true, false] |
|
Whether to present account association option for unknown locally users who were correctly authenticated remotely. |
|
string can have subkeys |
- |
Label to be used on UI for this option. Can have multiple language variants defined with subkeys. |
|
string |
- |
Registration form to be presented for unknown locally users who were correctly authenticated remotely. |
The jwt verificator must be configured in the very same properties format as the JWT management endpoint uses.
6.5.2. Authentication flows
Authentication flows are used to configure the authentication process as a whole, in the first place controlling the policy used to trigger multi factor authentication. Additionally flows can be used to define reusable groups of authenticators commonly used together.
An authentication flow consists of 3 sections: mandatory set of first factor authenticators, policy to trigger 2nd factor, and an optional list of 2nd factor authenticators.
Example configuration of an authentication flow:
unityServer.core.authenticationFlow.passAndSMSWeb.authenticationFlowName=passAndSMSWeb
unityServer.core.authenticationFlow.passAndSMSWeb.authenticationFlowPolicy=USER_OPTIN
unityServer.core.authenticationFlow.passAndSMSWeb.firstFactorAuthenticators=passwordWeb
unityServer.core.authenticationFlow.passAndSMSWeb.secondFactorAuthenticators=smsWeb,certWeb
In this example all users has to authenticate with password first. Then 2nd factor may kick in, but only if the user has opted to use 2nd factor (for others the 2nd factor will be skipped). User who preferrs to have their account secured, is either authenticated with SMS code sent to her phone or with X.509 certificate. Alwyas the first authenticator is used, for which a user has credential set.
Note that an endpoint may have more then one flow configured. Then the user can choose, and the selection of the first factor authentication option determines the flow to be used.
There are the following policies available:
-
REQUIRE - the 2nd factor authentication is mandatory
-
USER_OPTIN - 2nd factor authentication is only performed if user opted in for it (what can be set on HomeUI in credentials tab)
-
NEVER - only 1st factor is used
-
STEP_UP_IF_AVAILABLE - only the 1st factor is used for authentication, but when a security sensitive operation is invoked then 2nd factor must be provided, if set for the user. If user has none of the 2nd factor credentials of the flow then this policy is the same as NEVER.
6.5.3. Notifications and e-mail settings
Notifications and other messages are sent by Unity in several cases, for instance as an optional verification step during password reset or to notify an administrator about a new registration request.
Unity offers several message channels:
-
An embedded email channel
default_email. Messages are sent using a configured SMTP server. It can be disabled by removing or commenting the e-mail configuration property in the main configuration file. If enabled it is configured in a separate properties file. The default file provides a detailed information on the available options so should be easy to edit. -
An SMS channel
default_sms. Messages are sent using a configured SMS gateway. Currently only a single gateway (Clickatell) is integrated but adding new options is possible. -
A customized channel(s) which send messages using a Groovy script. The typical use case is to use an external mailing service with a rich feature set (like tracking of email opens, transactional emails etc).
Templates
Message template in Unity is used to configure both message contents and channel over which message is sent. Thanks to it all consumers of notification feature (e.g. registration form, password credential) are configured with message templates only.
Message template always has to select its purpose (so for what type of message it will be used, what type of consumer it supports) and a channel over which the message should be sent. Finally message template includes a definition of subject and body of the message, which can use variables, dynamically substituted at send time. Variables which must be formated using any of the two supported syntaxes:
${VARIABLE_NAME}
{{VARIABLE_NAME}}
Besides variables, message template may also include other templates which are set as "generic" fragments.
Message templates are configured using Admin Console (Setting→Message templates).
It is also possible to configure them with configuration file (by default msgTemplates.properties).
Variables are replaced dynamically with concrete values when a message is prepared to be sent. Naturally each subsystem sending messages provides different variables. Therefore each template must be associated with a concrete subsystem. This is performed in the template edit screen. The list of available variables for each subsystem is also provided there.
Certain subsystems (e.g. invitations) allow for defining custom variables that will be inserted into a template.
Those non-standard variables are always prefixed with custom. string: ${custom.myvar}.
External templates
When using a custom channel sending messages with an external mailing system, it is likely that the external service provides message templating functionality built in. External notification channel can be configured to take advantage of this fact. For such channels neither subject nor body in are set, instead a script sending messages gets as its input the target template id and a map of template variables - instead of a ready to be sent message.
A minimal Groovy script which merely logs the aforementioned data can look as follows:
log.info("Will send email to {}, using template {} with vars map {}", recipientAddress, templateId, templateParams);
6.5.4. Authentication realms and login sessions
Unity uses authenticaiton realms to manage shared configuration of login sessions for endpoints. Each endpoint must be associated with exactly one authentication realm.
In authentication realm configuration session expiration and blocking of brute force attacks are defined. It is also possible to enable remember me feature, which is rather insecure as the user must not use it from public computers:
unityServer.core.realms.1.realmName=lowSecurityRealm
unityServer.core.realms.1.blockAfterUnsuccessfulLogins=10
unityServer.core.realms.1.blockFor=30
unityServer.core.realms.1.maxInactivity=3600
unityServer.core.realms.1.enableRememberMeFor=3
Association of an endpoint with authentication realm is given in the main endpoint’s configuration in
unityServer.conf:
unityServer.core.endpoints.N.endpointRealm=lowSecurityRealm
Please note that several properties of authentication realms are supported only on web endpoints, as for instance web service (SOAP) endpoints do not use sessions. Still it is important to understand that even for those endpoints the fact whether the endpoint is or is not in the same authentication realm as other endpoint can be significant. The most important case is with all targeted tokens and identities which are generated by Unity. Let’s consider an example.
Two SAML endpoints A (Web) and B (SOAP) are in the same authentication realm R1, while the third endpoint C (SOAP) is in realm R2. If a service provider asks a client to to authenticate it via A endpoint and receives a transient (targeted) identity, this identity will be also valid for the queries to the endpoint B as both are in the same realm, sharing the session context of the logged user. At the same time this transient identity won’t be available at endpoint C.
7. Contents management
The web Admin Console allows to manage the schema and contents of the server. The initial admin user and its password is defined in the configuration file. The actual address is defined there as well, if unchanged it is https://localhost:2443/console. After the first login it is required to change the initial password.
7.1. Identities and entities
Unity represents principals as entities. Entity is a logical element symbolizing, the principal. Each entity must have at least one concrete representation which is called identity.
Identities in Unity have its type, which defines the syntax, comparison rules etc. of the value.
Regular identities can be created manually by administrators, imported from external IdPs with a help of input translation profile or added in effect of registration request acceptance. There is also a special category of identities: dynamic (or automatic) identities. Those identities are special in this sense that their values are assigned by Unity itself - administrator is able to only see their values and optionally can remove the values.
The following table describes all available identity types:
| UNITY identity type | Category | Description |
|---|---|---|
|
regular |
User name, compared with simple string equality. This type of identity can be used for all password-alike authentications in Unity. |
|
regular |
Generic identifier, compared with string equality. It is useful to represent remotely assigned user identifiers and to match against them during subsequent authentications. It is not possible to directly login with this identity type. |
|
regular |
X.500 name or a Distinguished Name (DN). Used in case of TLS/SSL authentication. The equality is tested on canonical form of DN. |
|
regular |
Email address identity, compared with simple string equality. This type of identity can be used for all password-alike authentications in Unity. The value of this identity is subject of confirmation process. |
|
automatic |
An automatically assigned anonymous identifier. Should be constant for each entity for its lifetime (and is unless manually removed). |
|
automatic |
An automatically assigned anonymous identifier. It is different from the persistent type as for each of Unity clients (targets) a different identifier is maintained. |
|
automatic |
An automatically assigned anonymous identifier. It is very similar to targetedPersistent, the only difference is that the identifier is regenerated for each login session. |
7.2. Attributes and attribute statements
Regular Unity attributes are assigned in groups and an attribute assigned in a group is valid and visible only in the group where is was defined. Regular attributes are assigned either manually (in Console or via REST interface) or by authenticator for users logging from remote IdP.
In many cases it is not enough: some attributes should be visible in multiple groups, some attributes should be added just for everybody, other attributes should be added to all users fulfilling some criteria. For all those cases Unity offers a feature called attribute statements.
Attribute statements are created per group. Each group can contain multiple statements, which are applied in order. Each statement can assign a single attribute to a group member. Each statement is evaluated per each group member what means it can provide a different values for different group members. The assigned attribute is always fixed, however the actual values and to whom/when the attribute is assigned is decided at runtime.
Each attribute statement contains a condition, an MVEL expression, which must evaluate to a boolean value. Only if condition evaluates to true the attribute of the statement is applied.
Statement’s attribute can be assigned in two ways:
-
as a fixed attribute. In this mode the attribute is defined together with values in the statement. The advantage of this mode is that one can define the value with the type-specific attribute editor.
-
as a dynamic attribute. In this mode attribute values are determined at runtime. It is the most useful to copy values from a different group, to modify some values etc.
Each statement contains a conflict resolution rule. It defines what to do if two statements create the same attribute. Note that if a statement creates a dynamic attribute which is already defined as a regular one, the dynamic one is always skipped.
Condition and (in case of dynamic attribute) attribute value expressions are given with MVEL language. See https://en.wikibooks.org/wiki/Transwiki:MVEL_Language_Guide for a generic introduction. Below we present a number of examples of the common cases.
Finally a statement can have an extra attribute group defined. If such group is set, then the attributes from this extra group are available in the MVEL context of conditions and dynamic value expressions. Note that dynamic attributes in an extra group are available too, what offers a great power. Unity, however uses advanced algorithms to prevent dependency circles. It is also only possible to to use a subgroup or a parent group as an extra group.
Always check log files after changing attribute statements, to verify if there are no errors. It is
also good to enable DEBUG logging on unity.server.AttributeStatementProcessor when behavior is not as expected.
7.2.1. Reference
MVEL context reference:
-
attrMap indexed with regular attribute names of the current group. Value of each entry is a single value of the attribute. If the attribute is multi-valued then the first value is returned. If the attribute has no value then empty string is returned. -
attrsMap indexed with regular attribute names of the current group. Value of each entry is a list of the attribute values. -
eattrAsattrbut with attributes of the extra group (only available if extra group is defined). -
eattrsAsattrsbut with attributes of the extra group (only available if extra group is defined). -
entityIdThe identifier (numeric) of the entity -
groupNameName of the group in which the statement is defined/evaluated. -
groupsList of all groups the entity is member of. -
idsByTypeMap indexed with identity types. Each entry is a list with all identities of the entity.
7.2.2. Examples
Condition:
true
can be used to assign an attribute to every group member.
Condition:
groups contains '/staff'
will assign statement’s attribute to all members of group /staff.
The following statement of group /staff/admins:
extra group: /staff
condition: eattrs contains 'phoneNumber'
attribute name: phoneNumber
attribute values: eattrs['phoneNumber']
copies the attribute phoneNumber from the parent group.
The following statement:
condition: idsByType contains 'userName'
attribute name: username
attribute values: idsByType['userName']
creates an attribute username with all identities of userName type.
7.3. Authorization
Unity offers a simple but quite powerful authorization control of its own access. It is controlled by a designated
attribute: sys:AuthorizationRole. The attribute is of enumeration type, and the type can not be changed.
By assigning this attribute to entities, those entities are granted some roles and therefore are authorized to perform certain operations in Unity. The detailed information on what is allowed for each role holder is provided in attribute type description (see Directory setup→Attribute types). The two most important roles are:
-
System managerwho is authorized to perform all actions and -
Regular userwho can perform all the typical operations reserved for users, i.e. read information about itself.
|
It is possible to create an entity without assigning any authorization role. Such entity will be present in the system, but won’t be able to perform any operation besides authenticating itself. It won’t be even allowed to read its own attributes. |
|
A good approach is to define an attribute statement assigning a default authorization role (e.g. |
The sys:AuthorizationRole is typically assigned in the root (/) group. However, Unity also supports
authorization on the group level: all Unity operations which operate on a particular group (e.g. read attributes in
a group, add a member to a group, read group members, create a subgroup, etc) are using the sys:AuthorizationRole
attribute which is defined for the user performing the operation in the group in question or in the closest parent
where it is defined. Example:
User Joe is a member of /Faculty/Staff group (therefore it is also a member of /Faculty) and no other groups.
He has the sys:AuthorizationRole=System Manager attribute defined in the /Faculty/Staff group. What’s more he has
sys:AuthorizationRole=Anonymous User defined in / group and sys:AuthorizationRole=Regular User attribute
in the /Faculty group.
Joe tries to add an attribute to an entity representing Ann, in the group /Faculty/Students. As he is not a member
of this group he has no authorization role defined there. The next group to check is /Faculty,
where he has the authorization role defined (Regular User). The role doesn’t allow for managing attributes
so the operation will fail. However Joe can modify attributes of any entity in the /Faculty/Staff
group as he has System Manager role there.
7.4. E-mail confirmations
Unity provides a powerful support for verifications of e-mail addresses. Both e-mail identities and e-mail attributes can be verified. In case of e-mail attribute each value is confirmed separately.
As this functionality touches many different areas of Unity functionality we group all the related information here.
7.4.1. Confirmations setup
To enable confirmations the following basic elements needs to be configured:
-
The E-mail notification channel must be configured.
-
There must be a message template (or templates) suitable for use with confirmation facility. See Notifications and e-mail settings.
-
To confirm attributes at least one attribute type must be defined which will use the
verifiableEmailsyntax. What’s more each such attribute type must have confirmations enabled and configured by selecting a proper message template in its definition. -
To confirm email identities, identity confirmations must be enabled and configured by selecting a proper message template in its definition.
Later in this section we assume that the confirmations were set up as described above.
7.4.2. When confirmations are sent?
Whenever an email attribute or identity is created or changed manually in Unity interface it is assumed to be not confirmed and the confirmation message is sent. The exception is a change of an attribute by administrator via the Admin Console: it is possible to control whether the attribute value should be added as confirmed or not.
Confirmations are also sent whenever a registration request is submitted, with an e-mail attribute or identity which was collected from the user filling the form. The attributes and identities collected from remote IdPs can be assumed be verified (depending on the input translation profile, see below).
The confirmations are not sent when an attribute is updated and some of the values are preserved.
Also already sent confirmations are not repeated during attribute update. E.g. if there is an attribute with
two email values [email protected] (confirmed) and [email protected] (unconfirmed, with confirmation request already sent),
and a user changes the attribute by adding a new attribute [email protected] only one confirmation request will be sent
(for [email protected]), and the confirmed status of [email protected] will be preserved.
Unity also takes care not to resent a confirmation if the same e-mail address was used for both identity and attribute (or multiple attributes). Then only a single confirmation is sent and is used to confirm all elements.
It is also possible to reset a confirmation state by the administrator (from Admin Console) by setting the unconfirmed state of an attribute value.
7.4.3. Registration forms and confirmations
Registration form including e-mail identities and/or attributes will have the confirmations automatically sent on submit. If the request is accepted before the user confirms its e-mail(s) then the confirmations are applied to e-mail/attribute of the already created entity. Otherwise are only recorded in the request. Administrator can always check confirmation status on the request review panel.
It is also possible to use email or identity confirmation status as auto accept condition. This means that the auto-accept condition is evaluated not only after request submission, but also after the request is updated in confirmation effect. The auto acceptance rules for email attribute and identity (respectively) are as follows:
attr["email"].confirmed == true
idsByTypeObj["email"][0].confirmed == true
7.4.4. Special encoding of emails
When setting an email value from translation profile of via REST API it might be necessary to set the email’s metadata.
To control an attribute or identity confirmation state, the regular e-mail value must be followed with the special
suffix [CONFIRMED] or [UNCONFIRMED] (case sensitive, without spaces between
the last character of email address). The default value is unconfirmed.
For instance assuming that the remote IdP provided an attribute emailAddress and we assume that this address
should be treated as already confirmed the following expression will produce a proper value for the mapAttribute
action:
attr["emailAddress"] + "[CONFIRMED]"
To control whether an address is designated as a main (primary) contact address one can use email tag main in
an email value provided to Unity (via REST or in input profile) as follows:
Of course the tag main can be used together with confirmation. Currently no other email tags are used by Unity.
7.4.5. User control of e-mail address
If the email attribute type is set as self modifiable, the user can edit its value on its own. To enable it also the Home UI must be configured to allow for this.
There is one special rule regarding edit of the e-mail attribute by an ordinary user: if the attribute has at least one confirmed value, then after changing the values also at least one confirmed value must be present.
Currently this rule is hardcoded, but in future we may enable its configuration in attribute type.
7.4.6. Authentication with e-mail identity
Authentication with e-mail identity can be used in the very same way as authentication with a plain username identity. Both identity types works out of the box with the password credential.
The only difference is that a user can not authenticate with e-mail identity if it was not confirmed.
7.5. Bulk entity operations
It is possible to invoke or schedule for recurring invocations conditional actions on entities database. This feature is activated in the Directory setup → Automation.
Scheduled actions are executed with a cron-like schedule (see tooltip for help). Actions are configured in a simple way. the only complicated and key part is rule condition, which must evaluate to true to select entity for which action should be invoked.
Condition is given in MVEL language (see https://en.wikibooks.org/wiki/Transwiki:MVEL_Language_Guide for details). The context exposes the following variables:
-
attrMap indexed with names of attribute in the / group. Value of each entry is a single value of the attribute. If the attribute is multi-valued then the first value is returned. If the attribute has no value then empty string is returned. -
attrsMap indexed with attribute names. Value of each entry is a list of the attribute values. -
idsByTypeMap of identity values indexed by type. -
idsByTypeObjMap of identity values indexed by type. Here values are full objects, what is useful to check for instance confirmation status of an email. -
groupsList of all groups where entity is a member. -
statusCurrent status of the entity. -
credReqcredential requirement id of the entity. -
credStatusMap indexed with credentials available for the entity. Value is one of:correct,notSetoroutdated.
Example condition selecting all disabled entities:
status == 'disabled'
Another much more complex example: let’s select all users who logged in no later then 6 months ago (line breaks added for clarity):
import java.time.*;
attr contains 'sys:LastAuthentication' &&
LocalDateTime.parse(attr['sys:LastAuthentication']).isBefore(LocalDateTime.now().minusMonths(6))
Here we first import Java namespace with time operations. The actual condition first checks
if the user has logged at all (i.e. has the sys:LastAuthentication attribute) and if so
we parse the last authentication attribute as date and compare it to the current time minus 6 months.
In case of troubles you can contact mailing list. It is always good to check server logs - detailed information on bulk processing execution can be found there.
8. Registration forms
Unity allows its administrators to define and deploy so called registration forms. A registration form can be used in four cases:
-
To collect registration information from prospective users. This can be seen as a classic registration feature use case. Such forms are called as public.
-
To quickly and conveniently create entities with common characteristics. In this case administrator can define what data needs to be entered for the created user and also automate actions which should be performed for newly added users.
-
To sign up users who authenticated with a remote IdP, but were not have been seen so far.
-
To sign up invited users.
After creation, a registration form can be tested and also filled (use case no 2 above) directly from the Admin Web UI. If the form is public it can be associated with any Web endpoint. Then a link to register a new account will appear on the login screen of the endpoint. Additionally all public forms get its own public address which can be used to directly launch a form. This address is constructed from the form name and can be seen in the forms table (Signup & Enquiry → Forms).
Finally a form can be associated with a remote authenticator as a "handler" for unknown users who were correctly authenticated remotely. For this last case the form need not to be public. It is also crucial to configure the input translation profile of the authenticator so it does not create a local user automatically. Otherwise the configured form won’t be ever launched, as the local user will be always present after translation profile execution.
An example of registration form creation:
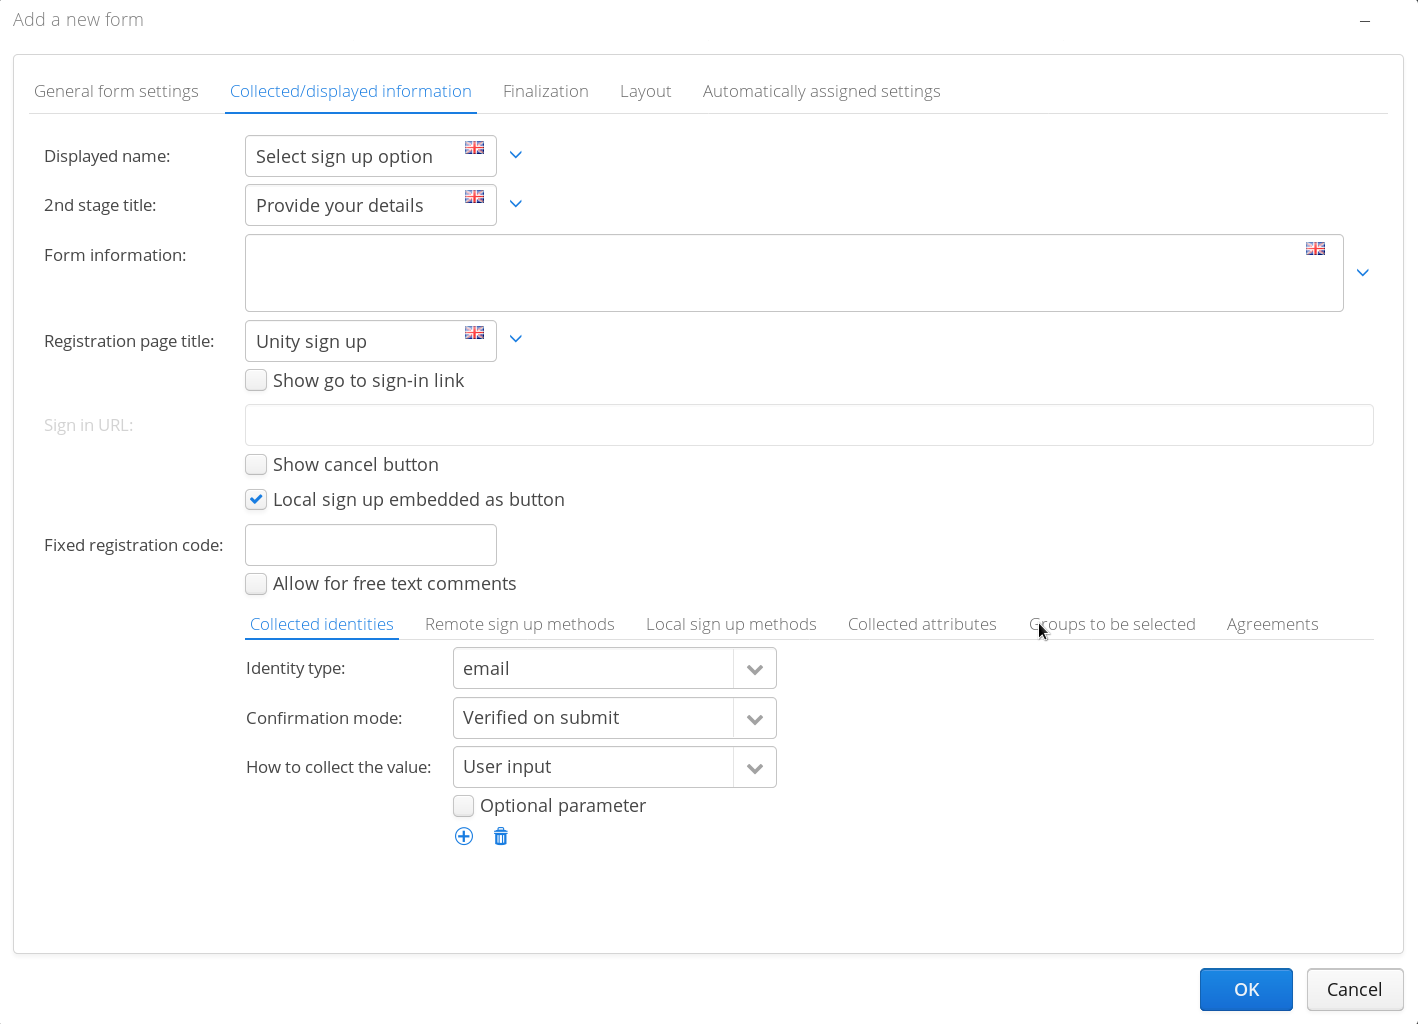
A simple registration form in action:
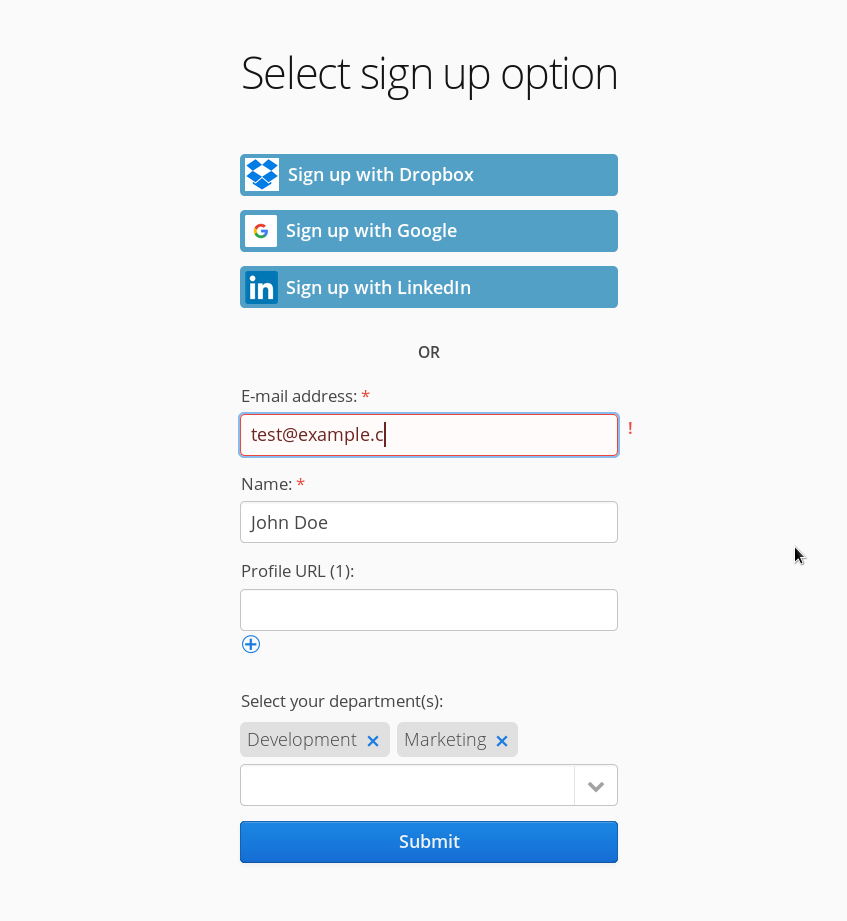
8.1. Defining a registration form
Unity can produce forms which are completed in a single stage (step) or in two stages. On the first stage it is possible to include external sign up options and (if needed) either a "local" sign-up button or just a complete local sign-up form. This latter scenario is useful when the form is small or when there are no remote sign-up options: then we have only the first stage.
The second stage shows a form which is contextual: it is used either to ask for additional data after remote sign-up (required information, which is not obtained from remote IdP) or all details in case on the first stage the "local sign-up" button was placed and used.
The form definition consists of multiple parts:
-
General settings as name, notifications configuration and decision whether the form is publicly available.
-
Collected information settings, which define what needs to be provided to create a final registration request. This information is usually collected interactively by filling a web form, but some data can be also collected from a remote IdP or preset by an invitation. This is a complete definition of collected data, which depending on scenario is collected in one or two stages as described above.
-
Form layout, which is by default generated automatically, but can be customized if order of elements, separators or section captions need to be adapted.
-
Finalization configuration: includes a list of rules which define handling of different final states after completing registration or running into different kinds of errors. See Finalization and redirection below.
-
Form automation: rules which can be used to automatically pre-process the request data or process it (e.g. accept). For instance this feature may be used to add all registered users to a specified group, accept all requests or even accept requests but only after their email address is confirmed.
The most important are the settings of the 2nd point, i.e. the data collected about the user. Each of the identities, group memberships and attributes can be collected in different modes. The modes are as follows:
- User input
-
A user interface component is displayed to collect the information from a user.
- From remote IdP and shown RO
-
The information must be provided by a remote IdP. It is then shown to a user in the form, but can not be edited.
- From remote IdP and hidden
-
As above but the information is not shown on the form filling screen.
- From remote IdP else user input
-
In this mode the user can fill the data only if it was not provided by a remote IdP. If it was provided by remote IdP then this data is hidden in the form.
- From remote IdP and editable
-
Same as User input, but if a remote IdP provided a value then it is used as a default.
Additionally all pieces of collected information can be made optional. The other types of collected information: agreements and credentials can be only collected interactively, therefore there is no mode selection in their case.
8.2. Processing a registration request
A submitted request is visible in AdminUI and can be accepted, denied or removed there. Depending on form’s configuration notifications are sent upon form arrival and processing.
When a request is accepted all the settings which were requested are applied: a new entity is created with specified identities, attributes and group memberships. Administrator can manually disable some of the attributes and group membership individually.
What is more, and is a big advantage of Unity, is a possibility to automate requests processing in a very flexible way. This automation is described in the subsequent section.
8.3. Invitations
Unity offers invitations support. Invitations are bound to an existing registration form, which must be public and must not possess a fixed (shared) registration code. Typically such forms are marked as by invitation only what ensures that only the invited users can fill the form (but this is not a requirement).
Invitations can be created in the AdminUI (Signup & Enquiry → Invitations). What is very useful in various integration scenarios, the invitations feature can be also fully controlled by the REST API of Unity, see RESTful Administration API endpoint for details.
Invitation fundamental element is the registration code, which is a unique, random identifier generated by Unity. This code can be handled manually to the invited person, and then used at the beginning of the registration form filling. Typically, however, invitation is sent by e-mail, with link including the code. To enable this feature, the invitation’s form must have the invitation template defined, and the invitation itself the user’s address specified.
| Forms which allows for both invited and not invited users, can not be accessed by providing an invitation code manually. For such forms the code must be always provided in the form’s public URL parameter. |
The fundamental invitation feature is the most useful for registration requests automatic acceptance: form which is
by invitation only can have auto acceptance rule included, as it is guaranteed that all requests were using a
valid invitation. For the forms accepting also not invited users, it is possible to check if a (valid) invitation
code was provided in form automation rule’s condition with the validCode variable.
Additional, powerful feature is request pre-filling from an invitation. If some information about an invited user is known when inviting (e.g. emial), this information can be associated with the invitation. Precisely speaking all attributes, identities and group parameters of a form can be pre-filled. For each element is is possible to define how the pre-filled value should be treated: whether the user should be able to change the pre-filled value, only see it or neither see nor change.
Finally invitation can contain custom parameters which can be used in invitation message template.
8.4. Registration request processing automation
Each registration form can have a translation profile attached to it. The registration translation profile is built using the same approach as the input and output translation profiles: i.e. it consists of a list of rules, where each rule has a MVEL condition and an action taken when the condition is true.
Registration profile is executed primarily when the request is submitted. There are however some rules which are consulted also in other corner cases (see below). Upon submission the the profile can perform couple of actions:
-
it can remove some of the data requested/provided by the requester (e.g. remove an attribute assigned in a group /staff if the user didn’t request membership in this group).
-
it can add additional data (e.g. it can add an identity of email type with the same value as the email attribute which was entered by the requester)
-
it can configure initial settings of the entity
-
finally it can (conditionally) automatically accept, deny or even drop the request.
MVEL expression context available in all conditions and value expressions contains the following elements. Note
that many of the variables come in a variant prefixed with the r letter. Those variants contain only the
elements which were collected automatically, i.e. usually were provided the the registration form by a remote IdP.
-
(r)attrMap indexed with attribute names. Value of each entry is a single value of the attribute. If the attribute is multi-valued then the first value is returned. If the attribute has no value then empty string is returned. -
(r)attrsMap indexed with attribute names. Value of each entry is a list of the attribute values. -
(r)idsByTypeMap of identity values indexed by type. -
(r)idsByTypeObjMap of identity objects indexed by type. This map is harder to use thenidsByType(which holds strings) but offers access to full information stored in identity as its confirmation state. -
(r)groupsList of selected groups. -
agrsList of agreements. Each agreement is boolean type. -
triggeredTells how the registration was started. Available values are:manualAtLogin,manualStandalone,manualAdmin,afterRemoteLogin. -
onIdpEndpointIf istruethen the registration was invoked in the middle of authentication where Unity is being used by some service as its remote IdP. Especially useful in case of redirect action. -
userLocaleContains the user’s locale. -
registrationFormName of the registration form (so it can be set in some attribute) -
requestIdId of the registration request (so it can be set in some attribute) -
validCodetrueif a valid registration code was provided,falseotherwise. Useful for checking if a request came by invitation or not (for forms allowing both).
8.4.1. Finalization and redirection
In the Finalization config or registration form one can define title, message, and redirection URL. In case when a more customized final screen is needed, redirection can happen automatically. The details of the status are added as parameters.
Note that older versions of Unity used a special actions in the form automation rules to control (in a limited way) the behavior. Since version 2.7.0 this is not active feature anymore. The actions are still there so that re-configuration to the new Finalization configuration is easier. In future those actions will be completely dropped.
The automatically added query parameters are:
-
statusone ofsubmitted,submittedAccepted(if auto accept condition triggered request acceptance),submittedWithError,cancelled,elementConfirmed,elementConfirmationError. The last two are used after confirming elements as email of the form. -
error_codemore detailed information about error in case of error status -
form_ididentifier of the form, may be missing in rare cases -
request_idrequest identifier, may be missing in rare cases -
confirmed_element_typeone ofidentityorattribute -
confirmed_element_name -
confirmed_element_value
8.4.2. Automatic processing
The rules which contain the autoProcess action are used to automatically accept, deny or drop the request.
Such rules behave in the same way as all regular rules, with one exception. Namely, those rules are consulted
not only after the request is submitted, but also after each confirmation of request elements
(such as email identity confirmation). Therefore it is possible to automatically accept a request only after
its email identity is confirmed.
The full MVEL documentation can be found here https://en.wikibooks.org/wiki/Transwiki:MVEL_Language_Guide
Example conditions:
Checks if request has an email attribute set (useful if this attribute is collected as optional).
attrs["email"][0] != null
The same as above but the emial attribute must come from a remote IdP, i.e. must be collected by the form in an automatic mode.
rattrs["email"][0] != null
Checks if request contains identity of x500Name type.
idsByType["x500Name"] != null
Checks if request’s first agreement was accepted.
agrs[0] == true
Checks if the first email type identity is confirmed.
idsByTypeObj["email"][0].confirmed == true
9. Enquiry forms
Enquiry forms are a close relative of registration forms, with one principal difference: enquires are targeted at existing Unity users.
Enquiry can be defined to collect additional information from existing users, allow them to apply for changes in their accounts or even automatically change owned account, in a controlled manner.
There are two general types of enquiries:
-
Regular enquiry — such enquiry is presented to (selected) users as soon as they log into any web endpoint or can be filled on dedicated enquiry path. Each regular enquiry can be filled once. Regular enquiries are good for collecting consent, terms of use agreements or requesting additional mandatory account information.
-
Sticky enquiry — can be included on HomeUI, or on dedicated enquiry path. It is up to the user to fill the form, and the form can be filled multiple times. Sticky forms are good for providing persistent account update features: option to change membership in groups, or request modification of attributes which requires administrator’s approval.
Both types of enquiries define a subset of system users for whom the form is applicable. This can be done simply by selecting groups (form will be applicable to all the members) in form configuration. Additionally an MVEL condition may be prepared to dynamically limit the form with nearly arbitrary constraints: users who are not members of a given group, individual members, given attribute holders etc. The context of the MVEL condition is the same as the one used in Bulk entity operations configuration.
Enquiry forms are created in a nearly the same way as registration forms. The differences are:
-
Enquiry can be filled on a standalone URL (similar to standalone URL of registration form, but requires authentication) or the user is asked to fill the enquiry after log in to Unity.
-
Information on filled enquiry (as well as ignored permanently in case of optional enquires) is recorded in user’s attributes (note hidden one, so to see it on AdminUI one need to enable showing of hidden attrs).
-
Enquiry can contain only manually entered information, it can not be associated with remote login pipeline as registration forms (what obviously doesn’t make any sense).
The remaining features are post submission translation profile, redirects, automation of processing etc. is the same as in case of registration forms. Enquiry form also work with the invitations subsystem the same way as registration requests. The only difference is in the way invitation receiver is selected. Note that when filling enquiry after invitation user needs not to authenticate.
10. Policy documents and agreements
Unity supports management and presentation of various policy documents like terms of use (ToU), EULA, marketing agreements and similar.
Documents are defined centrally in Admin Console → Settings → Policy documents. Documents are versioned, can be mandatory or optional. Documents may be also stored externally, or embedded.
Once a policy document is defined it can be used in various places of the system:
-
In registration forms, to show agreement as a part of new user signup.
-
In enquiry forms, to selectively prompt users to agree on a document.
-
On Identity Provider endpoints, to show policy document acceptance view as a part of login flow, from a service using Unity as an IdP.
In each case Unity stores result of policy acceptance (or disagreement, possible in case of optional documents) as an attribute of a user who took action on document. Such attribute can be viewed among regular attributes of the user.
Admin Console permits for changes of the document with and without revision change. User who has accepted a policy document won’t be presented with it again, until it is modified with revision change. In other words update of a policy document will require re-confirmation only when document revision is increased.
11. Enhancement scripts
Unity allows for invoking scripts written by administrator which enhance Unity functionality. Scripts can be used to initialize Unity database to deployment specific state, implement custom side effects, notifications, specialized logging etc.
Scripts are triggered by various system events and have access to the event context information as well as to a nearly complete Unity platform internal API.
Currently only Groovy scripts are supported. Groovy is easy to use for anyone familiar with Java and perfectly integrates with the Unity API. We may add support for other scripting languages in future.
Configuration of a script is performed in a following way in the unityServer.conf file:
unityServer.core.script.N.file=scripts/myCustomScript.groovy
unityServer.core.script.N.trigger=<TRIGGERING_EVENT>
Unity generates the following events:
- pre-init
-
Triggered before configured contents (endpoints, authenticators, credentials, …) is loaded to database.
- post-init
-
Triggered after configured contents (endpoints, authenticators, credentials, …) is loaded to database.
- methodInvocation.METHOD-NAME
-
Triggered after internal Unity platform API method is invoked. The actual event name has the method name added to the given prefix after dot, for instance
methodInvocation.addEntityis event name triggered afteraddEntityoperation is invoked. Note that you have to explicitly enable generation of those events withunityServer.core.enableLowLevelEvents=truein the main config file.
By enabling the following logger level it is possible to observe in the log file all produced events together with their context:
<Logger name="unity.server.EventProcessor" level="DEBUG"/>
11.1. Developing Groovy script
Groovy language is not described here, its documentation is provided at Groovy’s site http://groovy-lang.org/documentation.html
Example scripts available in the distribution are a very good starting point to learn how to create own solutions. We suggest to start from browsing and or modifying one of them.
Unity ships a simple test program which allows to perform a dry run of the script. The test tool is invoked with a tested script being its sole argument:
$> unity-idm-test-groovy my-script.groovy
During invocation all invocations of API methods are logged to the console.
Note however that the tool provides a mock environment to the script: all objects are the same as during regular run,
but all methods invoked on mocked objects return null value.
Therefore more complicated scripts relying on data returned by the API objects can require some
minor modifications for testing. Also note that regular logging as performed by the script (using the log object)
will be placed in the regular log file of the unity server, as it is configured in the logging configuration.
Unity injects a wide range of objects which are available to the script. One of the most important is context
which holds details of the event. For instance for all methodInvocation events the method name, arguments and
error message in case of failure are stored in this object.
The following table enumerates all available object:
| Object name | Type | Description |
|---|---|---|
|
|
Name of the event |
|
|
Event specific context |
|
|
Access to the parsed main configuration file |
|
|
Attribute classes management |
|
|
Attributes management |
|
|
Attribute types management |
|
|
Authenticators management |
|
|
Bulk processing management |
|
|
Credential management |
|
|
Credential requirement management |
|
|
Endpoint management |
|
|
Enquiry management |
|
|
Entity credentials management |
|
|
Entities management |
|
|
Groups management |
|
|
Identity types management |
|
|
Invitations management |
|
|
Message templates management |
|
|
Notifications management |
|
|
Preferences management |
|
|
Authentication realms management |
|
|
Registration management |
|
|
Translation profile management |
|
|
User import manaegment |
|
|
Allows for accessing Unity i18n message bundles |
|
|
Simplifies attribute type operations |
|
|
Simplifies identity type operations |
|
|
Simplifies generation of configuration items used when delegating group administration to UpMan - mostly creation of forms. |
|
|
Allows for managing login sessions of Unity clients |
|
|
Simplifies creation of registration form automation actions |
|
|
Low-level manipulation of all sorts of tokens maintained by Unity: from OAuth to session |
|
|
Low-level access to spring container, with all beans which are not exposed directly to the script (and enumerated in this table). |
|
|
Only for -init events is set to true when server was started on empty database |
|
|
Allows for logging to Unity log file |
Detailed documentation on the above API objects is available in Unity platform API docs
12. Web interface customization and branding
Unity interface appearance can be customized to match the owning organization preferences. There are two ways (which can be combined) to perform such customizations:
-
Change of the default CSS style, allowing for customizing colors, decorations and sizing of the whole UI
-
Change of the default web page template, allowing for adding a custom header, footer or even side bars to the Unity UI.
12.1. Modification of web page styles
Customization is based on SASS http://sass-lang.com/ (a superset of CSS), using its preferred SCSS syntax. Theoretically it is possible to prepare the theme purely in CSS but due to complex requirements in practice SASS usage is mandatory.
Unity themes are placed in a configured directory. Each theme is named and the server is configured with a selected
theme as follows (in unityServer.conf):
unityServer.core.defaultWebContentDirectory=webContents
unityServer.core.defaultTheme=unityThemeValo
What is more the theme can be changed per endpoint in endpoint’s configuration. Actually two themes can be set: one for the main user interface and one for the endpoint’s authentication screen. Endpoint can also use a separate directory with theme files and other web resources. For instance:
unity.endpoint.web.mainTheme=customTheme
unity.endpoint.web.authnTheme=customAuthnTheme
unity.endpoint.web.webContentDirectory=webContents-homeEndpoint
There are couple of facts that it might be useful to know:
-
All files (e.g. images) served by Unity must be present in the web content directory used for the endpoint in question.
-
While authentication screen and the main endpoint UI can have different themes the web contents directory is always common.
-
Sandboxed authentication UI (used during account association or during translation profile wizard run) uses the same theme as the endpoint’s main authentication UI.
-
Confirmation screen shown after email confirmation uses the default theme or the one configured separately with the
unityServer.core.confirmationUIThemeoption. -
Templates used for generating generic server-wide error pages (e.g. 404 - page not found) are always using a template defined in the
defaultWebContentDirectory.
12.1.1. Preparing a custom theme
Each theme is placed in a separate subdirectory of the VAADIN/themes folder (placed in the web contents directory
as described above). Subdirectory must be named as the style. Unity uses the styles.css file in the theme directory
as the web interface style. If the styles.css is not found but there is a styless.scss file then it is
compiled on the fly to CSS and used. This later scenario is not suggested for production, see below how to compile the
theme.
Distribution contains one production theme called unityThemeValo which is based on the Vaadin’s Valo theme (Vaadin
is underlying technology of the Unity’s web interface). Usage of the Valo theme as the base is not mandatory,
but highly preferred and easiest choice. Valo theme is highly configurable and can be customized to a large degree.
Valo theme is documented here is: https://vaadin.com/valo and API is documented https://vaadin.com/api/valo/ .
There is also one example theme called customTheme.
Both of them are based on SASS partial placed in the common directory. unityThemeValo is simply reusing the
whole partial as-is. customTheme is introducing several small changes as disabling the
blue background of the top bar and displaying a Unity logo there.
Strongly suggested structure of a theme is using two SCSS files: styles.scss (this name is mandatory)
and STYLE-NAME.scss. The first file should merely include the definitions from the second file allowing to
store the style in properly named file.
Typically the custom theme should be created basing on the customTheme example:
-
create a theme folder under
VAADIN/themese.g.myTheme -
create
myTheme/styles.scss,myTheme/favicon.icoandmyTheme/myTheme.scssbasing on the custom theme as template. -
introduce changes in the
myTheme/myTheme.scss
The exampleTheme contains a lot of comments which should help to understand the structure. In case when large changes
are introduced it might be easier to copy the common partial and modify it directly.
12.1.2. Compiling SASS theme
Manual compilation of a theme is a suggested approach as it improves server performance and allow to detect syntax errors early.
Unity provides a simple command line utility that compiles a given theme.
$> unity-idm-scss-compile conf/VAADIN/themes/myTheme
The sole argument to the utility is a directory with the source styles.scss file.
12.2. Customizing the template of web pages
Unity uses a Freemarker template engine to produce a web page. By default the whole visible contents of this page is generated by Vaadin framework and this contents can not be manipulated (besides styling described above and system configuration allowing for many customization).
However, the main interface can be wrapped with custom decorations. For instance it is possible to add a foot bar with logos of partners of the infrastructure using Unity.
12.2.1. Structure of a template
The default template looks as follows:
<!DOCTYPE html>
<html>
  <head>
    <#include "system/header-mandatory.ftl">

    <#include "system/header-std.ftl">
  </head>

  <body>

    <#assign appId="main-element">
    <#include "system/body-main-ui.ftl">
    <#include "system/body-mandatory-end.ftl">

  </body>
</html>
The statements including system/header-mandatory.ftl and system/body-mandatory-end.ftl files as well as
the assign instruction are mandatory and must be enclosed in the HTML head and body parts as in the default file.
The include of the system/header-std.ftl is not mandatory. It can be replaced with custom contents. The default
file sets a web page title (if defined by the UI), the favicon and size of the page.
Also other header elements, as keywords can be inserted.
The body defines first a variable with HTML id of the root div element where Unity displays its contents.
The subsequent include simply creates this element (it is empty as will be filled by Unity JavaScript code).
The final include adds a code necessary to load the Unity contents and is mandatory.
The modifications of the body part typically will include additional HTML code before and/or after the
system/body-main-ui.ftl include. Optionally this include can be removed, but then a div element with
the same id as defined in the appId must be inserted somewhere.
Of course also the full power of the Freemarker template engine is available, as documented at: http://freemarker.org/docs/dgui.html
Example template with a simple header and footer added:
<!DOCTYPE html>
<html>
  <head>
    <#include "system/header-mandatory.ftl">

    <#include "system/header-std.ftl">
  </head>

  <body>

    <#assign appId="main-element">

    <div style="background-color: blue;">CUSTOM HEADER</div>
    <#include "system/body-main-ui.ftl">
    <div style="background-color: blue;">UNITY ROCKS!</div>

    <#include "system/body-mandatory-end.ftl">

  </body>
</html>
12.2.2. Configuration settings
Modification of the default template influences all UIs of Unity. However, it is possible to use different
templates for every endpoint, what is configured with the unity.endpoint.web.template setting.
There are also options to set templates for the shared (not endpoint specific UIs), as the email confirmation screen. See the main server reference documentation: General server configuration.
12.3. Controlling translation of messages
Unity offers internationalization (i18) features out of the box. However, the list of available languages
is hardcoded and currently includes only English (en), Polish (pl) and German (de) locales. English locale is
the default one and all default messages are in this language. Couple of other translations are mostly complete with the
exception of the Admin Console which is English only.
Administrator can configure which of the supported languages are enabled
(see unityServer.conf documentation for up to date list of allowed ones in General server configuration).
If you would like to have other locale supported please contact us via the mailing list - there is no problem to add them or to allow for admin-configured locales outside from those predefined in distribution. We also use Weblate at https://hosted.weblate.org/projects/unity-idm for collecting open source improvements to existing translations.
Actual translations are fully controlled by Unity administrator.
In the i18n/ subfolder of the configuration directory a copy of all system messages is stored.
It is possible to change any of the messages which are stored there, also including translations.
Files are grouped in several directories; the structure of those directories is hardcoded and can not be modified.
In each directory there is one message.properties file with default values (the default is simply English) and
arbitrary number of files message_LC.properties, where LC is a code of a locale of the translation.
It is important to note how language-wise resolving of messages follows. For each message key and locale, Unity searches for the message value in the following order:
-
locale specific file in the configuration directory
-
default locale file in the configuration directory
-
locale specific, packaged translation (can not be modified)
-
default locale, packaged translation (can not be modified)
Note that initially (until any custom reconfigurations are performed) the two last options are the same as the two first.
| It is advised not to modify the default messages in place, as during subsequent updates those modifications may be lost, or, depending on update mode, the updated default messages may be ignored during update. Instead a separate directory may be configured for customized translations, while the default i18n directory is used for the reference only. |
What is more Unity allows for providing all names, descriptions and other texts which are end-user oriented and configurable by administrator in multiple languages. The user interface shows a small flag on right-top edge of each translatable component. After expanding the component, the translations in all enabled languages can be provided.
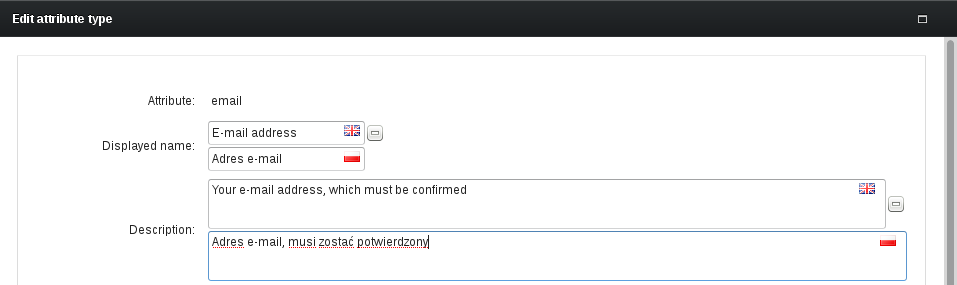
13. Integration of 3rd party Identity Providers
Unity can use external services to authenticate its own clients. This way Unity can act as an authentication hub (many authentication options are offered in a single place) and as an authentication bridge (Unity client can use different authentication protocol then the protocol of the upstream IdP).
External IdPs are configured as specialized authenticators which outsource credential verification to the upstream service. So this section treats about the configuration of external authenticators.
Data from external IdPs is accessed in a protocol specific way. The configuration of this part is described in the following subsections. After the protocol specific part, a common process for all external IdP types take place: translation of the obtained data to the internal Unity representation. This "mapping" can handle both semantical and syntactical differences of the identity-related information. Configuration of this process is described in Input translation.
13.1. LDAP
- Credential verificator name
-
ldapandldap-cert - Compatible credentials
-
passwordandX.509 certificate
LDAP based authentication allows for outsourcing credential verification to a server talking with the LDAP protocol, as OpenLDAP or Active Directory.
To configure LDAP authentication a server address must be provided as well as some information regarding the LDAP directory schema. The amount of options varies depending on the amount of information that should be retrieved from LDAP.
The typical authenticator’s configuration will look as follows:
unityServer.core.authenticators.x.authenticatorName=ldapWeb
unityServer.core.authenticators.x.authenticatorType=ldap
unityServer.core.authenticators.x.verificatorConfigurationFile=conf/authenticators/ldap.properties
unityServer.core.authenticators.x.retrievalConfigurationFile=conf/authenticators/passwordRetrieval-ldap.json
LDAP communication can be set up in several different ways:
-
All operations are performed as the user who is authenticating itself. It is a default mode, the
userDNTemplateproperty needs to be defined to make it working: login username is used as a part of the DN template. -
In many cases the ordinary users are not authorized to perform all required LDAP searches. In such case the system user identity must be set up using
ldap.systemDNandldap.systemPasswordproperties. Additionally Unity must be instructed to use it by settingldap.bindAs=system. In this mode the only operation performed with the user’s identity is the bind operation used to check user’s password. -
In some cases it may happen that username (as entered in the login process) is not a part of DN in the LDAP tree. In such case the DN must be found first. To use this mode one has to set
ldap.userDNSearchKey=SOME_KEYproperty and define an extra search specification under the keySOME_KEY. To make it working also the system user credentials must be set up as the initial search must be run as the system user, regardless of the further operations governed by theldap.bindAssetting. -
If LDAP attributes should not be anyhow imported/processed or can not be read due to authorization constraints then the
ldap.authenticateOnly=trueoption can be set.
Let’s consider an (complex) example of a configuration of the LDAP verificator
in file conf/authenticators/ldap.properties:
ldap.servers.1=localhost
ldap.ports.1=389
ldap.userDNTemplate=cn={USERNAME},ou=users,dc=unity-example,dc=com
ldap.attributes.1=cn
ldap.attributes.2=sn
ldap.groupsBaseName=dc=unity-example,dc=com
ldap.groups.1.objectClass=posixGroup
ldap.groups.1.memberAttribute=memberUid
ldap.groups.1.matchByMemberAttribute=cn
ldap.groups.1.nameAttribute=cn
ldap.groups.2.objectClass=groupOfNames
ldap.groups.2.memberAttribute=member
ldap.groups.2.nameAttribute=cn
In this example a single LDAP server is configured (also alternative addresses may be added
to take advantage of LDAP high availability deployment if it is set up): localhost:389.
The login name which is presented for authentication is converted to an LDAP DN using a template
expression. Thanks to it the user needs not to enter the full DN.
The two attributes (cn and sn) are going to be retrieved for the user.
Finally there are two group definitions, configuring how to extract group membership from LDAP.
In this case the LDAP server stores groups as separate tree nodes which contains group
members as values of a designated attribute.
In the both cases the groups are searched under the LDAP tree node dc=unity-example,dc=com. In the first
case the group objects have the class posixGroup. Members are listed as values of the memberUid attribute.
What is more the values are not the full DNs of the members but only their cn attributes. The
group’s short name is in its cn attribute. The 2nd group definition is similar but another
object class is used (groupOfNames), members are in other attribute (members) and are given
with their full DNs.
In some cases the above approach which retrieves group membership and user’s attributes from LDAP is not enough.
It may happen that additional attributes, which should be assigned to the user inside Unity, are placed in
other branches of the LDAP tree. To solve this problem it is possible to configure arbitrary number of additional
custom LDAP attribute searches. Results of those searches will be added to the regular user’s attributes. Let’s consider
an example where user is member of several groups, each group has its gidNumber attribute set and we want to have
a gidNumber attribute assigned to user in Unity. The following snippet should be added to configuration:
ldap.additionalSearch.1.baseName=dc=groups,dc=unity-example,dc=com
ldap.additionalSearch.1.filter=(memberUid={USERNAME})
ldap.additionalSearch.1.selectedAttributes=gidNumber
In the above example it is assumed that all groups are found under the dc=groups,dc=unity-example,dc=com node and
each group has its members listed with the memberUid attribute. Of course the filter expression
may be arbitrary complex.
The complete LDAP options reference follows:
| Property name | Type | Default value / mandatory | Description |
|---|---|---|---|
--- General settings --- |
|||
|
list of properties with a common prefix |
- |
List of attributes to be retrieved. If the list is empty then all available attributes are fetched. |
|
[true, false] |
|
If true then the user is only authenticated and no LDAP attributes (including groups) are collected for the user. This is much faster but maximally limits an information imported to Unity. |
|
[user, system, none] |
|
Fundamental setting controlling how Unity interacts with the LDAP server. By default Unity binds to the LDAP server as the user who is being authenticated by Unity. This may be changed to use a predefined user (system or unity user) and password. Then the credentials provided by the user are only compared if are genuine, but all searches (and LDAP authorization) is run as the designated system user. In this mode, the system user’s DN, password and user’s password attribute must be configured. The |
|
[plain, SSL, startTLS] |
|
It can be controlled whether a connection to teh server should be made using a plain socket, over SSL socketor over a socket with START TLS after handshake. |
|
list of properties with a common prefix |
- |
List of redundant LDAP server ports. The ports must match their corresponding servers. |
|
integer >= 0 |
|
Number of referrals to follow. Set to 0 to disable following referrals. |
|
integer number |
|
Maximum amount of entries that is to be loaded.If the limit is exceeded the query will fail. The LDAP server might have stricter limit. |
|
integer number |
|
Amount of time (in seconds) for which a search query may be executed. Note that depending on configuration there might be up to two queries performed per a single authentication. The LDAP server might have stricter limit. |
|
list of properties with a common prefix |
- |
List of redundant LDAP server hostnames. Use only one if there is no redundancy. |
|
integer >= 0 |
|
Number of milliseconds the network operations (connect and read) are allowed to lasts. Set to 0 to disable the limit. |
|
string |
- |
Relevant and mandatory only if bindAs is set to system or when using custom user search. The value must be the DN of the system user to authenticate as before performing any queries. |
|
string |
- |
Relevant and mandatory only if bindAs is set to system. The value must be the password of the system user to authenticate as before performing any queries. |
|
string |
|
Name of a translation profile, which will be used to map remotely obtained attributes and identity to the local counterparts. The profile should at least map the remote identity. |
|
[true, false] |
|
Used only when TLS mode is enabled. If true then the secured TLS protocol will accept any server’s certificate. If false - then the truststore must be configured. |
|
string |
- |
Truststore name used to configure client’s trust settings for the TLS connections. |
|
string |
- |
A key of one of the advanced search definitions. The search must be defined and must return a single entry. The DN of this entry will be treated as a DN of the user being authenticated. This is useful when the username is not present in the user’s DN or when users can have different DN templates. Using this mode is slower then userDNTemplate. Mutually exclusive with userDNTemplate and at least one of them must be defined. To use this mode the systemDN and systemPassword must be also set to run the initial search. |
|
string |
- |
Template of a DN of the user that should be used to log in. The tempalte must possess a single occurence of a special string: {USERNAME}. The username provided by the client will be substituted. Mutually exclusive with userDNSearchKey and at least one of them must be defined. |
|
string |
- |
This setting is mainly useful when searching for users whose name is given as X.500 name (a DN). If defined must contain a regular expression (Perl style) with a single matching group. This regular expression will be applied for the username provided to the system, and the contents of the matching group will be used instead of the full name, in the {USERNAME} variable. For instance this can be used to get uid attribute value from a DN. |
|
string |
|
Standard LDAP filter of valid users. Even the users who can authenticate but are not matching this filter will have access denied. IMPORTANT: if the authenticateOnly mode is turned on, this setting is ignored. |
--- Group retrieval settings --- |
|||
|
[true, false] |
|
If enabled then user’s groups are searched at LDAP server using advanced filter. This is much faster however can fail when group member is specified as a DN and not by some siple attribute. |
|
Structured list |
- |
Group definitions should be defined under this prefix. |
|
string |
- |
If this attribute is defined then it is assumed thet the members in the group entry are given with values of a single attribute (e.g. uid), not with their full DNs. This property defines this attribute (should be present on the user’s entry for which groups are searched). |
|
string |
mandatory to be set |
Group’s entry attribute with group members. Usually something like member. |
|
string |
- |
Group’s entry attribute with group’s name. If undefined then the whole DN is used. |
|
string |
mandatory to be set |
Object class of the group. |
|
string |
- |
Base DN under which all groups are defined. Groups need not to be immediatelly under this DN. If not defined, then groups are not searched for the membership of the user. |
|
string |
- |
User’s attribute name which contains groups of the user, usually something like memberOf. If not defined then groups are not extracted from the user’s entry (but might be retrieved by scanning all groups in the LDAP tree). |
|
string |
- |
If user’s attributes are read from memberOf (or alike) attribute, then this property may be used to extract the actual group name from its DN. If undefined then the DN will be used as group’s name. If defined then the group’s name will be the value of the attribute in the group’s DN with a name defined here. |
--- Advanced attribute search settings --- |
|||
|
Structured list |
- |
Advanced attribute searches can be defined with this prefix. |
|
string |
mandatory to be set |
Base DN for the search. The value can include a specialstring: {USERNAME}. The username provided by the client will be substituted. |
|
string |
mandatory to be set |
Filter in LDAP syntax, to match requested entries. The filter can include a specialstring: {USERNAME}. The username provided by the client will be substituted. |
|
[one, sub, base, subordinate] |
|
LDAP search scope to be used for this search. |
|
string |
- |
Space separated list of attributes to be searched. Attributes from the query will have all values unified from all returned entries by the query.Duplicate values will be removed and finally attributes will be added to the set of the standard attributes of the principal. |
13.2. LDAP with certificate-based authentication
- Credential verificator name
-
ldap-cert - Compatible credentials
-
X.509 certificate
The ldap-cert verification mechanism shares the same features as the ldap mechanism described above.
The only difference is that ldap-cert can be used with certificates which were checked on the transport layer (TLS).
Naturally the password is not checked in this case (as user does not provide any password), and only the certificate’s
subject is searched in LDAP and the attributes are assembled.
To use this verificator all the settings of the classic ldap verificator can be used, however the following
rules must be kept in mind:
-
The
{USERNAME}variable (used in configuration) is substituted with a full subject name (DN) of the user’s certificate. -
The LDAP configuration must use the
ldap.bindAs=systemsetting with all the consequences (binding as user is not possible without the password). -
In the
ldap.authenticateOnly=truemode it is only checked if the user is present in the LDAP database. -
The returned identity (as used in an input translation profile) is the LDAP distinguished name of the principal not the DN of the certificate. The DN of the certificate is available as an attribute in the translation context.
13.3. External SAML IdP
- Credential verificator name
-
saml2 - Compatible credentials
-
SAML tokens
|
The SAML integration can be very challenging, as the protocol is enormously complex. We advise to read the SAML HOWTO |
External SAML authentication module allows for authenticating the Unity’s client with the external SAML identity provider as Shibboleth IdP or any other SAML 2 compliant service. Attributes of the authenticated user can be as well obtained and mapped to the local database.
Currently the two most popular SAML2 bindings are supported: HTTP Post, HTTP Redirect and PAOS. PAOS (used for SAML ECP authentication of non-web browser clients) is configured as an endpoint: SAML PAOS Enhanced Client or Proxy (ECP) endpoint.
The remote SAML callout is configured with a list of trusted SAML identity providers. If more then one trusted provider is defined, then a user can select his/her home provider. As each provider features can be different nearly all settings are specified per provider.
|
You can alternatively configure the trusted IdPs with your federation’s metadata. Consult the reference table below for the list of the settings or the SAML Howto for examples. |
Let’s consider an example with two remote IdPs:
unity.saml.requester.requesterEntityId=https://unity.example.com/unitygw/saml-sp-metadata/metadata-main
unity.saml.requester.metadataPath=metadata-main
unity.saml.requester.requesterCredential=MAIN
unity.saml.requester.acceptedNameFormats.1=urn:oasis:names:tc:SAML:2.0:nameid-format:persistent
unity.saml.requester.acceptedNameFormats.2=urn:oasis:names:tc:SAML:1.1:nameid-format:emailAddress
unity.saml.requester.acceptedNameFormats.3=urn:oasis:names:tc:SAML:2.0:nameid-format:transient
unity.saml.requester.displayName=Remote SAML authentication

unity.saml.requester.remoteIdp.1.name=Simple SAMLPHP in Rohan
unity.saml.requester.remoteIdp.1.address=https://idp.example2.com:8080/simplesaml/saml2/idp/SSOService.php
unity.saml.requester.remoteIdp.1.binding=HTTP_REDIRECT
unity.saml.requester.remoteIdp.1.samlId=https://idp.example2.com:8080/simplesaml/saml2/idp/metadata.php
unity.saml.requester.remoteIdp.1.certificate=ROHAN_IDP
unity.saml.requester.remoteIdp.1.groupMembershipAttribute=urn:oid:1.3.6.1.4.1.5923.1.1.1.1
unity.saml.requester.remoteIdp.2.requestedNameFormat=urn:oasis:names:tc:SAML:2.0:nameid-format:transient
unity.saml.requester.remoteIdp.1.translationProfile=samlProfile

unity.saml.requester.remoteIdp.2.name=Shibboleth IdP in Gondor
unity.saml.requester.remoteIdp.2.address=https://idp.example2.com/idp/profile/SAML2/Redirect/SSO
unity.saml.requester.remoteIdp.2.binding=HTTP_POST
unity.saml.requester.remoteIdp.2.samlId=https://idp.example2.com/idp/shibboleth
unity.saml.requester.remoteIdp.2.certificate=GONDOR_IDP
unity.saml.requester.remoteIdp.2.translationProfile=samlProfile
The first part of the configuration provides the general settings: metadata (see below), credential used to sign contents, accepted name formats and the displayed name of the authentication option for the user interface. A configuration of two IdPs follows.
Both IdPs shares the same translation profile (common approach when the IdPs are from a single federation with agreed attributes profile), however the first IdP is configured to use HTTP Redirect binding, while the later the HTTP POST. The certificates are mandatory to verify responses, and are the fundamental element of the whole authentication to ensure proper trust and therefore security.
The first IdP has also two advanced options set: it is defined which attribute is used as a group attribute and a requested name format is fixed (in the latter case the IdP is free to choose).
The complete SAML authenticator configuration reference follows:
| Property name | Type | Default value / mandatory | Description |
|---|---|---|---|
--- Common settings --- |
|||
|
list of properties with a common prefix |
- |
If defined then specifies what SAML name formatd are accepted from IdP. Useful when the property requestedNameFormat is undefined for at least one IdP. |
|
[true, false] |
|
Default setting allowing to globally control whether account association feature is enabled. Used for those IdPs, for which the setting is not set explicitly. |
|
string |
- |
Default setting of requested identity format. Used for those IdPs, for which the setting is not set explicitly. |
|
[true, false] |
|
Default setting of request signing. Used for those IdPs, for which the setting is not set explicitly. |
|
Structured list |
- |
Prefix used to store mappings of SAML identity types to Unity identity types. Those mappings are used to reverse the mapping process of remote identity mapping into Unity representation (as configured with an input translation profile). This is used solely to provide a single logout functionality, where remote peer may request to logout an identity previously authenticated. Unity needs to be able to find this person’s session to terminate it. |
|
string |
mandatory to be set |
Unity identity to which the SAML identity is mapped. If it is set to an empty value, then the mapping is disabled, what is useful for turning off the default mappings. |
|
string |
mandatory to be set |
SAML identity to be mapped |
|
string |
- |
Local credential, used to sign requests and to decrypt encrypted assertions. If neither signing nor decryption is used it can be skipped. |
|
string |
mandatory to be set |
SAML entity ID (must be a URI) of the local SAML requester (or service provider). |
|
[true, false] |
|
SAML authN responses may be signed as a whole and/or may have signed individual assertions which are contained in the response. In general SAML SSO protocol requires assertions to be signed, but in the wild this is not always the case. If this optionis set to false, then response will be accepted also when it is signed, but its assertions are not. |
|
string |
- |
Last element of the URL, under which the SAML Single Logout functionality should be published for this SAML authenticator. Any suffix can be used, however it must be unique for all SAML authenticators in the system. If undefined the SLO functionality won’t be enabled. |
|
string |
- |
Name of the authentication realm of the endpoints using this authenticator. This is needed to enable Single Logout functionality (if undefined the SLO functionality will be disabled). If this authenticator is used by endpoints placed in different realms and you still want to have SLO functionality you have to define one authenticator per realm. |
--- Configuration read from trusted SAML metadata --- |
|||
|
Structured list |
- |
Under this prefix you can configure the remote trusted SAML IdPs however not providing all their details but only their metadata. |
|
string |
- |
If set then the given truststore will be used for HTTPS connection validation during metadata fetching. Otherwise the default Java trustststore will be used. |
|
string |
- |
Deafult registration form for all the IdPs from the metadata. Can be overwritten by individual IdP configuraiton entries. |
|
string |
- |
Deafult translation profile for all the IdPs from the metadata. Can be overwritten by individual IdP configuration entries. |
|
integer number |
|
How often the metadata should be reloaded. |
|
[require, ignore] |
|
Controls whether metadata signatures should be checked. If checking is turned on then the validation certificate must be set. |
|
string |
- |
Name of certificate to check metadata signature. Used only if signatures checking is turned on. |
|
string |
mandatory to be set |
URL with the metadata location. Can be local or HTTP(s) URL. In case of HTTPS the server’s certificate will be checked against the main Unity server’s truststore only if httpsTruststore is set. |
--- Manual settings of trusted IdPs --- |
|||
|
Structured list |
- |
With this prefix configuration of trusted and enabled remote SAML IdPs is stored. There must be at least one IdP defined. If there are multiple ones defined, then the user can choose which one to use. |
|
string |
- |
Address of the IdP endpoint. |
|
[HTTP_REDIRECT, HTTP_POST, SOAP] |
|
SAML binding to be used to send a request to the IdP. If you use SOAP here then the IdP will be available only for ECP logins, not via the web browser login. |
|
string |
- |
Certificate name (as used in centralized PKI store) of the IdP. This certificate is used to verify signature of SAML response and included assertions. Therefore it is of highest importance for the whole system security. |
|
list of properties with a common prefix |
- |
Using this property additional trusted certificates of an IdP can be added (when IdP uses more then one). See certificate for details. Those properties can be used together or alternatively. |
|
[true, false] |
- |
If true then unknown remote user gets an option to associate the remote identity with an another local (already existing) account. Overrides the global setting. |
|
string |
- |
Defines a SAML attribute name which will be treated as an attribute carrying group membership information. |
|
string can have subkeys |
- |
Displayed logo of the IdP. If not defined then only the name is used. The value can be a file:, http(s): or data: URI. The last option allows for embedding the logo in the configuration. The property can have subkeys being locale names; then the localized value is used if it is matching the selected locale of the UI. |
|
string can have subkeys |
- |
Displayed name of the IdP. If not defined then the name is created from the IdP address (what is rather not user friendly). The property can have subkeys being locale names; then the localized value is used if it is matching the selected locale of the UI. |
|
string |
- |
Address of the IdP Single Logout Endpoint supporting HTTP POST binding. |
|
string |
- |
Address of the IdP Single Logout response endpoint supporting HTTP POST binding. If undefined the base redirect endpoint address is used. |
|
string |
- |
Address of the IdP Single Logout Endpoint supporting HTTP Redirect binding. |
|
string |
- |
Address of the IdP Single Logout response endpoint supporting HTTP Redirect binding. If undefined the base redirect endpoint address is used. |
|
string |
- |
Name of a registration form to be shown for a remotely authenticated principal who has no local account. If unset such users will be denied. |
|
string |
- |
If defined then specifies what SAML name format should be requested from the IdP. If undefined then IdP is free to choose, however see the acceptedNameFormats. property. Value is arbitrary string, meaningful for the IdP. SAML specifies several standard formats: |
|
string |
mandatory to be set |
SAML entity identifier of the IdP. |
|
[true, false] |
|
Controls whether the requests for this IdP should be signed. |
|
string |
- |
Address of the IdP Single Logout Endpoint supporting SOAP binding. |
|
string |
|
Name of a translation profile, which will be used to map remotely obtained attributes and identity to the local counterparts. The profile should at least map the remote identity. |
--- SAML metadata settings --- |
|||
|
string |
- |
Last element of the URL, under which the SAML metadata should be published for this SAML authenticator.Used only if metadata publication is enabled. See the SAML Metadata section for more details. |
|
filesystem path |
- |
If undefined then metadata is automatically generated. If this option is defined, then it should contain a file path, to a file with custom metadata document. This document will be published as-is, however it will be checked first for correctness. |
|
[true, false] |
|
Controls whether the SAML Metadata should be published. |
|
[true, false] |
|
Controls whether the SAML Metadata should be automatically signed before publishing it. If a publication of a custom matadata from file is confiured which is already signed, do not turn this option on, as then metadata will be signed twice. |
13.3.1. SAML Metadata support
Many SAML services rely on the SAML Metadata format to configure trusted SAML agents. This can be done manually by creating and distributing such data out of bands, but Unity also allows to:
-
Automatically generate the metadata from the internal configuration.
-
Publish the metadata (generated or manually provided) so it can be downloaded.
-
Sign the metadata, both the generated or manually provided, before it is published.
Configuration reference provides the Metadata related settings. The metadata of an authenticator is published
under the path /unitygw/saml-sp-metadata/NAME, where NAME is configurable with the
unity.saml.requester.metadataPath property and is used to distinguish the metadata of
different SAML authenticators (as it is possible to configure more then one).
13.3.2. SAML specific information in translation profile
If the authentication response returned by the remote IdP contains the AuthnContextClassRef element, then its
value will be provided in the translation profile, under an attribute with a well known name: authnContextClassRef.
13.4. Standard OAuth2 (Unity as OAuth Client)
- Credential verificator name
-
oauth2 - Compatible credentials
-
OAuth2 tokens
The typical authenticator’s configuration will look as follows:
unityServer.core.authenticators.x.authenticatorName=oauthWeb
unityServer.core.authenticators.x.authenticatorType=oauth2
unityServer.core.authenticators.x.verificatorConfigurationFile=conf/authenticators/remoteOAuth.properties
Let’s consider an example of a configuration of the OAuth2 verificator
in file conf/authenticators/remoteOAuth.properties:
unity.oauth2.client.displayName=OAuth2 authentication

unity.oauth2.client.providers.fb.type=facebook
unity.oauth2.client.providers.fb.clientId=UNITY_APP_ID_FROM_FACEBOOK
unity.oauth2.client.providers.fb.clientSecret=UNITY_APP_SECRET_FROM_FACEBOOK

unity.oauth2.client.providers.google.type=google
unity.oauth2.client.providers.google.clientId=UNITY_APP_ID_FROM_GOOGLE
unity.oauth2.client.providers.google.clientSecret=UNITY_APP_SECRET_FROM_GOOGLE
unity.oauth2.client.providers.google.scopes=profile openid email
unity.oauth2.client.providers.google.translationProfile=googleProfile
In the above example two providers are configured: Facebook and Google. Facebook is configuraed with default settings which are most of the time sufficient: you have to select provider’s type ad provide OAuth client’s id and secret. In the 2nd example some of the default values are overriden for Google provider. See reference below for a complete list of fine-tuning options you can use.
| ORCID identity provider is supported, but its profile returns a super complex user information record. Unity doesn’t provide an out of the box input translation profile for ORCID yet, one must be always manually created. For Orcid the attrObj contrrust is very useful to traverse complex JSON data returned in the input profile rules. |
You can select among several providers for which we have a predefined type, or use the custom type, where nearly arbitrary
standards compliant OAuth identity provider can be configured.
Typically Unity service needs to be registered as a trusted application at the providers service.
Note that in some cases it may require paid account. During the registration a client identifier and secret
are generated, which need to be configured in Unity (clientId and clientSecret). What’s more the provider
typically should require to enter the client’s callback URL. For Unity it will be:
https://YOUR-EXTERNAL-UNITY-ADDRESS/unitygw/oauth2ResponseConsumer
Links to client management pages of some of the well known providers:
-
Microsoft Live: https://account.live.com/developers/applications
-
Facebook: https://developers.facebook.com
As with every remote authenticator a translation profile is used to map external data to local representation. Unity is shipped with default profiles for the supported providers, but you can use your own. Typically custom profile inherits rules from the base one and enriches or overwrites them with custom settings.
Finally you can override some of the default settings for the provider. The most useful is the scopes setting:
it controls how much of the information is requested to be fetched from the provider (of course the user must agree
to provide this level of access). Each provider uses different names for scopes so please check up
providers documentation to learn the available values.
The complete OAuth options reference follows. First a general table shows what are the options pertaining to the whole authenticator, then a separate table shows the options which can be set for each OAuth2 provider.
| Property name | Type | Default value / mandatory | Description |
|---|---|---|---|
|
[true, false] |
|
Default setting allowing to globally control whether account association feature is enabled. Used for those providers, for which the setting is not set explicitly. |
|
Structured list can have subkeys |
mandatory to be set |
Prefix, under which the available oauth providers are defined. |
| Property name | Type | Default value / mandatory | Description |
|---|---|---|---|
|
string |
- |
Location (URL) of OAuth2 provider’s access token endpoint. In case of OpenID Connect mode can be discovered, otherwise mandatory. |
|
[standard, httpParams] |
|
Some providers (Facebook) use legacy format of a response to the access token query. Non standard format can be set here. |
|
string |
- |
Location (URL) of OAuth2 provider’s authorization endpoint. It is mandatory for non OpenID Connect providers, in whose case the endopint can be discovered. |
|
[secretPost, secretBasic] |
|
Defines how the client secret and id should be passed to the provider. |
|
[secretPost, secretBasic] |
- |
Defines how the client secret and id should be passed to the provider’s user’s profile endpoint. If not set the clientAuthenticationMode is used |
|
string |
mandatory to be set |
Client identifier, obtained during Unity’s registration at the provider |
|
string |
mandatory to be set |
Client secret, obtained during Unity’s registration at the provider |
|
[true, false] |
- |
If true then unknown remote user gets an option to associate the remote identity with an another local (already existing) account. Overrides the global setting. |
|
list of properties with a common prefix |
- |
Allows to specify non-standard, fixed parameters which shall be added to the query string of the authorization redirect request. format must be: PARAM=VALUE |
|
[NONE, WARN, FAIL] |
|
Controls how to react on the DNS name mismatch with the server’s certificate. Unless in testing environment should be left on the default setting. |
|
string |
- |
Name of the truststore which should be used to validate TLS peer’s certificates. If undefined then the system Java tuststore is used. |
|
[post, get] |
|
Http method used in query to profile endpoint |
|
string can have subkeys |
- |
URL to provider’s logo. Can be http(s), file or data scheme. Can be localized. |
|
string can have subkeys |
mandatory to be set |
Name of the OAuth provider to be displayed. Can be localized with locale subkeys. |
|
[true, false] |
|
If set to true, then the provider is treated as OpenID Connect 1.0 provider. For such providers specifying profileEndpoint is not needed as the basic user information is retrieved together with access token. However the discovery endpoint must be set. |
|
string |
- |
OpenID Connect Discovery endpoint address, relevant (and required) only when OpenID Connect mode is turned on. |
|
string can have subkeys |
- |
Location (URL) of OAuth2 provider’s user’s profile endpoint. It is used to obtain additional user’s attributes. It can be autodiscovered for OpenID Connect mode. Otherwise it should be set as otherwise there is bearly no information about the user identity. If not set then the only information about the user is the one extracted from the access token (if any). Additionally a subkeys can be added (.1, .2, …) if user attributes should be fetched from more then a single endpoint. |
|
string |
- |
Registration form to be shown for the locally unknown users which were successfuly authenticated remotely. |
|
string |
- |
Space separated list of authorization scopes to be requested. Most often required if in non OpenID Connect mode, otherwise has a default value of openid email |
|
string |
- |
Name of translation profile which will be used to map received user information to a local representation. |
|
[custom, google, facebook, dropbox, github, microsoft, microsoftAzureV2, orcid, linkedin, unity, intuit] |
|
Type of provider. Either a well known provider type can be specified or custom. In the first case only few additional settings are required: client id, secret and translation profile. Other settings as scope can be additionally set to fine tune the remote authentication. In the latter custom case all mandatory options must be set. |
13.5. Simple OAuth2 (Unity as OAuth Resource Provider)
- Credential verificator name
-
oauth-rp - Compatible credentials
-
OAuth2 access token
The standard OAuth authentication is the best choice whenever it is possible to use it. Unfortunately there are cases when it is not suitable, e.g. if the authentication of a non web browser based user/client shall be performed.
Unity can authenticate its clients by consuming an OAuth2 access token, more precisely the bearer access token as defined by the http://tools.ietf.org/html/rfc6750. The access token can be issued by a remote OAuth Authorization Server or by the local Unity instance.
As a remote access token validation is not defined in OAuth protocol and there is no well established standard currently, the verification method depends on the OAuth AS implementation. If you want to use another OAuth AS which is unsupported let us know.
The validation work as follows:
-
The access token is validated using a remote service. Usually this means: one HTTP GET to a token validation endpoint of a remote AS.
-
If the token is valid then another query to a profile endpoint at the OAuth AS is performed, to obtain information about the user initiated token generation.
Of course Unity supports caching the verification results.
| The current implementation authenticates the client in somewhat simplistic way: as the user who issued the access token. This approach called impersonation is not the best one as we loose the ability to distinguish the identity of the actual Unity client who is providing the access token. Therefore the current implementation of the OAuth RP authenticator will be modified in future to fully support a delegation approach, instead of impersonation. |
The typical authenticator’s configuration looks as follows:
unityServer.core.authenticators.x.authenticatorName=oauthRP-Rest
unityServer.core.authenticators.x.authenticatorType=oauth-rp
unityServer.core.authenticators.x.verificatorConfigurationFile=conf/authenticators/remoteOAuth-RP.properties
An example configuration of the OAuth2 RP verificator
in file conf/authenticators/remoteOAuth-RP.properties follows:
unity.oauth2-rp.verificationProtocol=mitre
unity.oauth2-rp.profileEndpoint=https://mitreid.org/userinfo
unity.oauth2-rp.verificationEndpoint=https://mitreid.org/introspect
unity.oauth2-rp.cacheTime=20
unity.oauth2-rp.clientId=unity
unity.oauth2-rp.clientSecret=unity-pass
unity.oauth2-rp.translationProfile=tr-oauth
In this example the demo MITRE service is configured. The first three lines are the most important:
the verification protocol is chosen and the validation and user profile endpoints are defined.
The clientId and clientSecret are obtained
at registration time (note that in this case there is bit of ambiguity in naming: the client mentioned her
in OAuth terminology is not is OAuth Resource Provider not the OAuth client). Finally a translation profile
is set to process the user’s information and to map it to a local representation.
The following table lists all currently implemented validation protocols:
| Validation protocol | Description |
|---|---|
|
Validates a token using the internal Unity’s database of tokens issued by its own OAuth AS endpoint. This method doesn’t require any endpoints to be defined. |
|
Validates a token using an external Unity OAuth AS endpoint. |
|
Validates a token using an external MITRE OAuth Authorization Server. |
A full reference of configuration parameters:
| Property name | Type | Default value / mandatory | Description |
|---|---|---|---|
|
integer >= 0 |
- |
Per-token validation result cache time in seconds. If unset then the cache time will be equal to the discovered token lifetime or to 60s if it is impossible to establish the lifetime. Set to zero to disable caching. |
|
[secretPost, secretBasic] |
|
Defines how the client access token should be passed to the AS. |
|
string |
- |
Defines how the client secret and id should be passed to the provider’s user’s profile endpoint. If not set the clientAuthenticationMode is used |
|
string |
- |
Client identifier, used to authenticate when performing validation. If not defined then only the access token is used to authorize the call. |
|
string |
mandatory to be set |
Client secret, used to authenticate when performing validation. If not defined then only the access token is used to authorize the call. |
|
[NONE, WARN, FAIL] |
|
Controls how to react on the DNS name mismatch with the server’s certificate. Unless in testing environment should be left on the default setting. |
|
string |
- |
Name of the truststore which should be used to validate TLS peer’s certificates. If undefined then the system Java tuststore is used. |
|
[post, get] |
|
Http method used in query to profile endpoint |
|
[true, false] |
|
If true then the profile is fetched from the profile endpoint with assumption that the server is working in the OpenID Connect compatible way. |
|
string |
- |
Location (URL) of OAuth2 provider’s user’s profile endpoint. It is used to obtain token issuer’s attributes. |
|
list of properties with a common prefix |
- |
Optional list of scopes which must be associated with the validated access token to make the authentication successful |
|
string |
- |
Name of a translation profile, which will be used to map remotely obtained attributes and identity to the local counterparts. The profile should at least map the remote identity. |
|
string |
- |
OAuth token verification endpoint address. |
|
[mitre, unity, internal] |
|
OAuth token verification is not standardised. Unity supports several protocols, you can set the proper one here. |
13.6. Host OS PAM (Pluggable Authentication Modules)
- Credential verificator name
-
pam - Compatible credentials
-
password
PAM based authentication allows for authenticating Unity users against host Operating System PAM facility. PAM is supported on Linux OS, and may be available also on other UNIXes. The integration is tested on Linux.
To be able to use host operating OS facilities, native access is required, which is beyond capabilities of the portable Java platform on which Unity is build. That said Unity should be able to access most popular Linux platforms out of the box without any additional configuration. Still we test the feature only on the Linux x86-64 platform. In case of runtime problems with native access (which should be pretty obvious in log file) please ask at mailing list.
PAM authenticator exposes the following user attributes after successful authentication, which can be used by a translation profile:
-
uidUNIX uid (number) -
gidUNIX primary gid (number) -
homehome directory path -
shellShell path -
name1st element of GECOS -
contact2nd element of GECOS -
home-phone3rd element of GECOS -
work-phone4th element of GECOS -
other5th element of GECOS
The username is provided as always in case of Unity in the special profile’s variable id. Similarly
supplementary group names are in the standard array variable groups
The typical authenticator’s configuration will look as follows:
unityServer.core.authenticators.x.authenticatorName=pamWeb
unityServer.core.authenticators.x.authenticatorType=pam
unityServer.core.authenticators.x.verificatorConfigurationFile=conf/authenticators/pam.properties
unityServer.core.authenticators.x.retrievalConfigurationFile=conf/authenticators/passwordRetrieval-pam.json
PAM access is configured by providing a name of PAM facility that should be used by Unity and input translation profile which should map information about authenticated user to Unity representation.
Example configuration in file conf/authenticators/pam.properties:
pam.facility=unity
pam.translationProfile=pam-profile
For such configuration Unity will authenticate against PAM using configuration from /etc/pam.d/unity file.
Please refer to PAM documentation for details on how to create such file. An example (which is mostly default local
authentication on Linux) can be similar to:
auth        required      pam_env.so
auth        sufficient    pam_unix.so nullok try_first_pass
auth        requisite     pam_succeed_if.so uid >= 1000 quiet_success
auth        required      pam_deny.so

account     required      pam_unix.so
account     sufficient    pam_localuser.so
account     sufficient    pam_succeed_if.so uid < 1000 quiet
account     required      pam_permit.so

password    requisite     pam_pwquality.so try_first_pass local_users_only retry=3 authtok_type=
password    sufficient    pam_unix.so sha512 shadow nullok try_first_pass use_authtok
password    required      pam_deny.so

session     required      pam_limits.so
-session     optional      pam_systemd.so
session     required      pam_unix.so
|
When using local file authentication in PAM (i.e. # setfacl -m u:unity-idm:r /etc/shadow |
The complete PAM options reference follows:
| Property name | Type | Default value / mandatory | Description |
|---|---|---|---|
|
string |
|
Name of PAM facility that should be used to authenticate users. Typically this is a filename in the pam.d directory. |
|
string |
- |
Name of a translation profile, which will be used to map remotely obtained attributes and identity to the local counterparts. The profile should at least map the remote identity. |
14. Consumer access: the endpoints
Endpoints make Unity features accessible to the outside world. There are several endpoint implementations (or types) and each of them can be deployed multiple times under different addresses with different settings. Such a deployed and configured endpoint type is simply called endpoint or endpoint instance.
Each endpoint supports a binding. Binding defines an access mechanism (e.g. SOAP Web Service or Web browser interface) and a technology in which it is programmed. Endpoints with the same binding share some basic configuration options.
Endpoints are configured in the main configuration file. An example endpoint definition:
unityServer.core.endpoints.1.endpointType=WebConsoleUI
unityServer.core.endpoints.1.endpointName=UNITY administration interface
unityServer.core.endpoints.1.contextPath=/console
unityServer.core.endpoints.1.endpointConfigurationFile=conf/console.json
unityServer.core.endpoints.1.endpointAuthenticators=oauth;passwordWithSMS
The endpoint instance configuration must specify the endpoint type (in the example it is WebConsoleUI), one
of the available ones. Each available endpoint has a separate subsection later on, which provide its
type name. The endpoint instance must be named (any string) - the name is displayed in various user interfaces.
Endpoint context path defines the first element of a server relative address of an endpoint. E.g. for the
above context path /console, all URLs of the endpoint instance will start with the URL
https://unity-hostname:unity-port/console/....
Endpoint configuration file is used to specify endpoint type-specific configuration, including the binding specific settings.
The final configuration element of all endpoints is the configuration of authentication flows. Endpoint can have many alternative authentication flows enabled. Names of those must be separated with semicolon. As a shortcut endpoint may have individual atuhenticators assigned instead of flows (or mixed with them). Assigning an authenticator will create an ad-hoc flow with a single factor authentication, with the authentication options of the authenticator.
In the above example the endpoint allows for choosing between two authentication methods: one will use a single
authenticator oauthWeb and another alternative will require authentication using authentication flow
passwordWithSMS, which most likely is defined to use 2FA.
14.1. Common options for endpoints
As it was mentioned there are options which are common for all endpoints with the same binding. Those options are presented here, the endpoint sections later on do not contain them.
For the REST endpoints the common options are:
| Property name | Type | Default value / mandatory | Description |
|---|---|---|---|
|
list of properties with a common prefix |
- |
List of headers allowed for the CORS requests. If undefined then all are enabled by defult. |
|
list of properties with a common prefix |
- |
List of origins allowed for the CORS requests. The complete set of HTTP methods is enabled for the enumerated resources. If the list is undefined then CORS support is turned off. |
Options reference for all Web (Vaadin) endpoints are as follows:
| Property name | Type | Default value / mandatory | Description |
|---|---|---|---|
|
Structured list |
- |
Definitions of grid widgets for presenting mass lists of authentication options are configured under this prefix. Can be referenced in column definitions by name. |
|
string |
mandatory to be set |
Contents of the grid. Similar syntax as column contents, but no special entry is allowed. Note that only some authenticators (basically those that offer one click login) are compatible with the grid - others (like password) are skipped. |
|
integer >= 2 |
|
Number of rows to be shown in the grid. |
|
string |
|
Advanced setting, typically should not be changed. Same syntax as column’s contents. Defines layout which is used when a single last used authN is presented (i.e. relevant only when authnShowLastOptionOnly is enabled). May be used to change spacing or add label. |
|
Structured list |
- |
Under this prefix are defined columns in which authenticators are organized. |
|
string |
mandatory to be set |
Contents of the column. Values are space separated names of authenticators or authentication options (e.g. oauthWeb or oauthWeb.google). All options whose (primary) authenticator name matches will be added to the column, in the order of provided. Additionally there are special values which can be also used: |
|
string can have subkeys |
- |
Message (can be localized) which will be displayed after the column, i.e. will become separator between this and the next column. Not used for the last column. |
|
string can have subkeys |
- |
Message (can be localized) which will be displayed at the top of the column. |
|
floating > 1.0 |
|
Width of the column, specified in |
|
string |
|
Sets URL of image that should be shown above all authentication options. |
|
Structured list |
- |
Under this prefix it is possible to define text separators, which can be referenced in column definitions. The separators are defined separately so that it is possible to provide international variants of the text, what would be difficult in inline in the column contents specification |
|
string can have subkeys |
- |
Separator’s message (can be localized). |
|
[true, false] |
|
If set to true then all authentication options configured for the edpoint will be added on the screen. If any of options is not explicitly enumerated, then it will be appended to the last column. |
|
[true, false] |
|
Whether to show a cancel button. This setting is relevant only on authentication screens which are not accessed directly (e.g. on IdP authentication screen after redirection from SP). |
|
[true, false] |
|
Whether to show a filter control, allowing to search for desred authentication option. Useful if many authentication options are allowed. Note that search will be only visible if at least one grid widget with authenticators is on the screen. |
|
string can have subkeys |
- |
Message (can be localized) which will be displayed above all authentication options. If unset a default message from message bundle will be used. Set to empty string to completely remove the title. |
|
[true, false] |
|
Used for returning users (who authenticated at least once before). If set to true only the previously used authentication option will be shown to the user (it will be still possible to reveal other ones by clicking special button). If set to false then this feature is turned off and users always see all available options. |
|
string |
- |
Overrides the default theme name as used for rendering the endpoint’s authentication screen contents. If undefined the same setting as for the main endpoint UI is used. |
|
[true, false] |
|
If set to true and the endpoint has a single authentication option configured and this option supports automated login (as remote SAML or OAuth login), then this option will be activated automatically, without presenting (or even loading) the authentication screen. |
|
[true, false] |
|
Controls if credential reset UI and outdated credential UI should use separate captions (false), or captions put as placeholders resembling authN UI (true). |
|
[true, false] |
|
Controls if registration option should be allowed for an endpoint. |
|
list of properties with a common prefix |
- |
Defines which registration forms should be enabled for the endpoint. Values are form names. If the form with given name doesn’t exist it will be ignored.If there are no forms defined with this property, then all public forms are made available. |
|
string |
- |
If set then registration links on the authentication screen are not showing any Unity-provided registration forms, but redirect straight to the given address. |
|
string |
- |
Overrides the default theme name as used for rendering the endpoint contents. |
|
[true, false] |
|
Displays the links with registration forms in the top right corner of page, if registration is configured. |
|
string |
|
The name of a Freemarker template, relative to templates directory, with a template of the endpoint web interface. Custom template can be used to add static header/footer etc. |
|
filesystem path |
- |
Defines a folder from which the endpoint will serve static content, configured locally. If undefined the default value from the server’s main configration is used. |
Currently there are no common options for Web Service endpoints.
14.2. Configuration of web authentication screen
Web endpoints (besides settings relevant for the particular type of the endpoint, what is covered below) share a number of common settings. Those settings control:
-
what (if any) registration possibilities are enabled for the endpoint
-
custom theme and web resources location for the endpoint (see Web interface customization and branding for details)
-
how to arrange authentication options on the authentication screen
The last point constitutes the majority of the configuration options. In principle the authentication options (provided by authenticators configured for the endpoint) can be arranged in one or more columns. By default all options are shown in a single column. This is fine with a single option, but when having more some fine tuning is often desired.
The following screenshot shows an authentication screen with a single column:
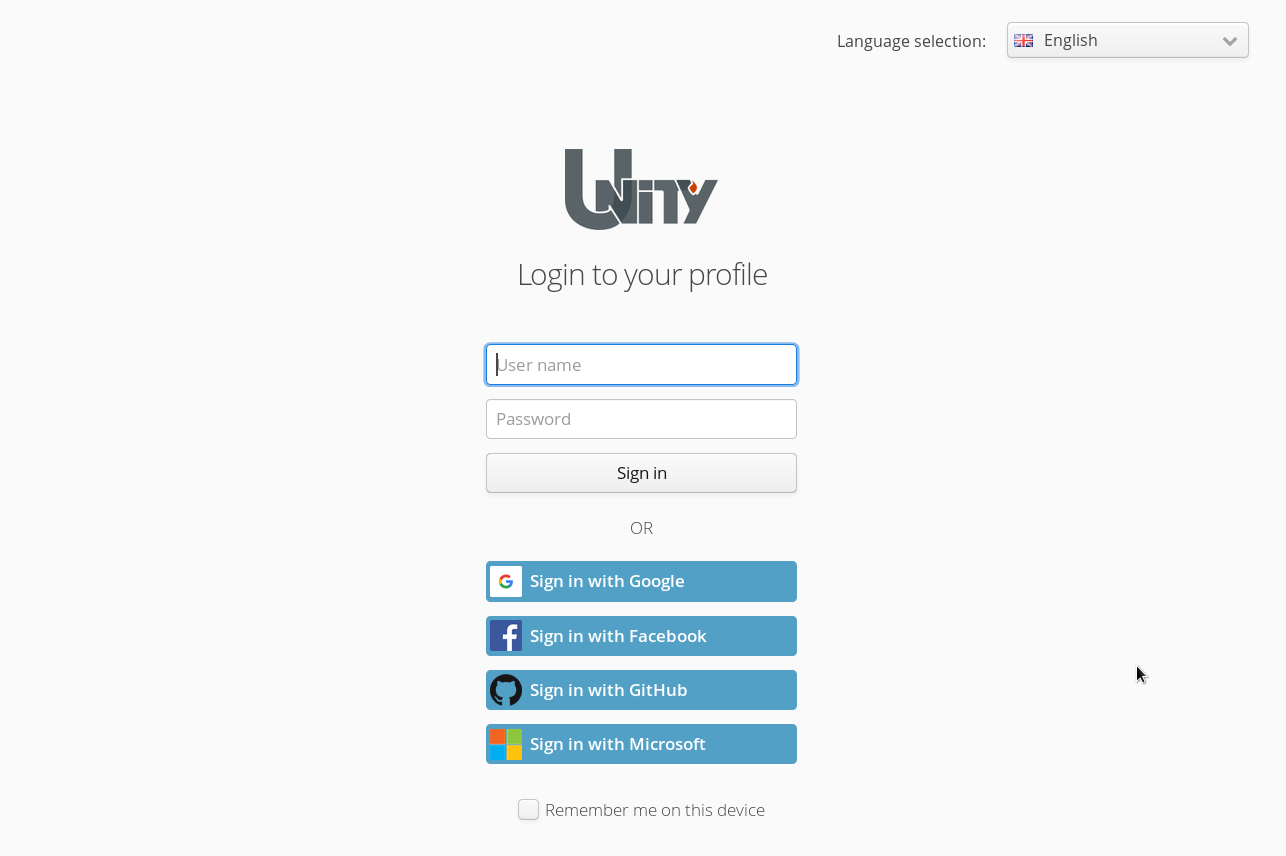
Configuration of the above example is as follows (note that it is also localized to Polish language):
unity.endpoint.web.authnScreenTitle=Login to your profile
unity.endpoint.web.authnScreenTitle.pl=Zaloguj się do zarządzania kontem
unity.endpoint.web.authnScreenShowAllOptions=false

unity.endpoint.web.authnScreenOptionsLabel.OR.text=OR
unity.endpoint.web.authnScreenOptionsLabel.OR.text.pl=LUB

unity.endpoint.web.authnScreenColumn.1.columnWidth=15
unity.endpoint.web.authnScreenColumn.1.columnContents=pwdWeb1 _SEPARATOR_OR oauthWeb.google oauthWeb.fb oauthWeb.gh oauthWeb.ms
When allowing access to a federation with many tens, or hundreds of authentication options, having all of them as individual entries would clutter the screen and make it loading very slowly. Therefore a special grid component is provided, which can be used to group many entries in a column. This is shown on the following example, using two columns.
Configuration of the example:
unity.endpoint.web.authnScreenTitle=Login to your profile
unity.endpoint.web.authnScreenShowSearch=true
unity.endpoint.web.authnScreenShowAllOptions=false

unity.endpoint.web.authnScreenOptionsLabel.OR.text=OR
unity.endpoint.web.authnScreenOptionsLabel.OR.text.pl=LUB

unity.endpoint.web.authnGrid.G1.gridContents=samlWeb
unity.endpoint.web.authnGrid.G1.gridRows=10

unity.endpoint.web.authnScreenColumn.1.columnSeparator=OR
unity.endpoint.web.authnScreenColumn.1.columnWidth=17
unity.endpoint.web.authnScreenColumn.1.columnContents=pwdWeb1

unity.endpoint.web.authnScreenColumn.2.columnSeparator=
unity.endpoint.web.authnScreenColumn.2.columnWidth=34
unity.endpoint.web.authnScreenColumn.2.columnContents=_GRID_G1
Number of columns to use is free to be changed, typically one or two are used. Contents of columns can be flexibly arranged. Typically entries are individual authentication options. However there is a plenty of other options, here is the complete list:
-
authenticatorIDorauthenticatorID.ENTRY- base element: either id of authenticator (then all options from this authenticator are added) or authenticator with a single option. The latter is useful when using an SAML or OAuth authenticators which often expose more then one option. -
_SEPARATORor_SEPARATOR_ID- allows for separating entries with an empty slot or a text element. -
_HEADER_ID- allows for setting a title for subsequent entry(ies). -
_LAST_USED- dynamic element, which show authentication option which was previously used by a returning user. -
_GRID_ID- element allowing for showing big amounts of authentication options, typically used in case of federation login. -
_REGISTER- inserts sign in button.
A very useful feature (by default turned on, controlled with unity.endpoint.web.authnShowLastOptionOnly)
helps returning users by hiding all options but the one previously used. User still has an option to revel all
available options.
Note that all separators and headers are automatically hidden if their corresponding authentication options are missing. Also empty columns are not shown.
More advanced customization of the authentication screen look can be performed with custom theme, see Web interface customization and branding. You will find that all elements on the authentication screen have their individual HTML classes, and so it is possible to customize branding to a very high degree.
14.3. Preselected & automated authentication
In many cases authentication screen of an Unity endpoint holds more then one authentication option.
The last used option is saved in user’s cookie. Additionally Unity supports a special query attribute
uy_select_authn which can be used for any web endpoint to select one of available authentication option.
A value of this parameter must be formed according to the following pattern: authenticatorId.authenticationOptionId.
For instance to preselect a remote OAuth provider under key google in configuration of an authenticator with id
oauthWeb one would need to add a query parameter uy_select_authn=oauthWeb.google.
If in doubt, it is always possible to check the available values by manually trying to authenticate with
authentication option of choice and verify the cookie set by Unity with the last authentication option used — the value format is the same.
Unity allows also for acting as an invisible authentication proxy. This can be useful when (sets of) clients should use a fixed upstream IdP, while Unity should still handle all the authentications (for whatever reasons, as attributes unification or protocol bridging). Such mode of operation is only available with remote (i.e. non-interactive from Unity PoV) authentication methods: remote SAML and remote OAuth authentication.
The automated proxy authentication may be enabled in two ways. The first option is to add a special, additional
query parameter uy_auto_login=true. Other possibility is to enable automatic authentication within endpoint’s
configuration with unity.endpoint.web.autoLogin=true setting. In any of case the target endpoint
either must be configured with a single authenticator, with a single authentication option
(e.g. OAuth authenticator with a single trusted provider) or the mentioned above uy_select_authn
query parameter must be additionally used to select the desired authentication option.
14.4. Web IdP endpoints
Unity offers couple of web endpoints which are used when remote service authenticates web user against Unity. The most significant examples are OAuth2 Authorization Server endpoint and SAML endpoint.
All IdP web endpoints have rather simple UI and share some of the common features. User can be presented with two screens.
On the first one (rather rarely used feature) user can select active value for an attribute or attributes. Typical use case is to allow user to select active role for the session. Configuration of the active value selection screen can be different per client (e.g. using the screen only for selected clients, or even presenting different attribute for value selection depending on a client). Of course the screen can be completely disabled what is the default behavior.
The 2nd screen in order (more often used) is a consent screen. User is presented with information who is requesting the authentication and what data will be shared with the requesting service. Details of the consent screen vary between IdP endpoints, e.g. OAuth endpoint shows requested scopes, while SAML endpoint doesn’t. Users can save the consent decision and then consent is skipped for them. It is also possible to turn off the consent screen completely.
Translation profile is a named, ordered list of conditional rules. The rules are used to modify the information about a principal being processed by Unity. Such situation occurs when:
-
Remote user was externally authenticated and its data is consumed by Unity. In this case translation is performed by so called input translation profiles.
-
Information about Unity’s entity is being exposed to outside world with an IdP-like endpoint as SAML web endpoint. In this case translation is performed by so called output translation profiles.
For instance, an input translation profile can change remote attribute size name to width and insert a remotely authenticated user to the local database (to a desired group) if the user is not yet there. An output profile can return an additional dynamic identity named email with a value of an email attribute.
The following subsections cover both types of translation profiles in details. Though many of the features are common. The profiles are managed with the Admin Console in the Server management→Translation profiles tab. The profile has a name and a list of rules. Each rule has a condition and an action.
Conditions are used to dynamically turn action execution on or off. Conditions (as well as some of the arguments of translation actions have) have to be specified as MVEL expressions. Such expressions allow for a powerful, dynamic functionality.
The full MVEL documentation can be found here: https://en.wikibooks.org/wiki/Transwiki:MVEL_Language_Guide
The following example condition:
attr contains 'cn'
will trigger an action whenever the subject has an attribute cn. In the following sections there are
additional examples and a complete reference of all variables which are available to write conditions. Nevertheless
the most popular condition is simply: true.
Actions are different for each type of the profile. The editor provides you with helpful interface to create them.
14.5. Output translation
An output translation profile can be associated with an IdP-like endpoint as the OAuth AS endpoint. It can be used to filter the data being exposed. For instance so called attribute release policies can be implemented with output profiles. Output profile can dynamically create additional data to be returned. It is even possible to store the dynamically created data back into the local Unity database, so it becomes a regular data.
Configuration of output profiles is optional. If no profile is manually installed on an endpoint, then a so called
default output profile is used. The default profile is simplistic: it doesn’t filter anything and only adds
one additional attribute: memberOf with all groups of the principal as value.
Output translation profile is a named, ordered list of conditionally executed actions. Conditions (as well as some of the arguments of translation actions) have to be specified as MVEL expressions. Such expressions allow for a powerful, dynamic functionality.
The full MVEL documentation can be found here: https://en.wikibooks.org/wiki/Transwiki:MVEL_Language_Guide
Output translation profile operate on a data structure which is initially filled by Unity with all attributes and identities of the queried principal. Attributes are from the group configured in the endpoint.
MVEL context used in conditions and as value of some action parameters can use the following variables:
-
protocolName of the protocol being used -
protocolSubtypeName of the protocol variant -
requesterName of the requester -
usedGroupUnity group from which attributes are served -
subGroupsAll sub groups of the Unity group from which attributes are served -
attrMap indexed with principal’s attribute names. Value of each entry is a single value of the attribute. If the attribute is multi-valued then the first value is returned. If the attribute has no value then empty string is returned. -
attrsMap indexed with attribute names. Value of each entry is a list of the attribute values. -
attrObjMap indexed with attribute names. Value of each entry is a list of all values provided as objects with attribute-type specific contents. Useful for inspecting complex types like email and accessing its confirmation status. -
requesterAttr,requesterAttrsandrequesterObjattributes of the requester, if it is represented by an entity in Unity. This is the case for OAuth authentication. -
idsByTypeMap of identity values indexed by type. -
groupsList of all groups the user is a member. -
groupsObjMap indexed with names of all groups the user is a member. Value of each map entry is complete group object. See examples below for example usage examples. -
authenticatedWithList of identities that were used to authenticate the user. If remote authentication was used the list contains a single identity that was used to map the remote user to the local entity (as chosen by the input translation profile). The list can have two elements when MFA was used. -
importStatusMap indexed with importer names which are enabled for the endpoint on which output profile is executed. Status of each importer is value of map entries. The following values are possible:notApplicableandsuccess. -
idpIdentifier of a remote IdP that was used to authenticate the current user’s session. In case when only a local authentication was used, the value is set to_LOCAL.
Example output profile:
1: Condition: idsByType contains 'userName'
Action: createAttribute
Action parameters:
  attributeName = userid
  expression = idsByType['userName']

2: Condition: true
Action: filterAttribute
Action parameters:
  unityAttribute = email
The above profile in the first action creates a new attribute userid with a value of user’s identity
of the userName type. The attribute is added only if the principal has such identity.
The second rule hides the email attribute unconditionally.
Additional examples of expressions and conditions can be found in the Input translation above. Note however that only the variables from the output MVEL context can be used.
Example: obtaining group’s details from groupsObj
groupsObj['/my-grp'].getDisplayedName().getValue('en')
groupsObj['/my-grp'].getDescription().getValue('en')
groupsObj['/my-grp'].isPublic()
The above expressions in order: retrieve English displayed name of the /my-grp group, then description of the group and finally boolean status of the group being public or private.
14.6. Web Admin Console endpoint
- Endpoint type
-
WebConsoleUI - Binding
-
Web
- Exposed paths
-
/console - Default path
-
/console
Web Admin Console is the first place to visit after server installation and startup as it offers
an administrator oriented management interface.
By default it is accessible under the link: https://localhost:2443/ENDPOINT-CONFIGURED-CONTEXT/console
or simply https://localhost:2443/ENDPOINT-CONFIGURED-CONTEXT as the /console path is the default.
The features of the Console interface are covered in the Contents management section.
Currently the Admin Console endpoint offers only options common for all web endpoints.
14.7. User home endpoint
- Endpoint type
-
UserHomeUI - Binding
-
Web
- Exposed paths
-
/home - Default path
-
/home
Web User Home UI provides a simple profile management interface for the ordinary Unity members. It is possible to change preferences, update credentials and check information stored in the Unity database about the user.
By default it is accessible under the link: https://localhost:2443/ENDPOINT-CONFIGURED-CONTEXT/home
or simply https://localhost:2443/ENDPOINT-CONFIGURED-CONTEXT as the /home path is the default.
Note that the Web Admin endpoint incorporates all the features of the of the Home endpoint (accessible after switching the view with the profile button).
The endpoint offers couple of options, which can be used to fine tune the information presented in its interface. All options common to all web endpoints are naturally also supported. The remaining options are provided below:
| Property name | Type | Default value / mandatory | Description |
|---|---|---|---|
|
list of properties with a common prefix |
- |
List of enquiries to be presented on User Home UI. |
|
Structured list |
- |
Prefix under which it is possible to define attributes which should be either presented or made editable on the User Home UI. |
|
string |
mandatory to be set |
Attribute name. |
|
[true, false] |
|
If enabled and the attribute is marked as self modificable, it will be possible to edit it. Otherwise it is shown in read only mode. |
|
string |
mandatory to be set |
Group of the attribute. |
|
[true, false] |
|
If true then the group is shown next to the attribute. |
|
[true, false] |
|
If set to true then user won’t be able to change setting of 2nd factor opt-in setting on the credentials panel. |
|
[true, false] |
|
If set to true then user won’t be presented with an option to schedule account removal with grace period. At the same time this enables selfRemovalMode |
|
list of properties with a common prefix |
- |
List of tags of UI components which should be disabled. Valid tags: [[credentialTab, preferencesTab, userDetailsTab, accountUpdateTab, accountRemoval, attributesManagement, userInfo, identitiesManagement, accountLinking], oauthTokens] |
|
[true, false] |
|
If true then the project managament link is shown in header of User Home UI. |
|
string |
- |
If project management link is active, then link redirect to this endpoint address. By default first active project management endpoint is used. |
|
[remove, disable, blockAuthentication] |
|
Relevant ONLY if the disableSelfRemovalScheduling is true. Controls what action should be performed when user orders account removal. Account can be fully removed, disabled, or only login can be blocked. |
For instance the following configuration snippet will enable display of the email attribute of the root group
in the profile page. What’s more the user will be allowed to edit the email attribute if only the attribute type
is marked as self modifiable.
unity.userhome.attributes.2.attribute=email
unity.userhome.attributes.2.group=/
unity.userhome.attributes.2.showGroup=false
unity.userhome.attributes.2.editable=true
14.8. Unity Project Management (UpMan) endpoint
- Endpoint type
-
UpManUI - Binding
-
Web
- Exposed paths
-
/upman - Default path
-
/upman
UpMan can be used to expose a simple group management interface to non-technical administrators, called project managers.
Endpoint configuration itself contains only standard options common for all web endpoints.
14.8.1. Exposing groups for management in UpMan
By default none of the groups defined in Unity is available for management with UpMan. Unity administrator must enable UpMan on each group, making it a manageable project root in AdminUI. This is done using group context menu, with the "Edit delegation configuration" option.
The main Unity admin can control which attributes are enabled for inspection in UpMan, setup visual settings for the project and most importantly configure forms. The forms are used for:
-
signing up new users (registration) into project,
-
signing up existing Unity users into project with sticky enquiry (note that this process is different than registration as no credentials need to be collected, as well as general entity related attributes), and finally
-
updating membership in the project for project members with a sticky enquiry (different then the signing one).
There is quite a few things to be set up when creating each of forms. Unity offers a generator on the dialog, we suggest to start from an autogenerated form, and then fine tune it. After changing the form Unity can verify its basic settings to check whether the form looks good for the project. This can be also invoked from the delegation edit dialog.
The final step after configuring the project is to designate an initial manager (who will be able to designate other
ones). To do so add the prospective manager to the project group and assign her the sys:ProjectManagementRole
attribute with value manager.
14.8.2. Consequences of using UpMan
Note that by using UpMan project manager will be able to perform actions that will influence also global state of Unity database. The primary control measure are the forms used in the project configuration. Project manager can accept requests submitted to those forms, invite users etc. Those users will become regular Unity users with (at least) all parent groups of the project group membership, will have credential set etc. There may be also other actions taken for those users as configured in the forms. However, project manager can not re-configure any of the project forms, therefore in a sense a person controlling the forms, also have some general responsibility and control over the project.
As it can be guessed from the above description that all UpMan triggered changes are visible in Admin Console, including project subgroups, project members, registration requests etc.
14.8.3. Using UpMan
Using UpMan should be straightforward. Project manager can browse users, control project sub groups structure, manage group membership and designate other managers.
New users can be invited to the project, using their email address. Unity will invite using appropriate registration form or sign up enquiry depending on whether invited email is already Unity member or not.
Additionally (if project forms allow for this) prospective users can fill the forms by going to their public link. Unless form is configured for automatic acceptance of all requests (e.g. after email confirmation), project manager will need to accept each request, what is also possible in UpMan UI.
14.9. Web SAML SSO endpoint
- Endpoint type
-
SAMLWebIdP - Binding
-
Web
- Exposed paths
-
/saml2idp-web,/metadata,/SLO-WEB,/SLO-SOAP
This endpoint exposes the SAML 2 authentication interface, implementing the SSO profile with the support for the SAML HTTP-POST and HTTP-Redirect bindings.
The endpoint first authenticates the redirected client, then presents a confirmation screen where a user can review and alter a returned information and, after acceptance, redirects the user to the SAML Service Provider with a SAML response.
The metadata related features and configuration is the same as in the case of remote SAML authenticator
(SAML Metadata support) with the exception that the metadata is published under the endpoint’s address with
the constant /metadata suffix.
The endpoint can be configured to support arbitrary SAML identity type names. By default the following identity type mappings are used:
| SAML name | UNITY identity type |
|---|---|
|
|
|
|
|
|
|
|
|
|
|
|
|
|
It is possible to reconfigure the mappings in the configuration or to add a new one. For example
the following snippet will map the SAML identity type userId to the Unity userName identity type:
unity.saml.identityMapping.1.localIdentity=userName
unity.saml.identityMapping.1.samlIdntity=userId
The options of the endpoint (besides the standard options for all Web endpoints) are:
| Property name | Type | Default value / mandatory | Description |
|---|---|---|---|
--- Configuration read from trusted SAML metadata --- |
|||
|
Structured list |
- |
Under this prefix you can configure the remote trusted SAML Sps however not providing all their details but only their metadata. |
|
string |
- |
If set then the given truststore will be used for HTTPS connection validation during metadata fetching. Otherwise the default Java trustststore will be used. |
|
integer number |
|
How often the metadata should be reloaded. |
|
[require, ignore] |
|
Controls whether metadata signatures should be checked. If checking is turned on then the validation certificate must be set. |
|
string |
- |
Name of certificate to check metadata signature. Used only if signatures checking is turned on. |
|
string |
mandatory to be set |
URL with the metadata location. Can be local or HTTP(s) URL. In case of HTTPS the server’s certificate will be checked against the main Unity server’s truststore only if httpsTruststore is set. |
--- Manual settings of allowed Sps --- |
|||
|
string |
- |
Certificate of the SP. Used only when acceptance policy is |
|
list of properties with a common prefix |
- |
Using this property additional trusted certificates of an SP can be added (when SP uses more then one). See certificate for details. Those properties can be used together or alternatively. |
|
string can have subkeys |
- |
Rarely useful: for SPs which use DN SAML identifiers as UNICORE portal. Typically entity is used instead. Value must be the X.500 DN of the trusted SP. |
|
[true, false] |
|
Whether to encrypt assertions sent to this peer. Usually not needed as Unity uses TLS. If turned on, then certificate of the peer must be also set. |
|
string |
- |
Entity ID (typically an URI) of a trusted SAML requester (SP). |
|
string can have subkeys |
- |
Displayed logo of the SP. If not defined then only the name is used. The value can be a file:, http(s): or data: URI. The last option allows for embedding the logo in the configuration. The property can have subkeys being locale names; then the localized value is used if it is matching the selected locale of the UI. |
|
string can have subkeys |
- |
Displayed name of the Sp. If not defined then the name is created from the Sp address (what is rather not user friendly). The property can have subkeys being locale names; then the localized value is used if it is matching the selected locale of the UI. |
|
string |
- |
HTTP POST Single Logout Endpoint of the SP. |
|
string |
- |
HTTP POST Single Logout response endpoint of the SP. If undefined the base endpoint address is assumed. |
|
string |
- |
HTTP Redirect Single Logout Endpoint of the SP. |
|
string |
- |
HTTP Redirect Single Logout response endpoint of the SP. If undefined the base endpoint address is assumed. |
|
string |
- |
Response consumer address of the SP. Mandatory when acceptance policy is |
|
list of properties with a common prefix |
- |
List of response consumer addresses of the SP. Used only when acceptance policy is |
|
string |
- |
SOAP Single Logout Endpoint of the SP. |
--- SAML subsystem settings --- |
|||
|
Structured list |
- |
List of entries defining allowed Service Providers (clients). Used only for |
|
Structured list |
- |
Under this prefix it is possible to configure a separate screen on which user can select attribute values which are used for the session. Multiple entries can be added with settings which are clients specific. |
|
string |
- |
Identifier of a client for which the settings should be applied. If unset then those settings will be default. If more then one entry without client set is present, or there is more then one with the same client, then it is undefined which one will be used. |
|
list of properties with a common prefix |
- |
List of attribute names for which multiple active values must be selected by a user. |
|
list of properties with a common prefix |
- |
List of attribute names for which a single active value must be selected by a user. |
|
integer >= 1 |
|
Defines maximum time (in seconds) after which the authentication in progress is invalidated. This feature is used to clean up authentications started by users but not finished. |
|
string |
mandatory to be set |
SAML IdP credential name, which is used to sign responses. |
|
string |
mandatory to be set |
Default group to be used for all requesers without an explicite mapping. |
|
Structured list |
- |
Prefix used to mark requester to group mappings. |
|
string |
mandatory to be set |
Group for the requester. |
|
string |
mandatory to be set |
Requester for which this entry applies. |
|
Structured list |
- |
Prefix used to store mappings of SAML identity types to Unity identity types. Those mappings can override and/or complement the default mapping. |
|
string |
mandatory to be set |
Unity identity to which the SAML identity is mapped. If it is set to an empty value, then the mapping is disabled, what is useful for turning off the default mappings. |
|
string |
mandatory to be set |
SAML identity to be mapped |
|
string |
mandatory to be set |
This property controls the server’s URI which is inserted into SAML responses (the Issuer field). It should be a unique URI which identifies the server. The best approach is to use the server’s URL. |
|
Structured list |
- |
Individual policy agreement items are configured under this prefix |
|
string |
- |
Policy agreement presentation type |
|
string |
- |
List of policy documents ids included in the item |
|
string can have subkeys |
- |
Policy agreement text with placeholders. Format of placeholder is {PolicyDocucmentId:DisplayedText} |
|
string can have subkeys |
- |
Policy acceptanance view additional information |
|
string can have subkeys |
- |
Policy acceptanance view title |
|
integer number |
|
Policy acceptanance view widht |
|
string |
|
Policy acceptanance view width unit |
|
integer >= 1 |
|
Defines maximum validity period (in seconds) of a SAML request. Requests older than this value are denied. It also controls the validity of an authentication assertion. |
|
[true, false] |
|
If true then a single SAML assertion is returned what provides a better interoperability with 3rd party solutions. If false then attributes are returned in a separate assertion, what is required by certain consumers as UNICORE. |
|
[always, ifResponseUnsigned] |
|
Defines when SAML assertions (contained in SAML response) should be signed: either always or if signing may be skipped if wrapping request will be anyway signed |
|
[always, never, asRequest] |
|
Defines when SAML responses should be signed. Note that it is not related to signing SAML assertions which are included in response. asRequest setting will result in signing only those responses for which the corresponding request was signed. |
|
[true, false] |
|
Controls whether the user being authenticated should see the consent screen with the information what service requested authorization and what data is going to be released. Note that user may always choose to disable the consent screen for each service, even if this setting is set to false. |
|
[true, false] |
|
Allows to completely disable user import functionality per endpoint. Useful mostly on SAML SOAP endpoint, where default is to useall (and not only defined with userImport.) importers. |
|
[all, validSigner, validRequester, strict] |
|
Controls which requests are authorized. |
|
string |
|
Name of an output translation profile which can be used to dynamically modify the data being returned on this endpoint. |
|
string |
- |
Truststore name to setup SAML trust settings. The truststore is used to verify request signature issuer, if the Service Provider accept policy requires so. |
|
[true, false] |
|
Controls whether user is allowed to remove released attributes on the consent screen. Note that attributes marked as mandatory in output profile can not be removed regardless of this option. |
|
Structured list |
- |
Under this prefix it is possible to configure enabled user importers on this endpoint. If no such options are defined then the user import feature is disabled, except of SAML SOAP assertion query endpoint on which by default all system defined user importers are enabled (this is for backwards compatibility reasons and can be disabled with skip option). |
|
string |
- |
Authenticated user’s identity of this type will be used as user importer parameter. If user has more then one identity of this type then a random one is used. |
|
string |
- |
Defines which user import configuration should be triggered. |
|
integer >= 1 |
|
Controls the maximum validity period of an attribute assertion returned to client (in seconds). It is inserted whenever query is compliant with SAML V2.0 Deployment Profiles for X.509 Subjects, what usually is the case. |
--- SAML metadata settings --- |
|||
|
filesystem path |
- |
If undefined then metadata is automatically generated. If this option is defined, then it should contain a file path, to a file with custom metadata document. This document will be published as-is, however it will be checked first for correctness. |
|
[true, false] |
|
Controls whether the SAML Metadata should be published. |
|
[true, false] |
|
Controls whether the SAML Metadata should be automatically signed before publishing it. If a publication of a custom matadata from file is confiured which is already signed, do not turn this option on, as then metadata will be signed twice. |
14.10. Web Service SAML SOAP endpoint
- Endpoint type
-
SAMLSoapIdP - Binding
-
Web Service (CXF)
- Exposed paths
-
/saml2idp-soap,/metadata
This endpoint exposes the SAML 2 authentication interface, exposing the functionality of the Attribute Query and Authentication SAML protocols over the SAML SOAP binding.
The SAML options and metadata notes are the same as in the case of the Web SAML SSO endpoint.
14.11. UNICORE Web SAML SSO endpoint
- Endpoint type
-
SAMLUnicoreWebIdP - Binding
-
Web (Vaadin)
- Exposed paths
-
/saml2unicoreIdp-web,metadata,/SLO-WEB,/SLO-SOAP
This endpoint is a slightly enhanced Web SAML SSO endpoint, with the UNICORE 7 Grid middleware support. It is useful for UNICORE portal SAML authentication, so if you don’t integrate UNICORE portal with Unity don’t use this endpoint.
The endpoint is configured in the same way as the Web SAML SSO endpoint, the only functional difference is that it allow to generate and return UNICORE 7 trust delegations made for the relaying party.
Only the users with the X.500 identity (among others identities) may use this endpoint. However neither authentication with certificate nor possession of a X.509 certificate is required.
14.12. UNICORE Web Service SAML SOAP endpoint
- Endpoint type
-
SAMLUnicoreSoapIdP - Binding
-
Web Service (CXF)
- Exposed paths
-
/saml2unicoreidp-soap,metadata
This endpoint is a slightly enhanced version of Web Service SAML SOAP endpoint, with the UNICORE 7 Grid middleware support. It is useful for UNICORE standalone client (e.g. UCC) SAML authentication, if you don’t integrate UNICORE with Unity this endpoint is useless.
The endpoint is configured in the same way as the Web Service SAML SOAP endpoint, the only functional difference is that it generates and return UNICORE 7 trust delegations made for the client.
Only the users with the X.500 identity (among others identities) may use this endpoint. However neither authentication with certificate nor possession of a X.509 certificate is required.
14.13. SAML PAOS Enhanced Client or Proxy (ECP) endpoint
- Endpoint type
-
SAML-ECP - Binding
-
none (this endpoint doesn’t use authenticators thus there is no binding in Unity sense. Formally it is HTTP/PAOS.)
- Exposed paths
-
/saml2-ecp
SAML ECP endpoint is a helper endpoint for non web browser clients, which want to authenticate for using Unity interfaces (e.g. to perform SAML attribute queries), however the authentication should be performed with a remote SAML IdP. In other words this endpoint is non-web browser client friendly counterpart of the Web SAML SSO endpoint. The details of the ECP are described in the SAML ECP profile: http://docs.oasis-open.org/security/saml/Post2.0/saml-ecp/v2.0/cs01/saml-ecp-v2.0-cs01.html.
As the only function of the endpoint is to actually authenticate the client, it is not using any of regular Unity authenticators (none is matching this endpoint).
After successful ECP authentication against this endpoint, the client receives a JWT credential which can be used to authenticate it against other Unity endpoints.
Configuration of the ECP endpoints is the same as the configuration of the remote SAML authenticator (see External SAML IdP) as ECP endpoint is in fact a relaying party (SP in SAML terminology) for remote IdPs. However there are the following things to note:
-
The ECP endpoint must have additional settings configuring JWT generation. Those are the same as the settings for JWT management endpoint, however the prefix is
unity.saml.requester.jwt.. -
The ECP endpoint always uses the default settings for signing the request and of the requested SAML format. This is because the target IdP is not known during SAML query generation.
An example configuration:
unity.saml.requester.requesterEntityId=http://ecpSP.example.com
unity.saml.requester.metadataPath=metadata
unity.saml.requester.remoteIdp.1.address=http://localhost:52443/
unity.saml.requester.remoteIdp.1.samlId=http://example-saml-idp.org
unity.saml.requester.remoteIdp.1.certificate=MAIN
unity.saml.requester.remoteIdp.1.translationProfile=testP
unity.saml.requester.jwt.credential=MAIN
unity.saml.requester.jwt.tokenTtl=10
14.14. OAuth 2 Authorization Server and OpenId Connect endpoints
- Endpoint 1 type
-
OAuth2Authz - Binding
-
Web
- Exposed paths
-
/oauth2-authz - Endpoint 2 type
-
OAuth2Token - Binding
-
RESTful (CXF)
- Exposed paths
-
/token,/userinfo,/jwk,/introspect,/tokeninfo,.well-known/openid-configuration,/revoke
The OAuth 2 endpoints expose a functionality of a generic Authorization Server with a support for the OpenID Connect specification. The code, implicit, client credentials and hybrid flows are supported.
The functionality is provided by two Unity endpoints, which shouldn’t be mixed with endpoints in OAuth sense
which are equivalent to particular paths exposed by Unity endpoints. The first Unity endpoint, OAuth2Authz,
exposes the OAuth authorization endpoint functionality. It is a web endpoint. It is used by end-users and
the authentication of this endpoint should be configured so that OAuth users can authenticate themselves.
The second Unity endpoint, OAuth2Token, supports all remaining OAuth endpoints, including the most important
token endpoint. The authentication settings of this endpoint should allow for authenticating OAuth clients accessing
the /token path as required by OAuth specification. Note however that some of the operations needs to
be authorized/authenticated by providing an OAuth access token only and this fact is handled internally -
nothing has to be configured. Also two of the paths require neither
authentication nor access token: /jwk and .well-known/openid-configuration. This is also handled automatically.
14.14.1. Configuration
Both OAuth endpoints create a pair, both must use the same configuration file. Configuration example:
unity.oauth2.as.issuerUri=https://example.com:2443/oauth2-token
unity.oauth2.as.signingCredential=MAIN

unity.oauth2.as.clientsGroup=/oauth-clients
unity.oauth2.as.usersGroup=/oauth-users
unity.oauth2.as.translationProfile=oauthOutputProfile

unity.oauth2.as.scopes.1.name=scope1
unity.oauth2.as.scopes.1.description=Provides access to base info
unity.oauth2.as.scopes.1.attributes.1=cn
unity.oauth2.as.scopes.1.attributes.2=o
unity.oauth2.as.scopes.1.attributes.3=email
The issuer should be equal to the base URL of the OAuth token endpoint in order to be compatible with OpenID Connect Discovery specification.
OAuth clients are configured as regular Unity entities. To make an ordinary entity an OAuth client one must
place it in the configured OAuth clients groups (/oauth-clients in the above example). Additionally the
client:
-
must have a credential so it can authenticate at the token endpoint in the way it was configured (typically a password credential),
-
must possess the
sys:oauth:allowedGrantFlowsattribute (in OAuth clients group) with allowed flows, -
must possess the
sys:oauth:allowedReturnURIattribute (in OAuth clients group) with allowed return URI(s), -
can have logo and/or displayed name OAuth attributes assigned to improve client’s presentation during user’s consent.
-
should have an attribute
sys:oauth:clientTypespecifying whether the client is confidential or public. By default client is assumed to be confidential, if the attribute is unset.
OAuth users must belong to a group specified in the configuration file. If no restrictions are required the / group
can be used. In case that there are different groups of users for different OAuth clients, those groups can be
configured with client’s attribute sys:oauth:groupForClient.
OAuth scopes should be defined next. Each scope includes a list of Unity attributes (use the Unity name) that should be exposed when the client asks for the scope and the user gives her consent.
Finally an output translation profile can be configured. It is highly useful to map Unity’s internal attribute names to names used by OAauth consumers. Standard OAuth/OIDC attribute names can be found in the OIDC specification: http://openid.net/specs/openid-connect-core-1_0.html#StandardClaims
Note that currently Unity requires you to configure all profiles and assign attributes to them manually.
The options for both endpoints (besides the standard options for all Web endpoints) are:
| Property name | Type | Default value / mandatory | Description |
|---|---|---|---|
|
integer >= 1 |
|
Controls the maximum validity period of an Access token (in seconds). |
|
Structured list |
- |
Under this prefix it is possible to configure a separate screen on which user can select attribute values which are used for the session. Multiple entries can be added with settings which are clients specific. |
|
string |
- |
Identifier of a client for which the settings should be applied. If unset then those settings will be default. If more then one entry without client set is present, or there is more then one with the same client, then it is undefined which one will be used. |
|
list of properties with a common prefix |
- |
List of attribute names for which multiple active values must be selected by a user. |
|
list of properties with a common prefix |
- |
List of attribute names for which a single active value must be selected by a user. |
|
[true, false] |
|
By enabling this option Unity allows to put Ant-style wildcards as allowed return URIs. There are three important implications. (1) this is generally considered as not very secure setting, rather for development infrastructures. (2) The first allowed URI should rather be a plain URI as will be used as a default return URI if client has not provided any. (3) Ant-style wildcards use single star to match arbitrary characters in single path segment and two stars to match strings across path segments. |
|
string |
|
Group in which authorized OAuth Clients must be present. OAuth related attributes defined in this group are usedto configure the client. |
|
integer >= 1 |
|
Controls the maximum validity period of a code token returned to a client (in seconds). |
|
integer >= 1 |
- |
If defined then Unity will extend lifetime of a previously issued access token up to this time (so must be larger then accessTokenValidity). Lifetime will be extended on each successful check of the token, and each timethe enhancement will be for the standard validity time. However the token won’t be ever valid after the time specified in this property. |
|
integer >= 1 |
|
Controls the maximum validity period of an OpenID Connect Id token (in seconds). |
|
string |
|
Allows for selecting the identity type which is used to create a mandatory sub claim of OAuth token. By default the targeted persistent identifier is used, but can be changed to use for instance the global persistent identity. |
|
string |
mandatory to be set |
This property controls the server’s URI which is used in tokens to identify the Authorization Server. To be compliant with OAuth&OIDC specifications it should be the server’s URL of the OAuth endpoint. |
|
Structured list |
- |
Individual policy agreement items are configured under this prefix |
|
string |
- |
Policy agreement presentation type |
|
string |
- |
List of policy documents ids included in the item |
|
string can have subkeys |
- |
Policy agreement text with placeholders. Format of placeholder is {PolicyDocucmentId:DisplayedText} |
|
string can have subkeys |
- |
Policy acceptanance view additional information |
|
string can have subkeys |
- |
Policy acceptanance view title |
|
integer number |
|
Policy acceptanance view widht |
|
string |
|
Policy acceptanance view width unit |
|
integer number |
|
Controls the validity period of a refresh token (in seconds). If is set to a negative number refresh tokens won’t be issued. If is set to 0 refresh tokens will have an unlimited lifetime. |
|
Structured list |
- |
Under this prefix OAuth scopes can be defined. In general scope defines a set of attribtues returned when it is requested. |
|
list of properties with a common prefix |
- |
List of Unity attributes that should be returned when the scope is requested. Note that those attribtues are merely an input to the configured output translation profile. |
|
string |
- |
Human readable description of the scope meaning. |
|
string |
mandatory to be set |
Name of the scope as used in OAuth protocol. |
|
[RS256, RS384, RS512, HS256, HS384, HS512, ES256, ES384, ES512] |
|
An algorithm used for JWT access token and id token (OIDC mode) signing. |
|
string |
- |
Name of a credential which is used to sign tokens. Used for signing Id tokens (in OpenId Connect mode) and for signing access tokens in JWT format. Only useful when one of RS* or ES* algorithms is set for token signing. |
|
string |
- |
Secret key used when one of HS* algorithms is set for token signing (both access token in JWT form and OpenId Connect id token). |
|
[true, false] |
|
Controls whether the user being authenticated should see the consent screen with the information what service requested authorization and what data is going to be released. Note that user may always choose to disable the consent screen for each service, even if this setting is set to false. |
|
[true, false] |
|
Allows to completely disable user import functionality per endpoint. Useful mostly on SAML SOAP endpoint, where default is to useall (and not only defined with userImport.) importers. |
|
[PLAIN, JWT, AS_REQUESTED] |
|
Controls whether JWT or plain access tokens are issued. If set to AS_REQUESTED, client by default will receive plain token unless JWT is requested by accepted MIME type header set to application/at+jwt. |
|
string |
- |
Name of an output translation profile which can be used to dynamically modify the data being returned on this endpoint. When not defined the default profile is used which simply return all Unity attribtues. |
|
Structured list |
- |
Under this prefix it is possible to configure enabled user importers on this endpoint. If no such options are defined then the user import feature is disabled, except of SAML SOAP assertion query endpoint on which by default all system defined user importers are enabled (this is for backwards compatibility reasons and can be disabled with skip option). |
|
string |
- |
Authenticated user’s identity of this type will be used as user importer parameter. If user has more then one identity of this type then a random one is used. |
|
string |
- |
Defines which user import configuration should be triggered. |
|
string |
|
Group for resolving attributes of OAuth users. Only members of this group can authorize with OAuth. |
| This Unity endpoint can be also used to issue an access token which subsequently can be used as a simple credential (mostly suitable for RESTful clients) to access Unity. Such approach is similar to the use of the JWT authentication and JWT management endpoint. The differences are that the Unity’s JWT tokens can be obtained in a much easier way then an OAuth access token. On the other hand JWT tokens can be used only with Unity, other services will neither issue nor validate them, and can be considered less secure. |
14.14.2. OpenID Connect
Unity supports OpenID Connect (OIDC) protocol nearly out of the box. The only requirement to enable OIDC
is to define a scope with a special name openid. Typically the openid scope has no attributes assigned.
Clients requesting the openid scope trigger OpenID Connect compatibility mode. In this mode the OIDC id token
is generated and returned in the implicit grant from the authorization endpoint or in the
code grant from the token endpoint.
14.14.3. Usage
Unity as Authorization Server usage is mostly regulated with the OAuth or OIDC specifications. In short the client redirects the user’s browser to the authorization endpoint. There user should accept the client’s request and Unity redirects the user back to the client. Depending on the flow used, the client receives an OAuth access token immediately (the implicit or hybrid flows) or has to ask Unity’s token endpoint about it (the code flow). The access token is then used by the client to access resources owned by the user.
14.14.4. Token refresh
Unity can be configured to support the standard OAuth token refresh. See refreshTokenValidity option description
for allowed modes. When refresh is enabled, then client receives a refresh token along with an access token.
The refresh token can be used to receive a new acceess token from the token endpoint.
The client can refresh access token only with the same or reduced set of OAuth scopes as were bound
to the original token. Refresh may be only performed by an authenticated client and the client must be the same
as the one requesting the original access token. User information (claims) associated with the token is updated
at token refresh time.
14.14.5. Token validation/introspection
Unity supports two means to validate issued tokens. Both are useful for checking bearer style tokens as signed tokens can be checked by the consumer itself without calling Unity.
The standard way of validating tokens is by using the RFC 7662 compliant Token introspection endpoint. It is available
at /introspect path. See https://tools.ietf.org/html/rfc7662 for the details of the protocol.
Unity supports almost all optional elements of the response, besides jti and username. Requests to the introspection
path must be authenticated, i.e. client need to provide a valid credential as configured for the OAuth token endpoint
in Unity. Both access token and refresh token can be introspected.
Additionally an older endpoint is available with a simpler contract. Using this method a client
(any, not necessarily the OAuth client) may validate an access token, by sending a GET request to the
/tokeninfo path at the OAuth token endpoint.
@Path("/tokeninfo")
@Authorization("Bearer access token")
@GET
Returns status of a given access token, which must be provided in the Authorization header according to the RFC 6750). If the token is invalid then the HTTP 401 error is returned (see RFC 6750, section 3.1). If the token is valid then the following JSON document is returned:
{
  "sub": "subject id",
  "client_id": "client id",
  "exp": "12345678",
  "scope": ["scope1", "scope2"]
}
14.14.6. Token exchange
Unity supports token exchange according to https://tools.ietf.org/html/draft-ietf-oauth-token-exchange-08 specification.
For this purpose a special grant type urn:ietf:params:oauth:grant-type:token-exchange is used.
The token exchange process can be described in a simplified way:
-
Client A receives an access token A from Unity.
-
Client A gives the obtained access token A to Resource Provider B (to authorize itself).
-
Resource Provider B wants to play a role of client — Client B — and access Resource Provider C. To do so Client B exchanges the access token A for a new access token B which can be used to obtain data from Resource Provider C. The exchange is supported by Unity token endpoint.
There are several conditions that must be met to perform a successful exchange:
-
Only an access token which was issued with a special scope
token-exchangecan be exchanged. -
Only the
urn:ietf:params:oauth:token-type:access_tokentoken type exchange can be used assubject_token_type. -
Only the original scopes or their subset can can be requested for the exchanged scope.
-
Audience parameter in exchange request is mandatory and must contain Unity username of the new access token owner (and must be the same as the
client_idparameter). -
id token can be issued only if
requested_token_typeis equal tourn:ietf:params:oauth:token-type:id_tokenand scopes containopenid. -
Exchange may be only performed by an authenticated Unity client.
Sample exchange request parameters:
client_id=oauth-client2
client_secret=secretPass
grant_type=urn:ietf:params:oauth:grant-type:token-exchange
audience=oauth-client2
subject_token=ZCrlkMyxzhJ0CyQlskOsIgkcDqjW51ViZko0bopHzfM \ # This token was received from the initial client
subject_token_type=urn:ietf:params:oauth:token-type:access_token
requested_token_type=urn:ietf:params:oauth:token-type:id_token
scope="openid profile read-tasks"
14.14.7. Revocation and logout
The path /revoke can be used to revoke an access token which was previously issued. This endpoint
is implemented according to the RFC 7009, with the following Unity specifics:
-
The
token_type_hintis a mandatory argument, must be always provided (in RFC it is optional). THe allowed values areaccess_tokenandrefresh_token. -
The endpoint access is not authenticated - or better said the access is authorized implicitly by providing a valid token to be revoked. The
client_idmust be always given.
Typical usage:
POST /.../revoke HTTP/1.1
Host: ...
Content-Type: application/x-www-form-urlencoded

token=45ghiukldjahdnhzdauz&client_id=oauth-client&token_type_hint=refresh_token
Besides the standard token revocation, it is also possible to request token’s owner logout (disposal of the SSO session)
together with token revocation. To be able to perform this operation, the client must request and obtain a special
OAuth scope: single-logout. Having this scope, token revocation can be used to logout the token owner
by adding the following form parameter to the request: logout=true.
14.14.8. Dynamic token validity enhancement
Unity allows for enhancing access token validity in effect of a successful request to the token info or user info endpoint authorized with the token in question. This feature is very useful in case of state less systems where login "session" management is reduced to access token verification.
To enable this feature set accessToken validity to a proper short time (e.g. 30 minutes) - equal to the intended inactive login session
time. Additionally set extendAccessTokenValidityUpTo to the intended longest session time (e.g. 12 hours). Then the actively used
access token can be valid for up to 12 hours, but will automatically expire after 30 minutes without use.
14.14.9. Public and native clients, PKCE
Unity supports Proof Key for Code Exchange by OAuth Public Clients OAuth 2.0 for Native Apps
(PKCE for short, RFC 7636) and OAuth 2.0 for Native Apps profile (RFC 8252).
The features are activated for clients marked as PUBLIC by the
clientType attribute on the client entity. Setting client to PUBLIC causes the following consequences:
-
PKCE is mandatory
-
IP (v4&v6) based loopback redirections to any port are available, regardless of the port set in authorized return URI. Note that the path must still match exactly.
-
The
httpscheme can be used in case of IP based loopback redirect, even ifhttpsis configured in authorized return URI. -
Consent screen acceptance can not be saved - it is always presented.
See the aformentioned RFCs for details on how to use PKCE, and what forms of return redirections are available for native clients.
14.15. JWT management endpoint
- Endpoint type
-
JWTMan - Binding
-
RESTful
- Exposed paths
-
/*
This endpoint exposes a simple JWT (JSON Web Token) management endpoint. It is possible to obtain, refresh and invalidate JWT with simple API calls.
JSON Web Token authentication is a simple and lightweight authentication option, useful for non-web browser clients. The purpose is to authenticate the client to Unity using some sort of authentication which involves user-obtained credentials (as password) or heavy weight authN (as SAML ECP) ONCE, and then continue to use a simple JWT mechanism for the duration of the session.
Note that this is a fairly limited (or simple if you prefer) interface, not conforming to any web standards. Therefore for more important production use cases usage of e.g. an appropriate OAuth flow (like client credentials grant) is advised instead. The JWT authentication mechanism is on other hand good for testing, or more internal solutions.
The options of the endpoint are:
| Property name | Type | Default value / mandatory | Description |
|---|---|---|---|
|
string |
mandatory to be set |
Name of the PKI credential that will be used to sign or verify tokens. Note that this must be an RSA credential. |
|
integer >= 1 |
|
Token validity time in seconds. Relevant only for token generation |
14.15.1. JWT token contents
- iss
-
Address of the Unity endpoint that issued the token or a configured value.
- sub
-
Authenticated user (token bearer) identity which is always persistent (not targeted) identity.
- aud
-
the public address of unity instance with # authenticationRealmName appended.
- exp
-
Expiration time
- iat
-
Issue time
- jti
-
id of the token
The token is always signed with JWT and is not encrypted.
14.15.2. JWT management API
JWT can be obtained in two ways:
-
The client can contact the JWT-enabled endpoint
-
The client can go through SAML ECP authentication using the SAML ECP endpoint
Here we describe the first option.
The jwtMan endpoint is configured as a regular Unity endpoint. Its configuration includes the validity time of a token. Its authenticators are used to authenticate the client which can get its own token, i.e. the token for the currently authenticated user.
GET /token
Returns JWT token
POST /refreshToken
HTTP Entity: a valid JWT Token
Returns a refreshed Token
Note: to make the refresh feature working, the token endpoint must have the JWT authentication enabled by itself. Otherwise refreshing would require authentication with regular credential, what is equivalent to obtaining a new token.
POST /invalidateToken
HTTP Entity: a valid JWT Token
After invalidation the invalidated token can be used until expired. But since invalidation it can not be refreshed. How JWT is used to authenticate the client
14.15.3. Authenticating with JWT token
To authenticate with any Unity endpoint with JWT authentication enabled, the JWT token must be Base 64 encoded and inserted as a value of the HTTP Authorization header. The token MUST be provided conforming to the rules of RFC 6750, section 2.1:
"Bearer" 1*SP b64token
As always in Unity, an endpoint which should support such authentication must have an appropriate authenticator assigned.
Note that each token is valid for authentication only on those endpoints which are in the same authentication realm in which the token was obtained.
14.15.4. Configuring JWT authentication on endpoint
The JWT authenticator is named jwt. Its configuration should follow the same syntax as the endpoint,
however only the credential configuration is relevant.
Typically the same configuration file should be used for both endpoint and authenticator.
14.16. RESTful Administration API endpoint
- Endpoint type
-
RESTAdmin - Binding
-
RESTful
- Exposed paths
-
/v1/*
This endpoint exposes a RESTful API to Unity features. The endpoint does not require any specialized configuration.
The documentation of the REST API is available on a separate page REST API
14.17. Access with well-known URLs
- Endpoint type
-
WellKnownLinksHandler - Binding
-
Web
- Exposed paths
-
/sec
This endpoint is providing access to various Unity functions which are accessible via well known URLs and,
at the same time, require authentication to be used. Analogous feature but for cases not requiring authentication
is exposed always under the /unitygw reserved path.
Currently the endpoint offers a single feature but there are plans to extend it in future.
Available paths:
| Path | Description |
|---|---|
|
Provides direct access to account association feature, i.e. the same which is available from the HomeUI. |
The following settings are allowed for the endpoint:
| Property name | Type | Default value / mandatory | Description |
|---|---|---|---|
|
string |
- |
If defined must must contain a valid URL to which the requester is redirected after completing the accountassociation process. Additional status information is providedwith query parameters. |
15. Automatic user import
Automatic user import, sounds as an important integration feature. However in Unity it is a minor, rarely used option. In a typical situation "user import" happens as a side effect of user’s authentication to Unity, in effect of input translation profile execution, or processing of a registration request.
There is, however, one case when this is not suitable: a so called 3rd party query, i.e. when one service asks Unity about another principal. Currently 3rd party query is only available by using the WebSerice (SOAP) SAML endpoint and its AttributeQuery service. In future additional such options may be added. During 3rd party query the query subject is not authenticated (possibly it never logged into Unity) so the authentication facility won’t be ever activated. Automatic user import can be used in such cases.
Unity user import feature works as follows:
-
When data about an user is requested by a 3rd-party query to any Unity IdP endpoint, before it is resolved from the local database the import facility is invoked.
-
The configured importers are tried in order until one finds the requested user or all return nothing.
-
Each import works as follows:
-
Data about the user is first fetched from remote data store.
-
It is then postprocessed with a configured input translation profile.
-
There are two things to note here:
-
Import of a user recently checked is not retried for some (configurable) amount of time.
-
The translation profile does the actual application of the imported user to Unity database. Therefore the profile must CREATE the identity if it is missing. Usage of a profile which only matches a user will simply have no effect and is useful merely for testing.
User import is activated by adding one (or more) import configurations in the main unity config as follows:
unityServer.core.userImport.1=conf/ldapImport.properties
The referenced file must contain import configuration. The configuration is composed from two sections. The first one includes all options which are common for all types of importers. Each import is configured with the following mandatory setting:
unity.userImport.importerType=ldap
unity.userImport.remoteIdpName=Company LDAP
unity.userImport.inputTranslationProfile=ldap-profile
The first option selects import implementation, one of the available and documented later in this chapter. Remote IDP name assigns an IdP name which will be used to identify in Unity the data provided by this import. Finally the translation profile specifies the translation profile which is used to postprocess and effectively apply the raw result of user import.
Complete reference of common importer options follows:
| Property name | Type | Default value / mandatory | Description |
|---|---|---|---|
|
integer number |
|
The user import won’t be retried for this time (in s), after a failed import. Don’t set this to a too small value as the import is a heavyweight operation. |
|
integer number |
|
The user won’t be re-imported for this time (in s), after a successful import. Don’t set this to a too small value as the import is a heavyweight operation. |
|
string |
mandatory to be set |
Name of the importer facility to be used. |
|
string |
mandatory to be set |
Translation profile which is used to postprocess imported user data and add it to database. Note that the profile used with import facility should create/update user identity. A profile intended for remote user registration (only matching aginst existing identity) is useless for import. |
|
string |
mandatory to be set |
Name of the remote idp, it will be used for identyfing imported usersin the internal database. |
In the following text available import implementations are described.
15.1. LDAP import
- Import type
-
ldap
LDAP import allows for fetching user information from LDAP server. The import works nearly exactly as remote LDAP authentication (see LDAP) the configuration is also the same.
The main difference to regular authenticator is that bindAs=user (what is the default value for the bindAs
parameter) is disallowed - during import there is no user’s credential so binding must be performed with
some system identity. Typically bindAs=system is used, however in case of import it is also possible to use
anonymous connection to the LDAP server with bindAs=none.
It is possible to share configuration file of LDAP authenticator and LDAP import. The generic import settings
(unity.userImport.*) will be ignored by the authenticator.
15.2. Host OS import
- Import type
-
hostOS
This import option allows for importing information about users which are available in the host operating system. The system must be glibc based, and was tested with Linux only. See Host OS PAM (Pluggable Authentication Modules) for discussion of installation requirements. Besides the integration with the hosting OS this import option does not require any additional, mechanism specific configuration. Therefore an example configuration can be:
unity.userImport.importerType=hostOS
unity.userImport.remoteIdpName=Local system
unity.userImport.inputTranslationProfile=pam-profile
Appendix A: Currently supported features
A.1. Core engine features
| Feature | Status | Notes |
|---|---|---|
Identities, entities |
||
Groups |
||
Attribute statements |
||
Attribute classes |
||
Credentials |
||
Credential requirements |
||
Upstream IdPs framework |
||
Registration forms |
||
Preferences |
||
Notifications |
Can be achieved with the scripts feature, may be enhanced in future |
|
Auditing |
A.2. Local credentials
| Feature | Status | Notes |
|---|---|---|
Password |
||
Certificate |
Pseudo credential allowing for X.509 certificate login |
|
SMS code authN |
||
One Time Passwords |
A.3. Endpoints
| Feature | Status | Notes |
|---|---|---|
SAML 2, Web SSO profile |
||
SAML 2, SOAP binding |
||
SAML 2, PAOS binding (for ECP) |
||
Web Console interface |
||
REST admin interface |
||
Web user profile management |
||
SAML 2, Web binding + UNICORE profile |
||
SAML 2, SOAP binding + UNICORE profile |
||
OpenID Connect |
||
OAuth 2 |
A.4. Upstream IdPs
| Feature | Status | Notes |
|---|---|---|
LDAP |
||
SAML 2, Web SSO profile |
||
OAuth 2 |
Tested with Facebook, Microsoft Live, MITRE |
|
OpenID Connect |
Tested with Google |
|
OpenID 2 |
Not available and not planned currently |
|
OAuth 1 |
Not available and not planned currently |
|
Host OS PAM |
A.5. Attribute syntaxes
| Feature | Status | Notes |
|---|---|---|
String |
||
Verifiable e-mail |
||
Verifiable mobile number |
||
Enumeration |
||
Integer number |
||
Floating point number |
||
Web images image |
||
Date & time |
There are variants for date, time and date+time |
A.6. Identity types
| Feature | Status | Notes |
|---|---|---|
User name |
||
E-mail identifier |
Must be confirmed to be usable |
|
X.500 distinguished name (DN) |
||
Persistent (anonymous) |
||
Persistent,targeted (anonymous) |
||
Transient,targeted (anonymous) |
||
Opaque identifier |